# Eclipsa Audio Plugins Overview

Learn how to install, configure, and use Eclipsa Audio Plugins for spatial audio production with Element and Renderer plugin guides.

The Eclipsa Audio Plugins provide music and audio creators with an intuitive, user-friendly interface for authoring IAMF audio files or Eclipsa Audio compatible MP4 files. Designed to integrate seamlessly into existing workflows as a plugin for Avid Pro Tools, Logic Pro, Premiere Pro, or REAPER, it allows professionals to work easily with immersive audio formats.

### Key Functions

The Eclipsa Audio Plugins have several key functions:

• 3D Audio Recording: Captures the creative audio intent of the author by recording tracks in 3D space.

• Audio Structure Definition: Enables the author to define the structure of the resulting audio and its elements for playback.

• Real-time Monitoring: Allows creators to monitor musical or audio content on their audio system throughout the creative process, ensuring the mix translates well to the target environment.

• Audio Transcoding: Transcodes audio streams into Eclipsa Audio supported codecs, adhering to the author’s creative intent.

• IAMF File Encoding: Provides a simple process for exporting the final audio mix into an IAMF audio file.

• Audio and Video Muxing: Combine IAMF audio with video files to produce Eclipsa Audio compatible MP4 files. These can then be used on YouTube or played back on Eclipsa Audio compatible devices.

• IAMF File Playback: Validate exported files and how they will work across different speaker layouts.

### Package Contents

The Eclipsa Audio Plugins are the following two plugins:

* Eclipsa Audio Renderer Plugin: Provides tools for monitoring, configuring, and encoding the final audio mix into the IAMF format, including options for muxing audio with video during export.
* Eclipsa Audio Element Plugin: Allows users to assign tracks to IAMF audio elements, which record the spatial information for each track.


# System Requirements

Check the system requirements to run Eclipsa Audio Plugins smoothly, including OS, hardware, and DAW compatibility recommendations.

The Eclipsa Audio Plugins are currently supported for **Avid Pro Tools and REAPER** on macOS and Windows; and **Logic Pro and** **Premiere Pro** on macOS. To ensure optimal performance, please verify that your system meets the following minimum requirements.

### Supported Digital Audio Workstations

* AAX Support (macOS and Windows):
  * Avid Pro Tools 2021.9 or later.
* VST3 Support (macOS and Windows):
  * REAPER 7.39 or later.
* AU Support (macOS):
  * Adobe Premiere Pro 25.3 or later.
  * Logic Pro 11.2.2 or later.

### Minimum Requirements

* Operating System: macOS 14.0 or later; Windows 11 Professional / Enterprise.
* Processor:
  * macOS:
    * AAX / VST3 / AU: Apple Silicon M1 or later.
    * Logic Pro: Apple Silicon M3 or later.
  * Windows:
    * AAX / VST3: Intel i5 or higher.

### Recommendations

* Memory: 16 GB RAM or higher.
* Storage: 1 GB of available disk space for installation and project files.
* Audio Interface: Professional-grade Core Audio-compliant device.

***

<mark style="color:yellow;">**Note:**</mark> The VST3 and AU versions of the plugin are only officially tested and supported on the DAWs listed above. It is not guaranteed that the plugin will load in other DAWs and some features may not work correctly.

***


# Installation Guide

Step-by-step instructions for downloading and installing Eclipsa Audio Plugins using the official installer for supported digital audio workstations.

This section provides step-by-step instructions for installing the Eclipsa Audio Plugins on macOS and Windows.

### Download the Plugins

* Visit the [Eclipsa Audio Plugins website](https://www.eclipsaapp.com/) to download the installer for your OS and DAW.
  * For use with Avid ProTools, download the AAX version installer (**macOS** and **Windows**).
  * For use with REAPER (or other workstations which support VST3 plugins), download the VST3 version installer (**macOS** and **Windows**).
  * For use with Adobe Premiere Pro, or other workstations which support AU plugins, download the AU version installer (**macOS-only**).
* Confirm that you are downloading the most current release.

### Install the Plugins

* Locate the installer: Once the download is complete, navigate to your “Downloads” folder or the location where the file was saved.
* Run the installer: Double-click the installer package (.pkg / .exe) to launch the installation wizard.
* Follow the on-screen instructions:
  * Select “Continue” to proceed with the installation.
  * Set installation location (usually the system default plugin directory is recommended).
  * Select "Install."
  * Administrator privileges: If prompted, enter your system Administrator password to authorize the installation.
* Completion: Once the installation is complete, you will see a confirmation message. Select “Close” to finish the installation process.


# Installation Verification

Learn how to confirm successful installation of Eclipsa Audio Plugins by verifying plugin availability within your digital audio workstation.

Follow these steps to ensure plugin installation was successful.

{% tabs %}
{% tab title="Avid ProTools" %}

### Method 1: Verifying Plugins via Track Insert

Below are two methods for verifying successful installation of both the Audio Element Plugin and Audio Renderer Plugin. The "Mix Bus" will refer to an **Aux Input track** for monitoring the output of your session.&#x20;

1\. Open Avid Pro Tools.

2\. Create a New Session or Open an Existing Session.

3\. Add an Audio Track:

* Select Track > New > Mono or Stereo Audio Track, depending on your project setup.

4\. Access the Insert Slots on the track:

* In the Mix or Edit window, find the Insert slot (usually on the left side of the track channel strip).

5\. Select the plugin:

* Select an empty Insert slot.

* To access the **Audio Element Plugin**, navigate to the insert drop-down list, and select either the plugin **Categories** (e.g., Multi-Channel Plug-In or Sound Field) or **Manufacturers** (Avid, Eclipsa Project) to find the Eclipsa Audio Element Plugin.<br>

  <figure><img src="https://2064516701-files.gitbook.io/~/files/v0/b/gitbook-x-prod.appspot.com/o/spaces%2FISImAXhuTi4GI5slDrH1%2Fuploads%2Fkhl4PSWThHevG6eGCSUr%2FOverview_Audio_Element.gif?alt=media&amp;token=8eef41ea-042a-4905-9c07-d43831a6137e" alt=""><figcaption></figcaption></figure>

* To access the **Audio Renderer,** navigate to an existing Mix Bus aux track or create a new Aux Input track for use as the mix bus.&#x20;

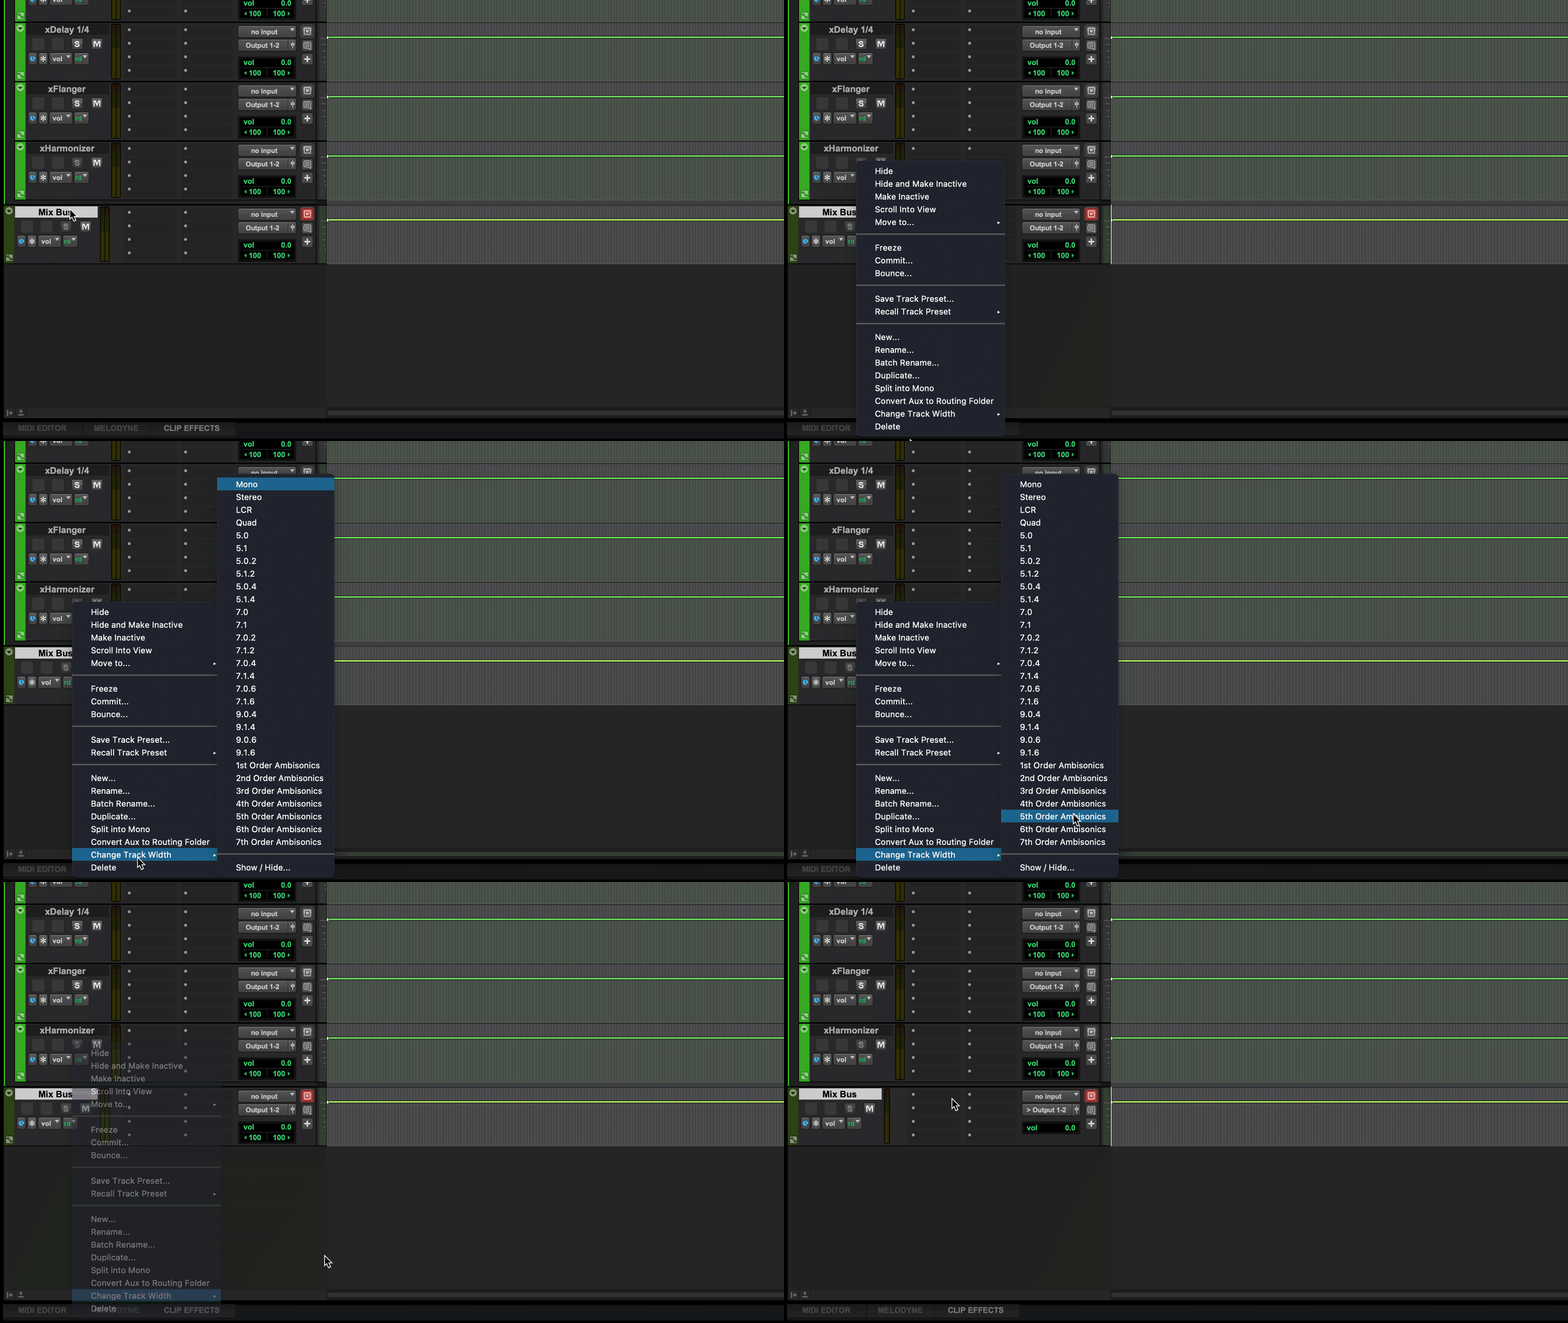
* Set the Mix Bus / Aux track's width to **5th Order Ambisonics** to support 3D audio monitoring as shown below.&#x20;

* Locate the Audio Renderer within the **Instrument** category or under the **Eclipsa Project** manufacturer category:<br>

  <figure><img src="https://2064516701-files.gitbook.io/~/files/v0/b/gitbook-x-prod.appspot.com/o/spaces%2FISImAXhuTi4GI5slDrH1%2Fuploads%2FXP7YUAUcqUZr2T5nkuOH%2FOverview_Renderer_Load.gif?alt=media&amp;token=97ef1c2f-3f10-4db1-9f59-0b65dc76f2e8" alt=""><figcaption></figcaption></figure>

6\. Verify:

* &#x20;If both plugins appear in the plugin list and load when selected, they have been installed correctly.<br>

  <figure><img src="https://2064516701-files.gitbook.io/~/files/v0/b/gitbook-x-prod.appspot.com/o/spaces%2FISImAXhuTi4GI5slDrH1%2Fuploads%2FbwSjdbLr11kdBSiKWUGH%2FScreenshot%202025-12-03%20at%201.54.29%E2%80%AFPM.png?alt=media&amp;token=a99fdc43-26a8-436a-8729-2d83eaf4e576" alt=""><figcaption></figcaption></figure>

### Method 2: Managing Plugins via AudioSuite

1\. Open Avid Pro Tools.

2\. Click on  **AudioSuite** in the top menu bar:

3\. Select **Instrument** or **Eclipsa Project** to find the Eclipsa Audio Renderer:

<figure><img src="https://2064516701-files.gitbook.io/~/files/v0/b/gitbook-x-prod.appspot.com/o/spaces%2FISImAXhuTi4GI5slDrH1%2Fuploads%2FxT3djdqfvCBhKPezB33T%2FAudioSuite_Renderer.gif?alt=media&amp;token=ebd41c29-5cbd-459d-917a-6101b272a193" alt=""><figcaption></figcaption></figure>

4\. Select **Sound Field** or **Eclipsa Project** to find the Eclipsa Audio Element:

<figure><img src="https://2064516701-files.gitbook.io/~/files/v0/b/gitbook-x-prod.appspot.com/o/spaces%2FISImAXhuTi4GI5slDrH1%2Fuploads%2FjSacyP0RPkFZwNuBEL3X%2FAudioSuite_Audio_Element.gif?alt=media&amp;token=17b9de19-2bc4-458e-b02a-600c46c370c9" alt=""><figcaption></figcaption></figure>

***

<mark style="color:yellow;">**Note:**</mark> This method does not provide full plugin management (like enabling or disabling plugins), but it does help verify that the plugin has loaded and is available for use.&#x20;

***

{% endtab %}

{% tab title="REAPER" %}

### Confirm Availability Via FX

1. Open REAPER.

2. Create a new project or open an existing project.

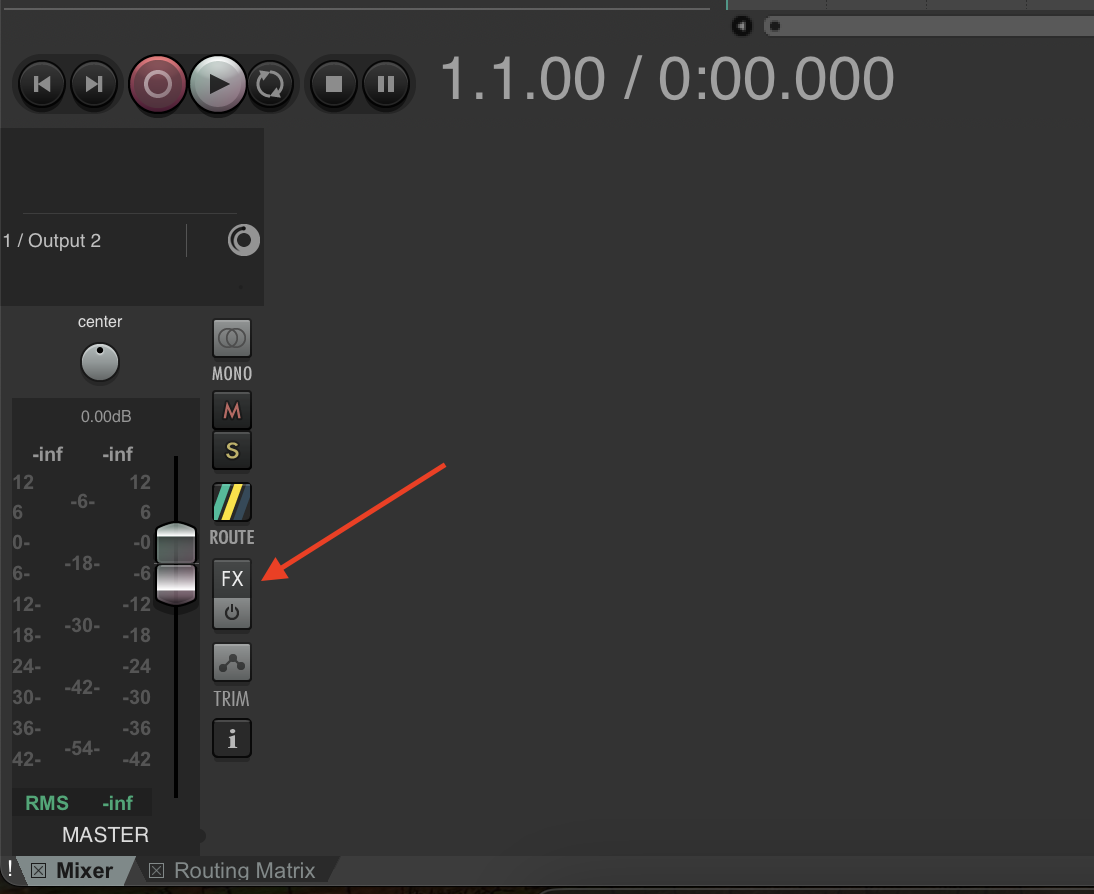
3. On the Master track select the "FX" button:

   <figure><img src="https://2064516701-files.gitbook.io/~/files/v0/b/gitbook-x-prod.appspot.com/o/spaces%2FISImAXhuTi4GI5slDrH1%2Fuploads%2FCkdXc7X5SuWh2FRdu1RR%2FLocatePlugins.gif?alt=media&amp;token=886ac0da-79d5-47dc-abff-e3d86634e0c5" alt=""><figcaption></figcaption></figure>

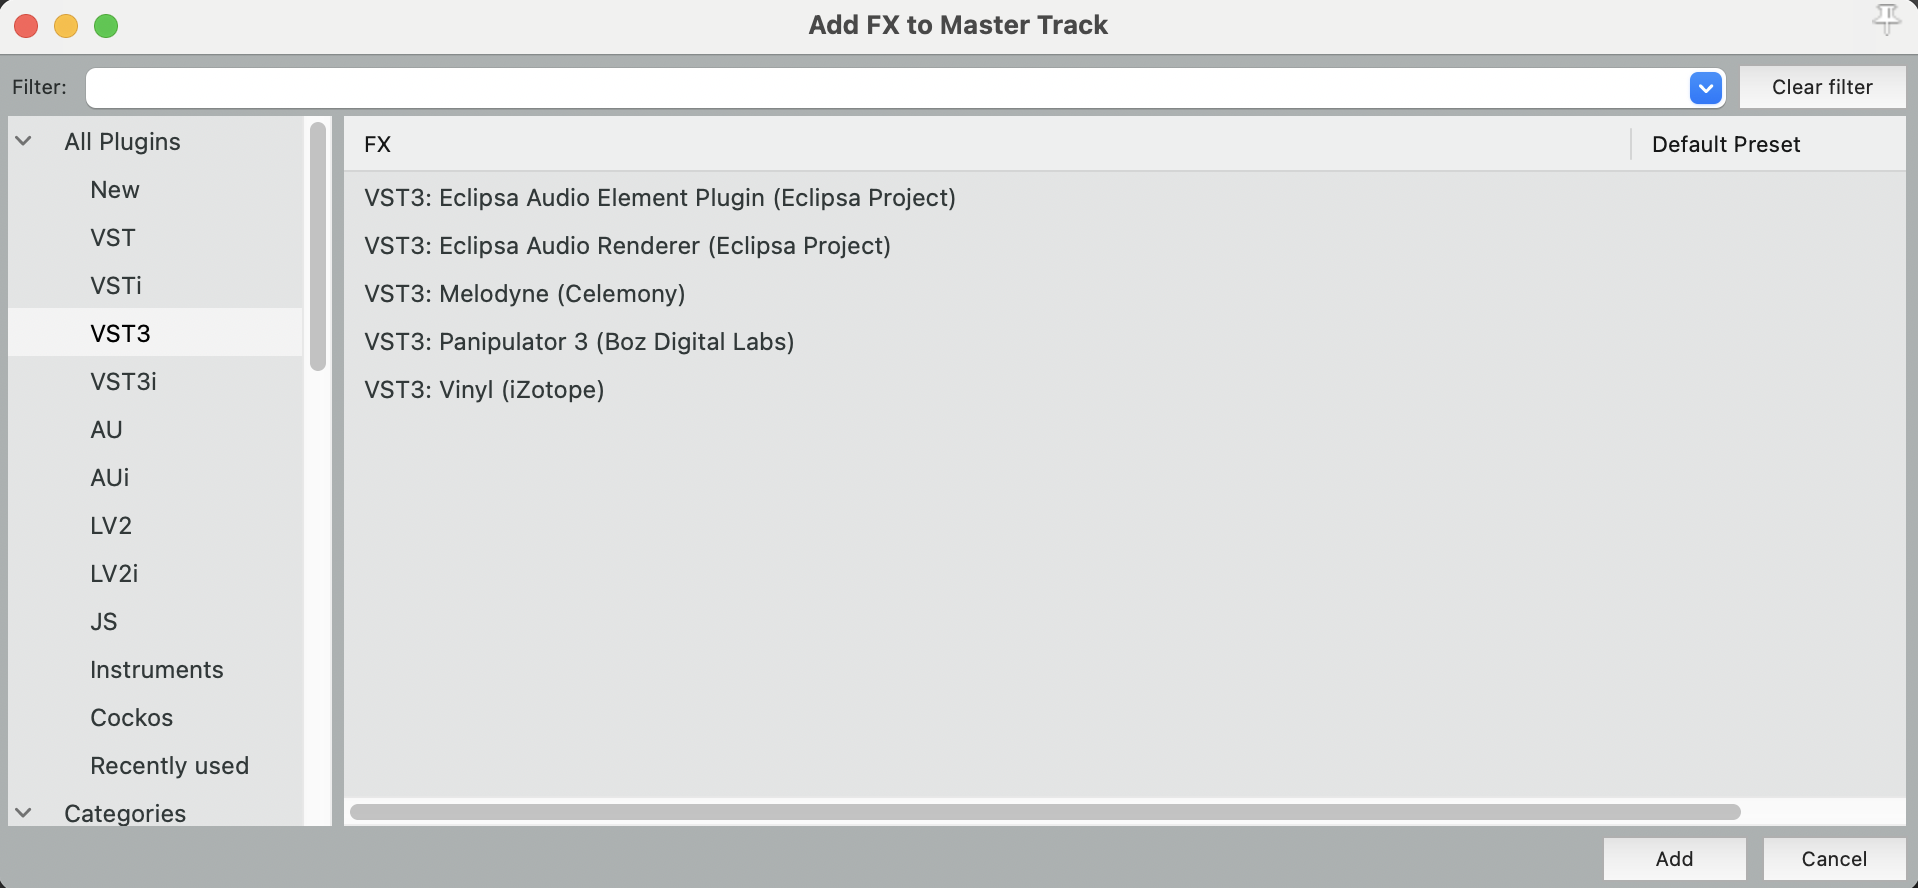
4. Select All Plugins > VST3.

5. Confirm that the "VST3: Eclipsa Audio Element Plugin (Eclipsa Project)" and "VST3: Eclipsa Audio Renderer (Eclipsa Project)" are present.
   {% endtab %}

{% tab title="Adobe Premiere Pro" %}

### Verify Via Audio Plug-In Manager

1\. Open Adobe Premiere Pro, either opening an existing project or starting a new project

2\. If the created project does not have a Sequence, create one: File --> New  --> Sequence...

3\. Open the Audio Track Mixer window for any existing Sequence: Window --> Audio Track Mixer --> Sequence Name

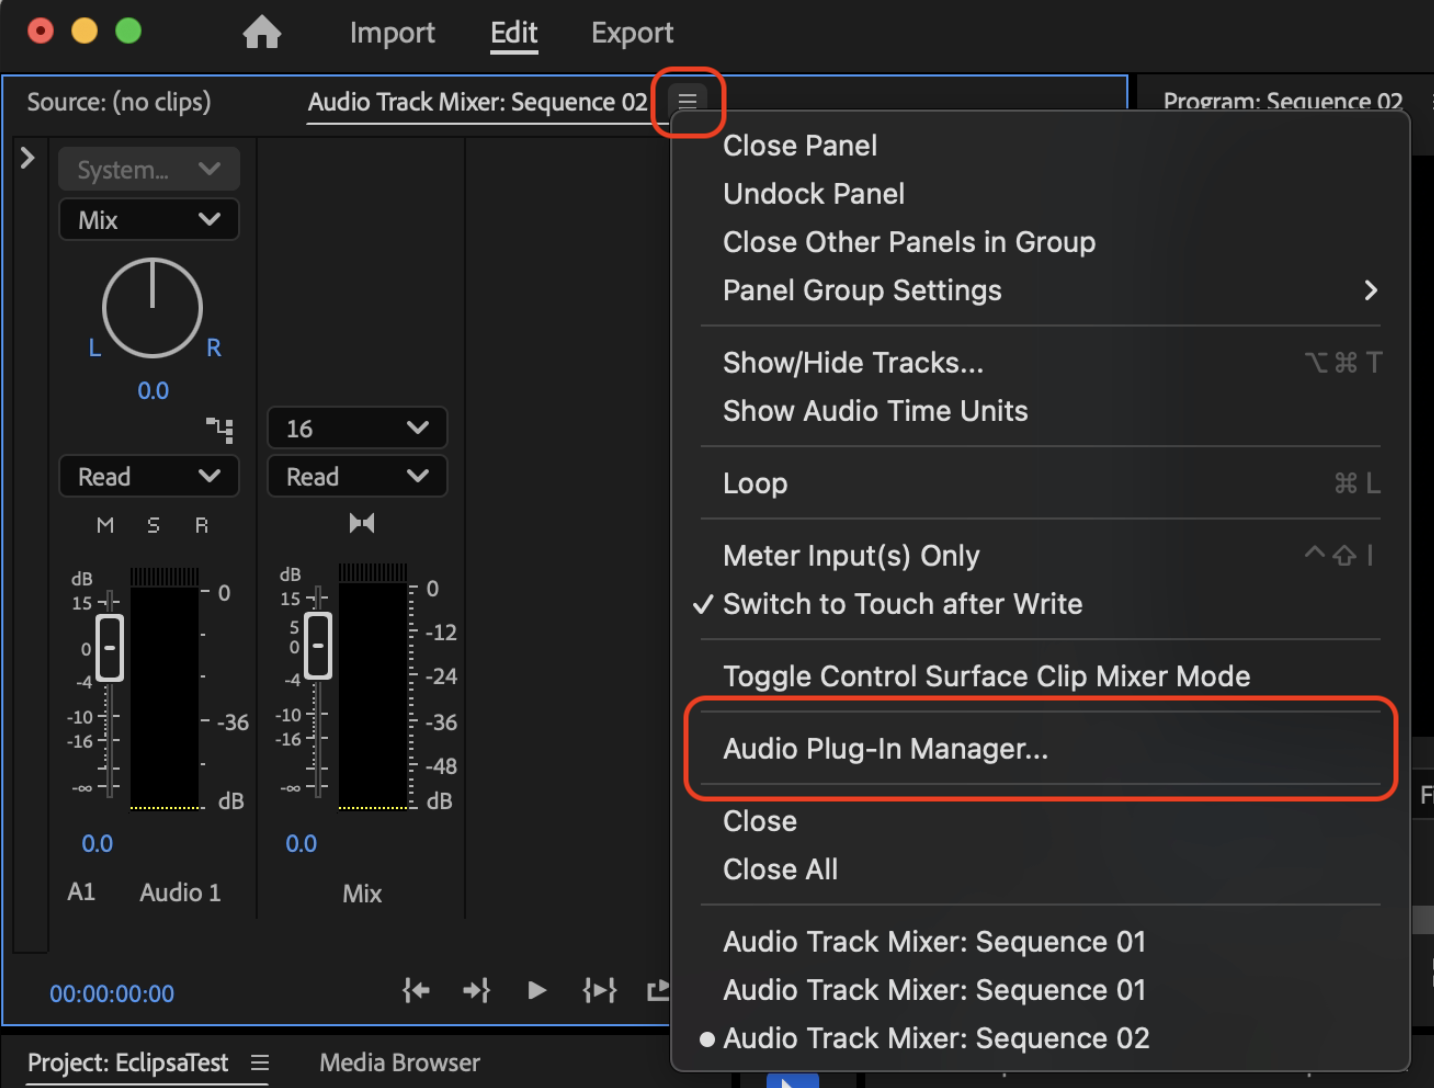
4\. In the Audio Track Mixer window, click the hamburger button in the top right corner and select "Audio Plug-In Manager"

<figure><img src="https://2064516701-files.gitbook.io/~/files/v0/b/gitbook-x-prod.appspot.com/o/spaces%2FISImAXhuTi4GI5slDrH1%2Fuploads%2FcQN1V96SVQvdNxLaojyB%2FScreenshot%202025-06-20%20at%203.09.18%E2%80%AFPM.png?alt=media&amp;token=875afde0-12f7-4c07-81fa-91dc036a105e" alt=""><figcaption><p>In the "Audio Track Mixer: Sequence" select the top right corner, then "Audio Plug-In Manager"</p></figcaption></figure>

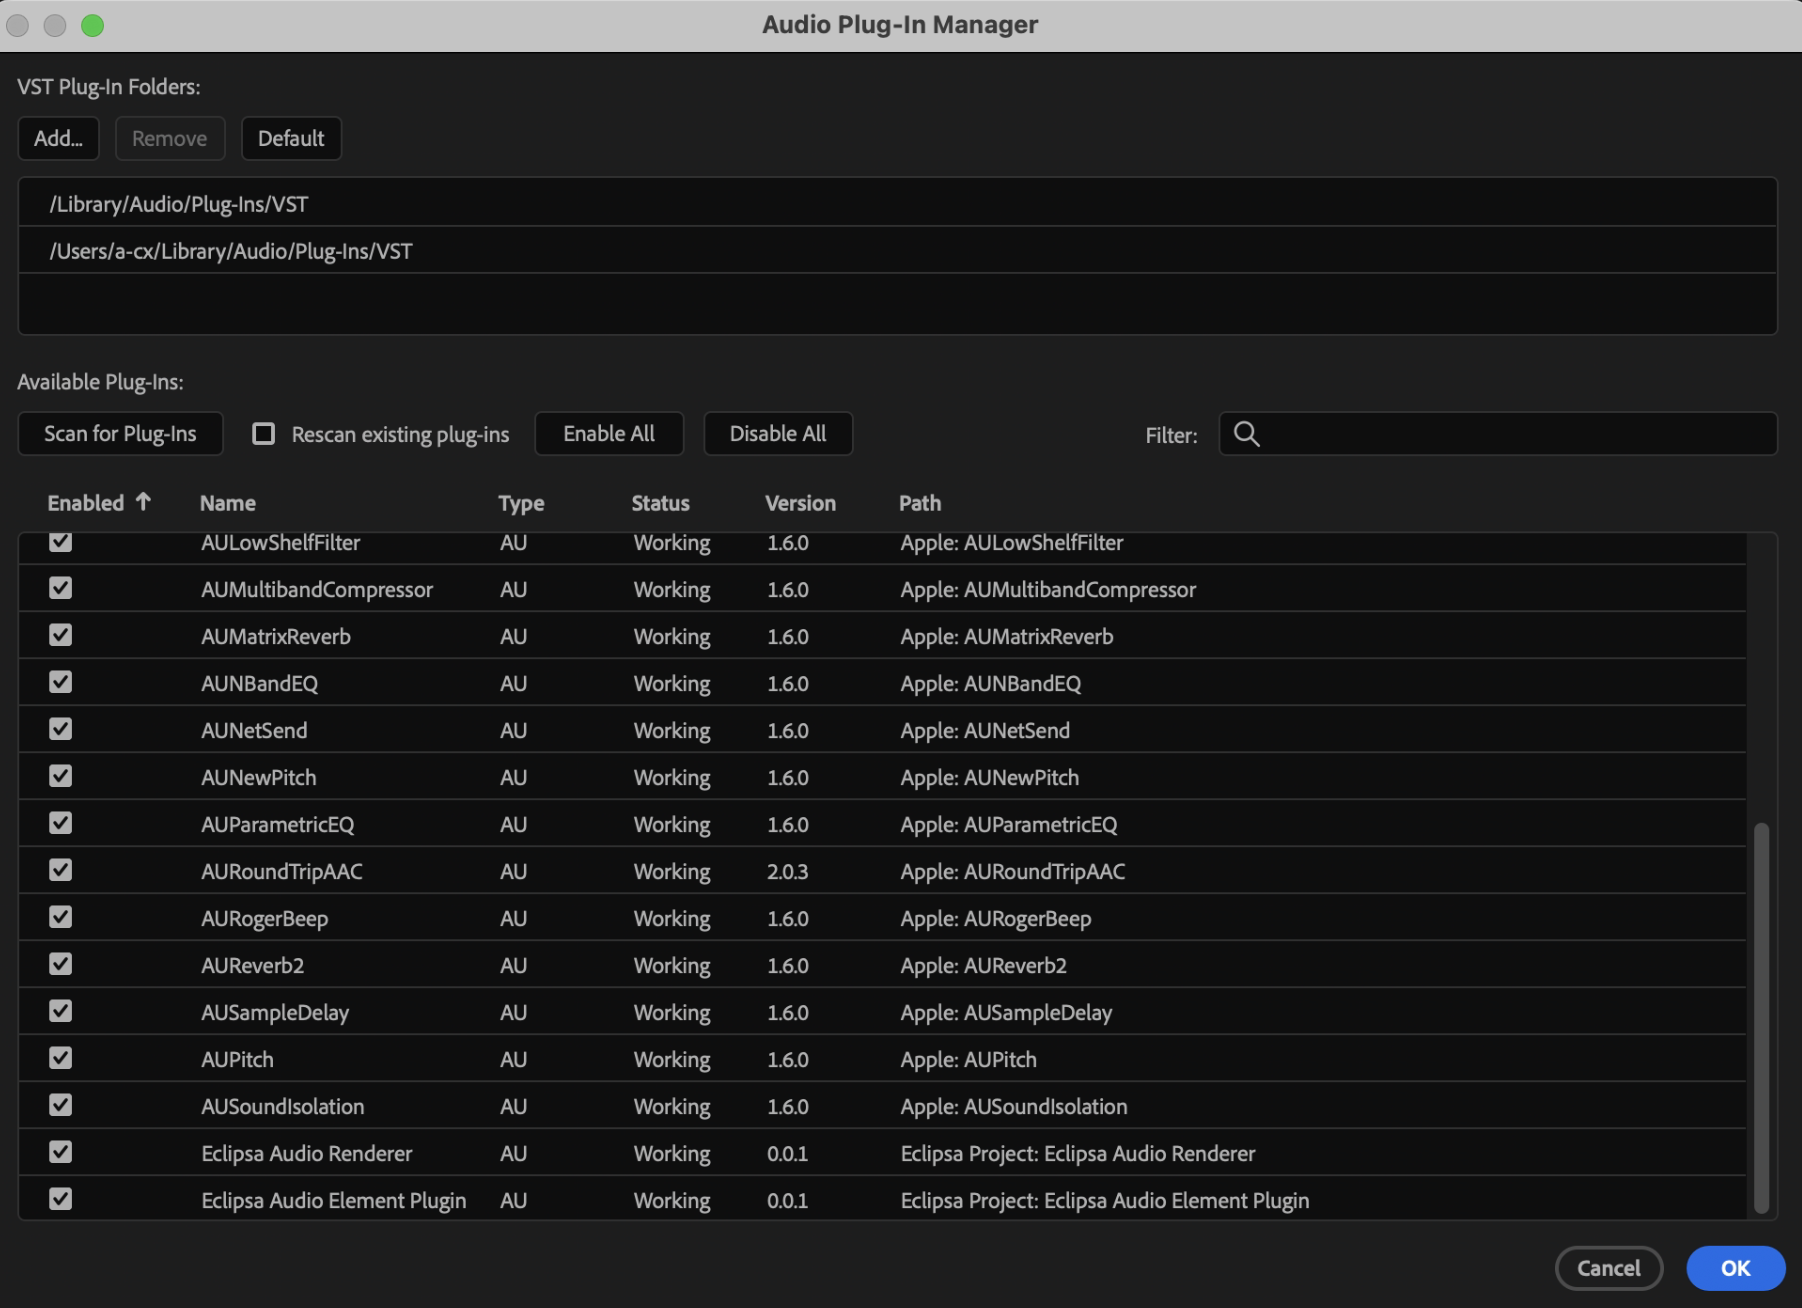
5\. In the "Audio Plug-In Manager" select "Scan for Plug-Ins"

6\. Verify the "Eclipsa Audio Element Plugin" and "Eclipsa Audio Renderer" are listed in the table with Status "Working", typically at the bottom of the list.<br>

<figure><img src="https://2064516701-files.gitbook.io/~/files/v0/b/gitbook-x-prod.appspot.com/o/spaces%2FISImAXhuTi4GI5slDrH1%2Fuploads%2Fz2lSRS4qm4nuRoGbYZGo%2Fimage.png?alt=media&amp;token=a62f0a41-09a2-4ef2-a9de-a2e2af7ce289" alt=""><figcaption><p>"Eclipsa Audio Renderer" and "Eclipsa Audio Element Plugin" are shown at the bottom of the list</p></figcaption></figure>

{% endtab %}

{% tab title="Logic Pro" %}

### [Verify Via Logic Pro Plug-In Manager](#logic-pro)

1. Open Logic Pro (either create a new project or open an existing one).
2. From the menu bar, select **Logic Pro** → **Settings** → **Plug-in Manager.**
3. In the Plug-in Manager window, you can view all installed plugins organized by manufacturer.
4. In the left sidebar under "Manufacturer", look for and select **Eclipsa Project.**
5. Verify that the Eclipsa plugins are listed in the main table as shown in below image:
   * "Eclipsa Audio Element Plugin for Logic Pro" (Type: effect)
   * "Eclipsa Audio Renderer for Logic Pro" (Type: effect)
6. Check that both plugins show "successfully validated" in the Compatibility column.
7. If the plugins don't appear or show validation issues, click **Reset & Rescan Selection** to force Logic Pro to rescan for plugins:<br>

   <figure><img src="https://2064516701-files.gitbook.io/~/files/v0/b/gitbook-x-prod.appspot.com/o/spaces%2FISImAXhuTi4GI5slDrH1%2Fuploads%2Ft4gIMYIEgDgpYscHpHQL%2Fimage.png?alt=media&amp;token=949f5195-951f-48de-ad8f-b6aaa5b01fca" alt=""><figcaption><p>From menu bar select <strong>Logic Pro</strong> → <strong>Settings</strong> → <strong>Plug-in Manager</strong></p></figcaption></figure>

#### Alternative Method - Loading Plugins in Logic Pro

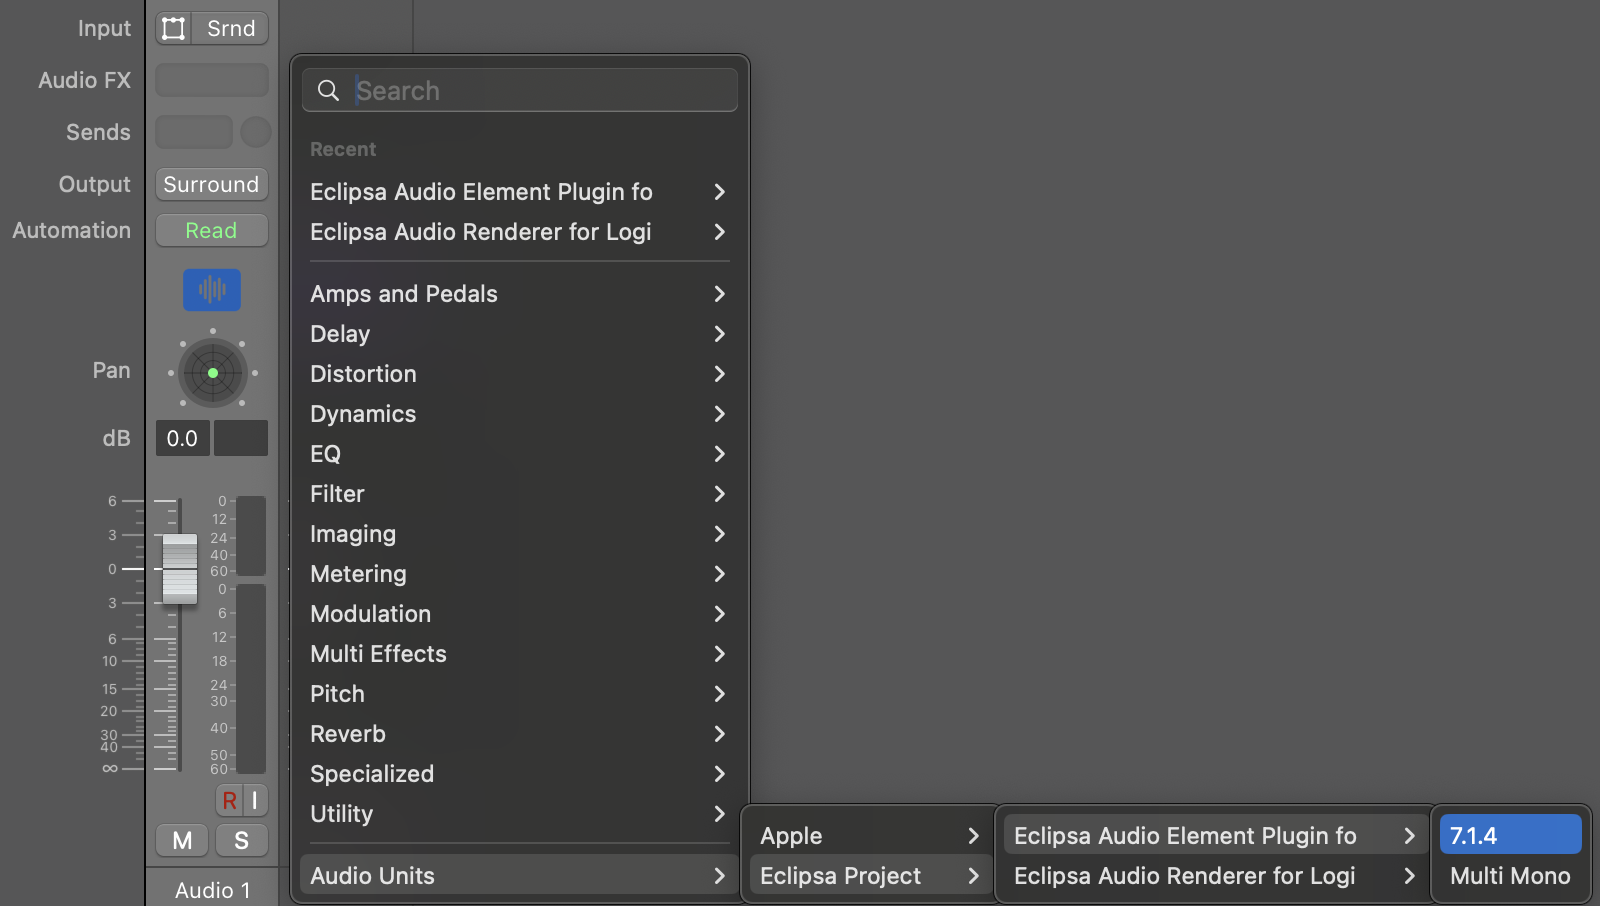
1. Create a new audio track or select an existing one.
2. In the Channel EQ/Insert section of the track, click on an empty insert slot.
3. Navigate through the plugin menu hierarchy to find your Eclipsa plugins:
   * **Audio Units**  → **Manufacturer: Eclipsa Project** → **Eclipsa Audio Element Plugin for Logic Pro**
   * **Audio Units**  → **Manufacturer: Eclipsa Project** → **Eclipsa Audio Renderer for Logic Pro**
4. If the plugins load successfully, they are properly installed and validated.<br>

   <figure><img src="https://2064516701-files.gitbook.io/~/files/v0/b/gitbook-x-prod.appspot.com/o/spaces%2FISImAXhuTi4GI5slDrH1%2Fuploads%2FcFdeL9Fr2DxErR1Tu3WP%2Fimage.png?alt=media&amp;token=e7625423-c1d3-43c2-a5fa-6a6fed87f4c3" alt=""><figcaption></figcaption></figure>

{% endtab %}
{% endtabs %}


# Getting Started

Learn how to get started with the Eclipsa Audio Plugins to create, monitor, and render immersive 3D audio using audio elements and mix presentations.

## Getting Started with Eclipsa Audio Creation

The Eclipsa Audio Plugins consist of two plugins: the Eclipsa Audio Element Plugin and the Eclipsa Audio Renderer Plugin. These plugins work together to allow you to position, monitor, and render your audio in 3D space.

To make the most of the Eclipsa Audio plugins, first review the documentation or watch our introductory tutorials [found here](/online-tutorials).

***

<mark style="color:yellow;">**Note:**</mark> To ensure proper setup, instantiate the Eclipsa Audio Renderer Plugin first and create an audio element, as the Eclipsa Audio Element Plugin requires this configuration to produce output.&#x20;

***

### **How Eclipsa Audio Records and Plays Spatialized Audio**

To produce Eclipsa Audio spatialized audio and video, we need to first record audio in the IAMF file format. This format is used to store the data required to play spatialized audio on Eclipsa Audio compatible devices.

IAMF files are made up of a series of audio channels where each audio channel is associated with a speaker. These channels are grouped into audio elements which define the speaker layouts of the audio channels. These audio elements serve as the building blocks for mix presentations. During playback, the listener selects a mix presentation to be monitored. The mix presentation's constituent audio elements, and the audio associated with them, is then played back.

<figure><img src="https://2064516701-files.gitbook.io/~/files/v0/b/gitbook-x-prod.appspot.com/o/spaces%2FISImAXhuTi4GI5slDrH1%2Fuploads%2FrycnL9MHHVRyCGp8akVa%2FAudioFileLayout.png?alt=media&amp;token=fef8db52-eeca-4c10-879c-1e3f7e3df359" alt="" width="375"><figcaption><p>IAMF File Layout Hierarchy</p></figcaption></figure>

* **Audio Channels**: Each channel corresponds to a specific speaker (e.g., left, right, center).
* **Audio Elements**: Collections of audio channels that define a specific spatial speaker layout. For example:
  * A stereo audio element contains two channels for left and right positioning.
  * A 5.1 audio element includes six channels: front left, front right, center, subwoofer, surround left, and surround right.
* **Mix Presentations**: Combine multiple audio elements into unique configurations for playback, such as different languages, formats, or speaker layouts. An audio element may belong to multiple mix presentations.

### Creating Mix Presentations

The key to creating great Eclipsa Audio mixes is in creating the right mix presentations for your listeners.&#x20;

Mix presentations are used to allow a mix to target multiple speaker layouts or listening profiles in the same file. For example, we can use mix presentations to record mixes for both headphones and 7.1 speakers, or have separate mix presentations each with their own language specific vocal track.&#x20;

During playback, most Eclipsa Audio players select a mix presentation based on user configuration and playback speaker layout, though some may allow users to manually select a mix presentation. The IAMF standard recommends players use the following rules to determine which mix presentation in a file should be played:

1. First, mix presentation tags are checked against user preferences. Players may allow users to automatically select a mix presentation based on known tags like "Content Language".
2. If the playback device is headphones, the mix presentation containing a "Binaural" type audio element is selected.
3. If the playback device is loudspeakers, the mix presentation containing an audio element of the same speaker layout as the loudspeakers is selected.
4. If no matching mix presentations can be determined, the player will select the mix presentation containing the audio element with the largest layout.

***

<mark style="color:yellow;">**Note:**</mark> The above rules are only a suggestion, and players are free to automatically select mix presentations as they see fit. Many players will automatically select the first mix presentation as well.

***

If a perfect speaker match is not found, eg: playback requests a 5.1 and only a 7.1 mix exists, Eclipsa Audio players will automatically **downmix** the 7.1 mix to 5.1.

### Mix Presentation Layouts

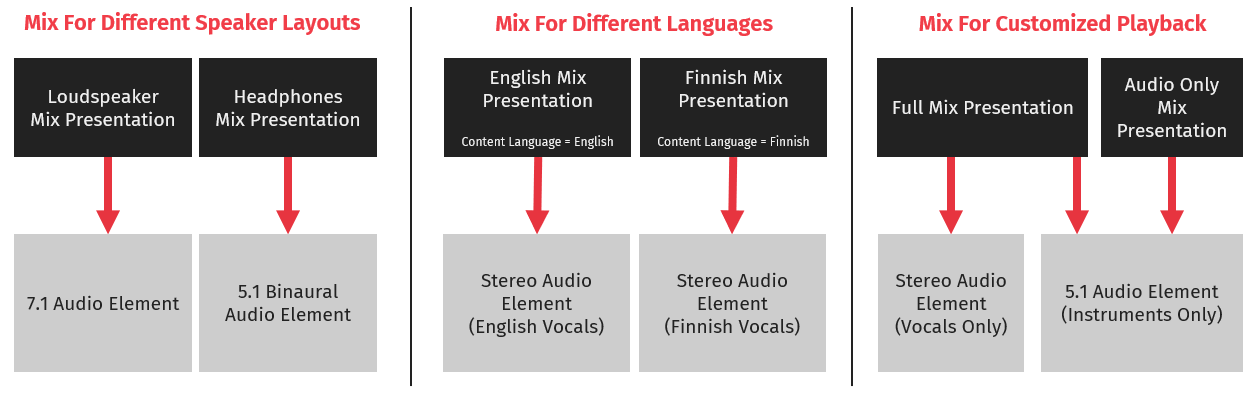
<figure><img src="https://2064516701-files.gitbook.io/~/files/v0/b/gitbook-x-prod.appspot.com/o/spaces%2FISImAXhuTi4GI5slDrH1%2Fuploads%2FYqRfGdrG460CAr8SGqRk%2FSampleMixes.png?alt=media&amp;token=f0a9b8df-8306-42bf-a143-b7737064459c" alt=""><figcaption><p>Different mix presentation layouts for different use cases</p></figcaption></figure>

The three mix presentation layouts above give a rough idea of how mix presentations can be laid out for different use cases:

* The first presentation shows how a mix can target headphones and speakers by having binaural and non-binaural mixes. In this case, the audio on both audio elements is similar, but loudness and spatial mixing differ between layouts.
* The second presentation shows how a file can use mix presentations to support multiple languages using the "Content Language" tag. In this case, the audio on the audio elements is the same layout type, but each audio element has different language audio.
* The third presentation shows how mix presentations can be used to support custom use cases. Here, the IAMF file is configured for both vocal and non-vocal playback so that it can be used for karaoke.

### **Eclipsa Plugin Configuration Overview**

The Eclipsa Audio Plugins consist of two plugins, the Eclipsa Audio Renderer Plugin and the Eclipsa Audio Element Plugin. The Eclipsa Audio Renderer Plugin serves as the central hub for managing the various components of an IAMF file and the Eclipsa Audio Element plugin serves to assign audio elements to spatialized audio tracks.

One instance of the Eclipsa Audio Renderer Plugin must be added to a project's aux track (regularly referred to as **Mix Bus** here), and all of a projects audio must pass through the Eclipsa Audio Renderer Plugin instance. The Eclipsa Audio Renderer Plugin is used to configure audio elements which define the various spatialized speaker layouts for recording. It also defines the Mix Presentations. These can be configured to customize different playback scenarios, such as different speaker setups or languages. Finally, the Eclipsa Audio Renderer Plugin handles the rendering and playback of the Eclipsa audio, as well as creates the IAMF  file.

Once the Eclipsa Audio Renderer Plugin is in place, each spatialized audio track must have an Eclipsa Audio Element Plugin instance added to it. This plugin is used to assign an audio element and it's constituent channels to the audio track. The plugin also connects to the Eclipsa Audio Renderer Plugin to ensure accurate spatial mixing by separating audio from different audio elements onto different channels. Audio must pass through an Eclipsa Audio Element Plugin to be included in the 3D mix.  This setup ensures all spatialized audio is organized and rendered correctly in the final mix.

<figure><img src="https://2064516701-files.gitbook.io/~/files/v0/b/gitbook-x-prod.appspot.com/o/spaces%2FISImAXhuTi4GI5slDrH1%2Fuploads%2FxNtZ3KomRtN4HnSkPqKv%2FScreenshot%202025-06-03%20at%2010.04.07%E2%80%AFAM.png?alt=media&amp;token=cb3e59c5-0205-4e01-9957-f5bc3313d919" alt=""><figcaption><p>Audio Element Plugin and Renderer Plugin Setup</p></figcaption></figure>

***

<mark style="color:yellow;">**Note:**</mark> Due to DAW and plugin library limitations, the DAW Mix Bus may not be exactly 28 channels. For example, in Avid ProTools a 5th order ambisonics bus is used as it is the smallest bus which contains 28 channels. Similarly, in Adobe Premiere Pro, the DAW Mix Bus is only 16 channels, as this is the maximum number of channels supported by the DAW.

***

## **The Eclipsa Audio Renderer Plugin**

The Eclipsa Audio Renderer Plugin manages the overall 3D audio mix, enabling you to configure speaker setups, monitor your mix, and export the final mix to an IAMF file or Eclipsa Audio compatible MP4 file. Additionally, it’s used to create audio elements and configure mix presentations, both of which are required for playback.

### **How to Use the Eclipsa Audio Renderer Plugin**

1\. Add the Eclipsa Audio Renderer Plugin to a Mix Bus / Aux Track / Output Track:

{% tabs %}
{% tab title="Avid ProTools" %}
1\. Widen the **Mix Bus aux track** to 5th Order Ambisonics:

* Navigate to your **Mix Bus aux track** or create a new **Aux Input track** to act as your mix bus.
* Set the track width to 5th Order Ambisonics to support the plugin as shown below.&#x20;

<figure><img src="https://2064516701-files.gitbook.io/~/files/v0/b/gitbook-x-prod.appspot.com/o/spaces%2FISImAXhuTi4GI5slDrH1%2Fuploads%2F3YOfv3jPODeH96LGMBve%2F5th_Order.gif?alt=media&amp;token=87e21646-3c78-4530-870d-a166b715f051" alt=""><figcaption></figcaption></figure>

2\. Insert the Eclipsa Audio Renderer Plugin:

* Click on an empty **Insert** **slot** on the Mix Bus aux track.
* Choose Multi-Channel Plug-In and select the **Eclipsa Audio Renderer** from the Instrument **Category** or Eclipsa Project M**anufacturer** in the plugin list.
* Select the instance of the Eclipsa Audio Renderer with the highest speaker layout you wish to play back on from within Pro Tools.

<figure><img src="https://2064516701-files.gitbook.io/~/files/v0/b/gitbook-x-prod.appspot.com/o/spaces%2FISImAXhuTi4GI5slDrH1%2Fuploads%2Ff3JPKJUsDXGfDZFPH8a6%2Fimage.png?alt=media&amp;token=7fa04bee-9369-4047-b880-9032dd94b469" alt=""><figcaption><p>Add the "Eclipsa Audio Renderer" plugin to the Mix Bus</p></figcaption></figure>
{% endtab %}

{% tab title="REAPER" %}
1\. Add the Eclipsa Audio Renderer Plugin to the Master Track

* Find the Master track on the REAPER Mixer tab.
* Select the "FX" button, then select "Add" if other plugins have already been added to this track:

<figure><img src="https://2064516701-files.gitbook.io/~/files/v0/b/gitbook-x-prod.appspot.com/o/spaces%2FISImAXhuTi4GI5slDrH1%2Fuploads%2FZMD5P053O0LQVEuyodHK%2FScreenshot%202025-06-02%20at%2010.40.05%E2%80%AFAM.png?alt=media&amp;token=3dc1b61e-32dc-4f50-9d62-4994b26a01dd" alt="" width="375"><figcaption><p>Select "FX" to add a plugin to the Master Track</p></figcaption></figure>

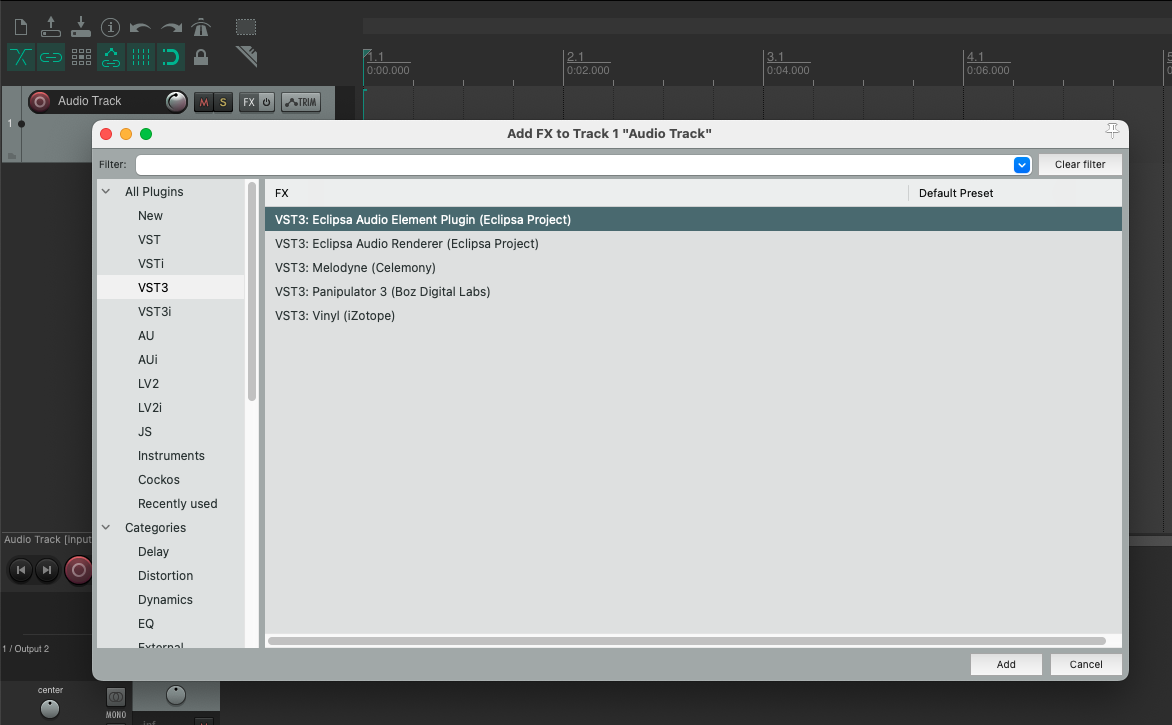
* Under "All Plugins" > "VST3" select "VST3: Eclipsa Audio Renderer (Eclipsa Project).
* Select "Add" to add the plugin to the Master track.

<figure><img src="https://2064516701-files.gitbook.io/~/files/v0/b/gitbook-x-prod.appspot.com/o/spaces%2FISImAXhuTi4GI5slDrH1%2Fuploads%2Ff2WW00RK1WgStPnjsW7t%2FScreenshot%202025-06-02%20at%2010.41.25%E2%80%AFAM.png?alt=media&amp;token=77b6e66d-388c-4a29-b99e-62e9ee41d3e0" alt=""><figcaption><p>Find the Renderer Plugin under "All Plugins" --> "VST3"</p></figcaption></figure>

2\. Use the Plug-In Pin Connector to connect the plugin

* On the "Eclipsa Audio Renderer" UI, change the "Speaker Setup" to match the speaker layout you wish to play back audio locally on.
* In the Plug-In UI window, select the Pin Connector in the top right corner to open the Pin Connector UI.

<figure><img src="https://2064516701-files.gitbook.io/~/files/v0/b/gitbook-x-prod.appspot.com/o/spaces%2FISImAXhuTi4GI5slDrH1%2Fuploads%2F3oe02Aoh6Kb9YTfq85St%2FRenderer%20Setup.gif?alt=media&amp;token=b06a1fc3-28e4-455b-b745-c37b4394f890" alt=""><figcaption></figcaption></figure>

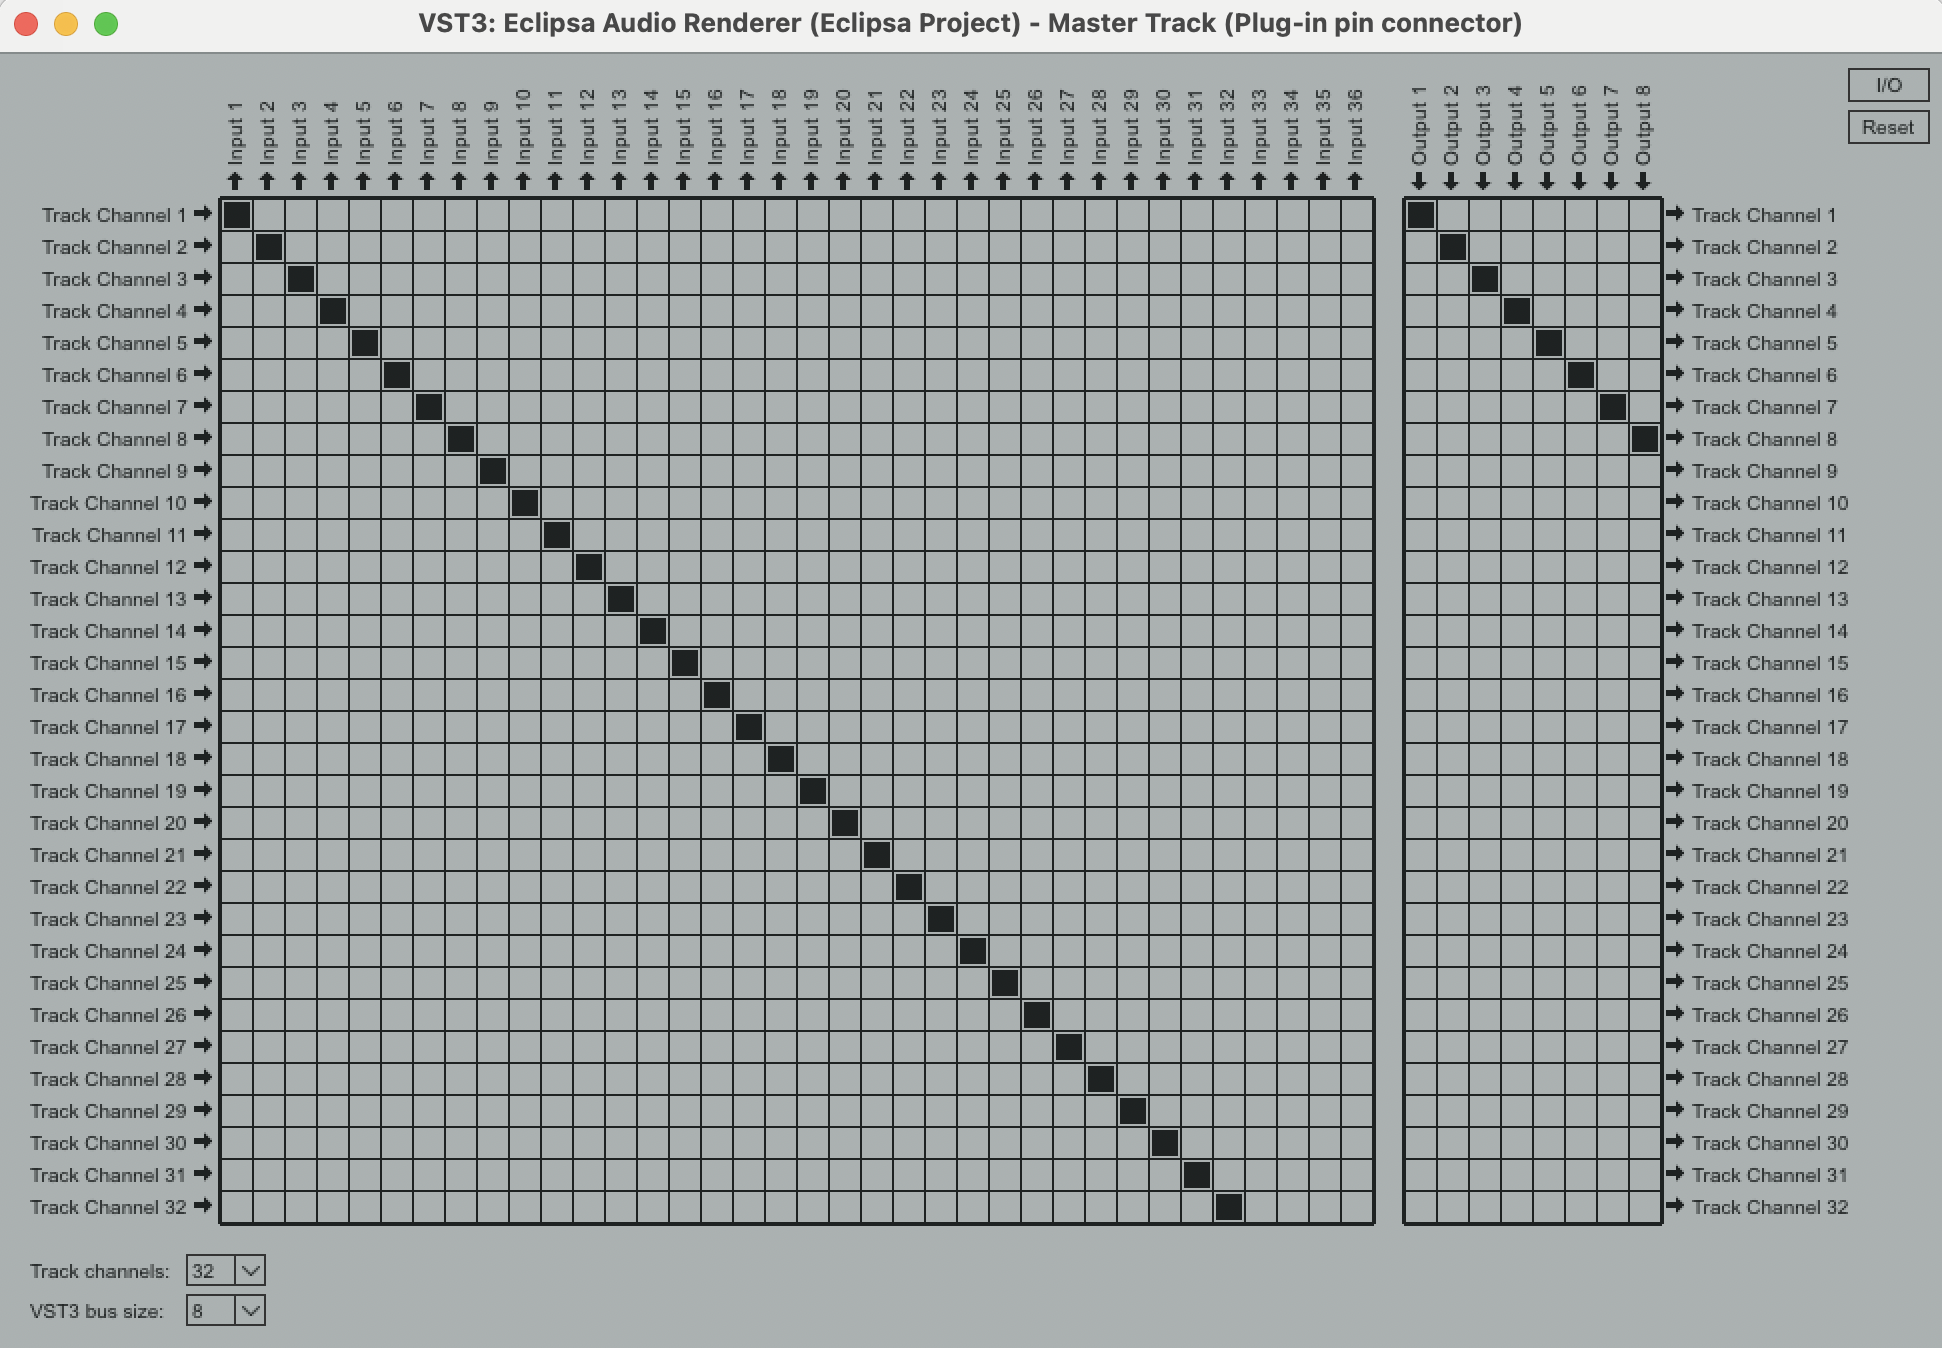
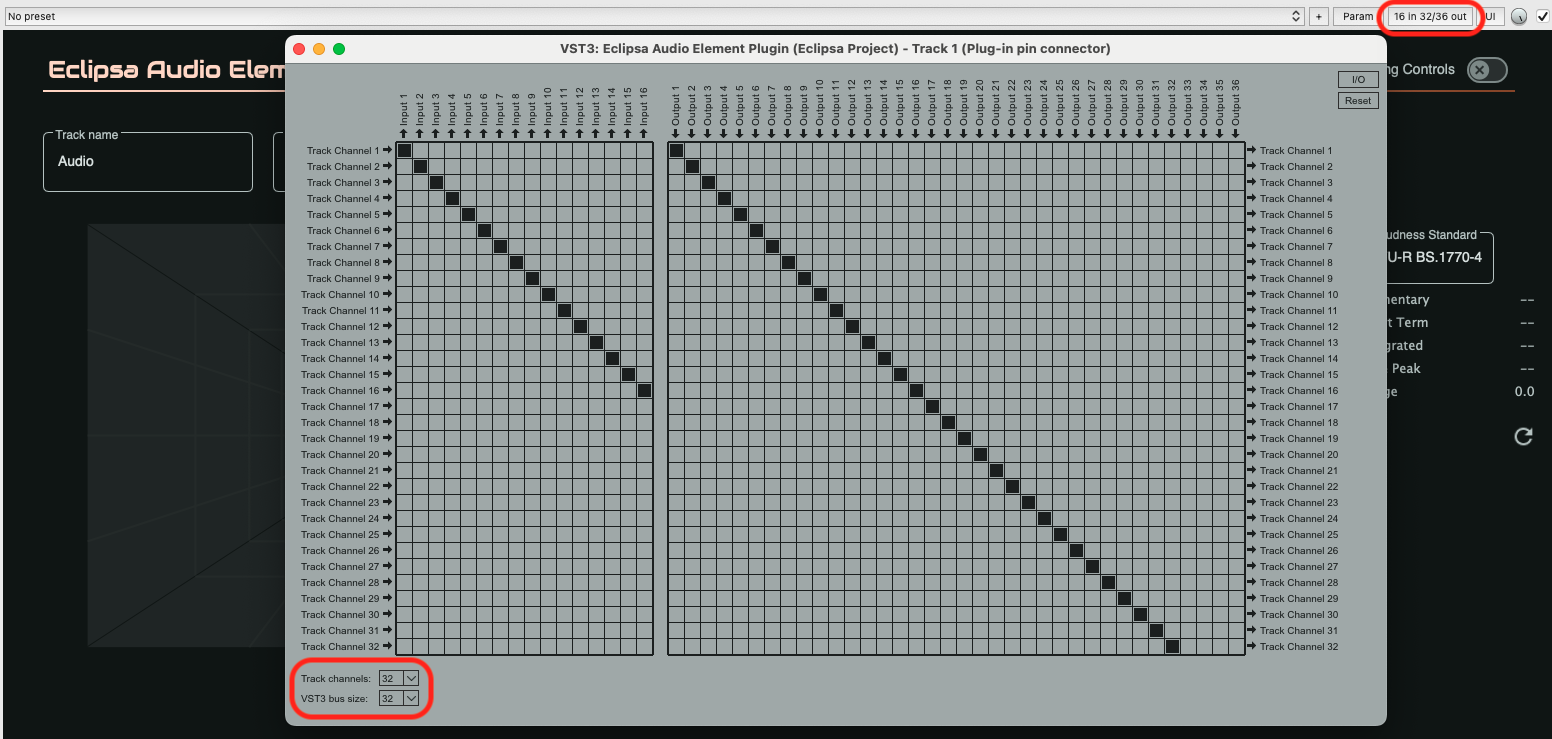
* Under "Track Channels" select a value larger than 28, typically 32
* Under "VST3 bus size" select a value matching the number of speakers in the speaker layout you wish to play back audio locally on:

<figure><img src="https://2064516701-files.gitbook.io/~/files/v0/b/gitbook-x-prod.appspot.com/o/spaces%2FISImAXhuTi4GI5slDrH1%2Fuploads%2F67mkaXG6CYR2toAWJlZi%2FScreenshot%202025-06-02%20at%2011.14.58%E2%80%AFAM.png?alt=media&amp;token=13e863a5-3865-4670-acc2-1cea9535f130" alt=""><figcaption><p>Set "Track channels" to 32 and "VST3 bus size" to match the desired number of output speakers</p></figcaption></figure>
{% endtab %}

{% tab title="Adobe Premiere Pro" %}
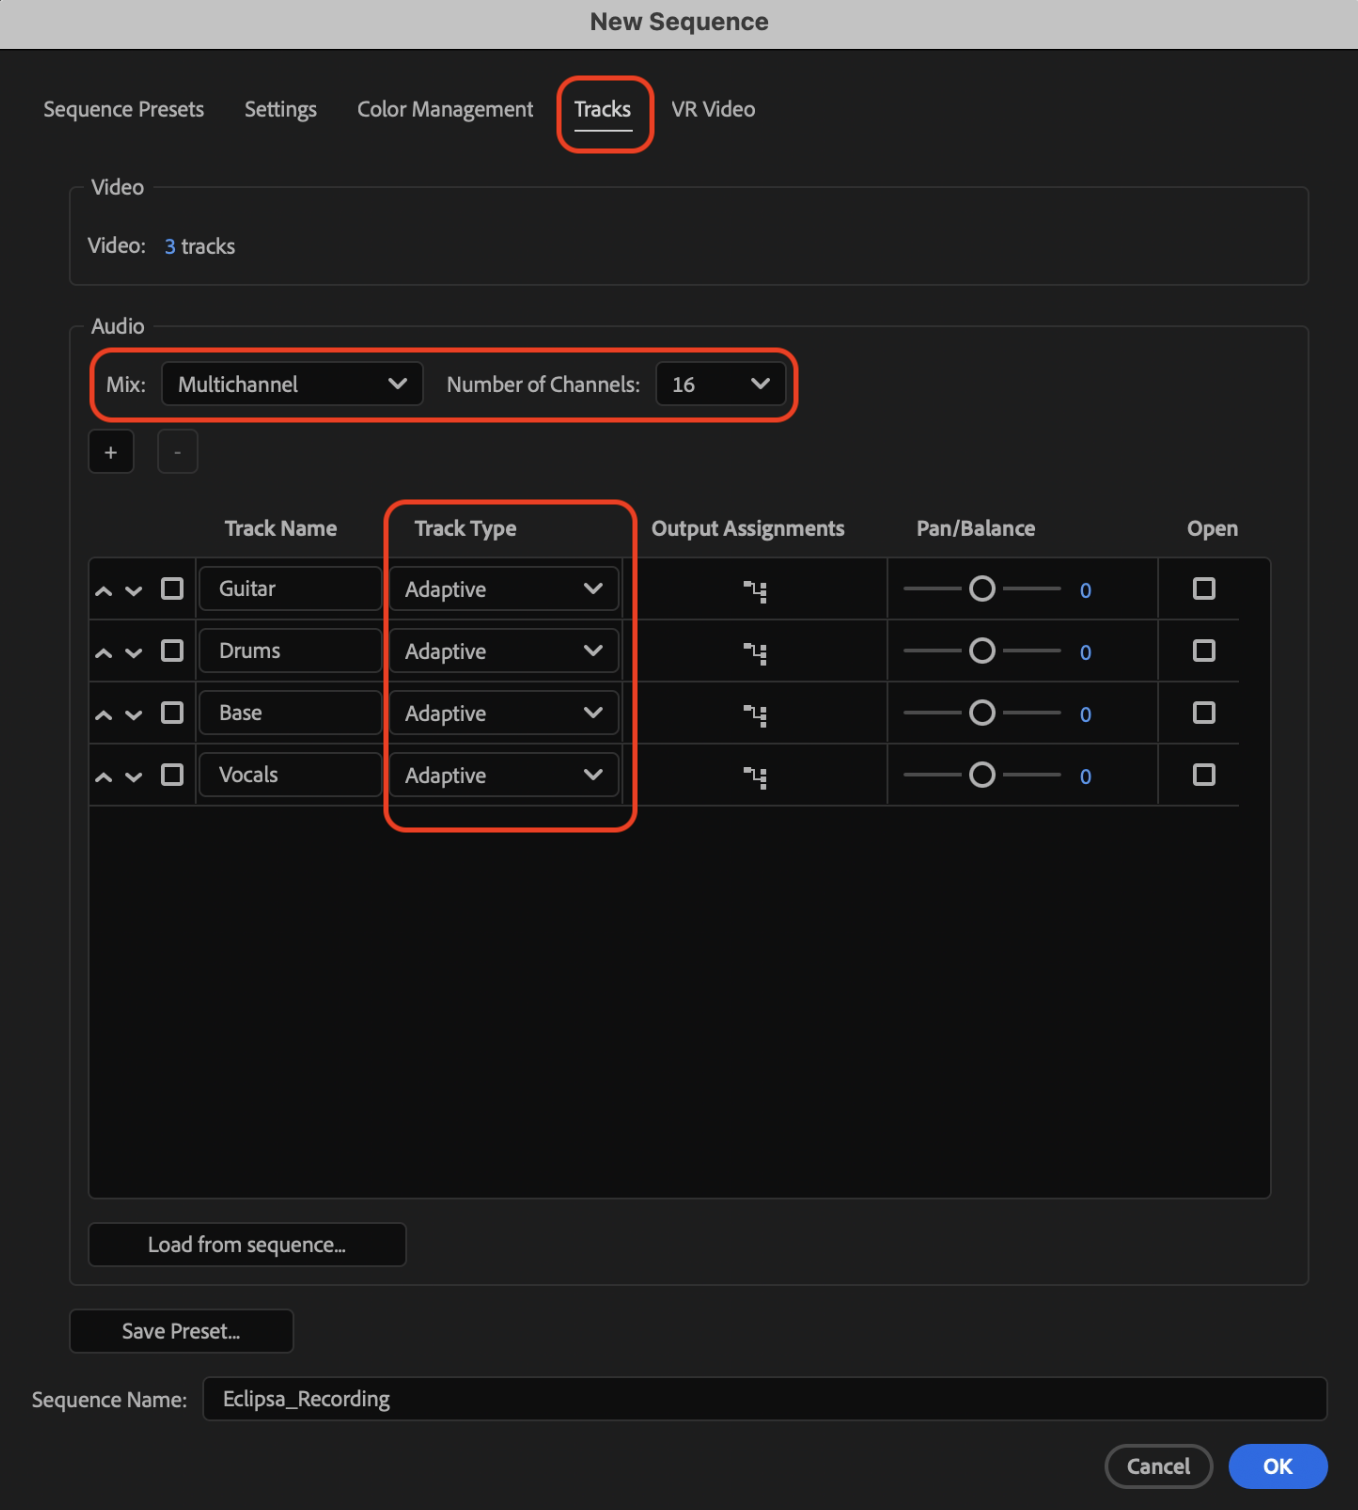
1\. Create a new sequence with 16 channels

* In Adobe Premiere Pro select "File" --> "New" --> "Sequence..."
* Select "Tracks", then under "Audio" change the "Mix" to "Multichannel"
* Change the "Number of Channels" to 16
* Add or remove tracks as needed for your project. Ensure the "Track Type" of all tracks is "Adaptive". A minimum of 1 track is required.

<figure><img src="https://2064516701-files.gitbook.io/~/files/v0/b/gitbook-x-prod.appspot.com/o/spaces%2FISImAXhuTi4GI5slDrH1%2Fuploads%2FufAswJkFt804etwnRiP2%2FScreenshot%202025-06-24%20at%2011.52.52%E2%80%AFAM.png?alt=media&amp;token=086b031c-cf39-42a4-b1d8-4467498898bd" alt=""><figcaption><p>Set Mix to "Multichannel" with 16 channels, and change Track Type to "Adaptive"</p></figcaption></figure>

2\. Refresh the Audio Plugins

* This step needs to be done once after installation
* If it's not visible already, open the "Audio Track Mixer" window by selecting "Window" --> "Audio Track Mixer" --> Your Sequence Name
* Select the hamburger button in the top left corner and select "Audio Plug-In Manager"

<figure><img src="https://2064516701-files.gitbook.io/~/files/v0/b/gitbook-x-prod.appspot.com/o/spaces%2FISImAXhuTi4GI5slDrH1%2Fuploads%2FcQN1V96SVQvdNxLaojyB%2FScreenshot%202025-06-20%20at%203.09.18%E2%80%AFPM.png?alt=media&amp;token=875afde0-12f7-4c07-81fa-91dc036a105e" alt=""><figcaption><p>Open the Audio Plug-In Manager</p></figcaption></figure>

* In the Audio Plug-In Manager select "Scan for Plug-Ins" and verify the Eclipsa Audio plugins are present

<figure><img src="https://2064516701-files.gitbook.io/~/files/v0/b/gitbook-x-prod.appspot.com/o/spaces%2FISImAXhuTi4GI5slDrH1%2Fuploads%2F2BbJxveiL8DFltfV6t7q%2FScreenshot%202025-06-24%20at%2011.42.48%E2%80%AFAM.png?alt=media&amp;token=d5bc9efa-7e02-434a-96da-689eff1e84bb" alt=""><figcaption><p>The "Eclipsa Audio Renderer" and "Eclipsa Audio Element Plugin" should be both be visible at the bottom</p></figcaption></figure>

3\. Add the Eclipsa Audio Renderer Plugin to the Mix Track

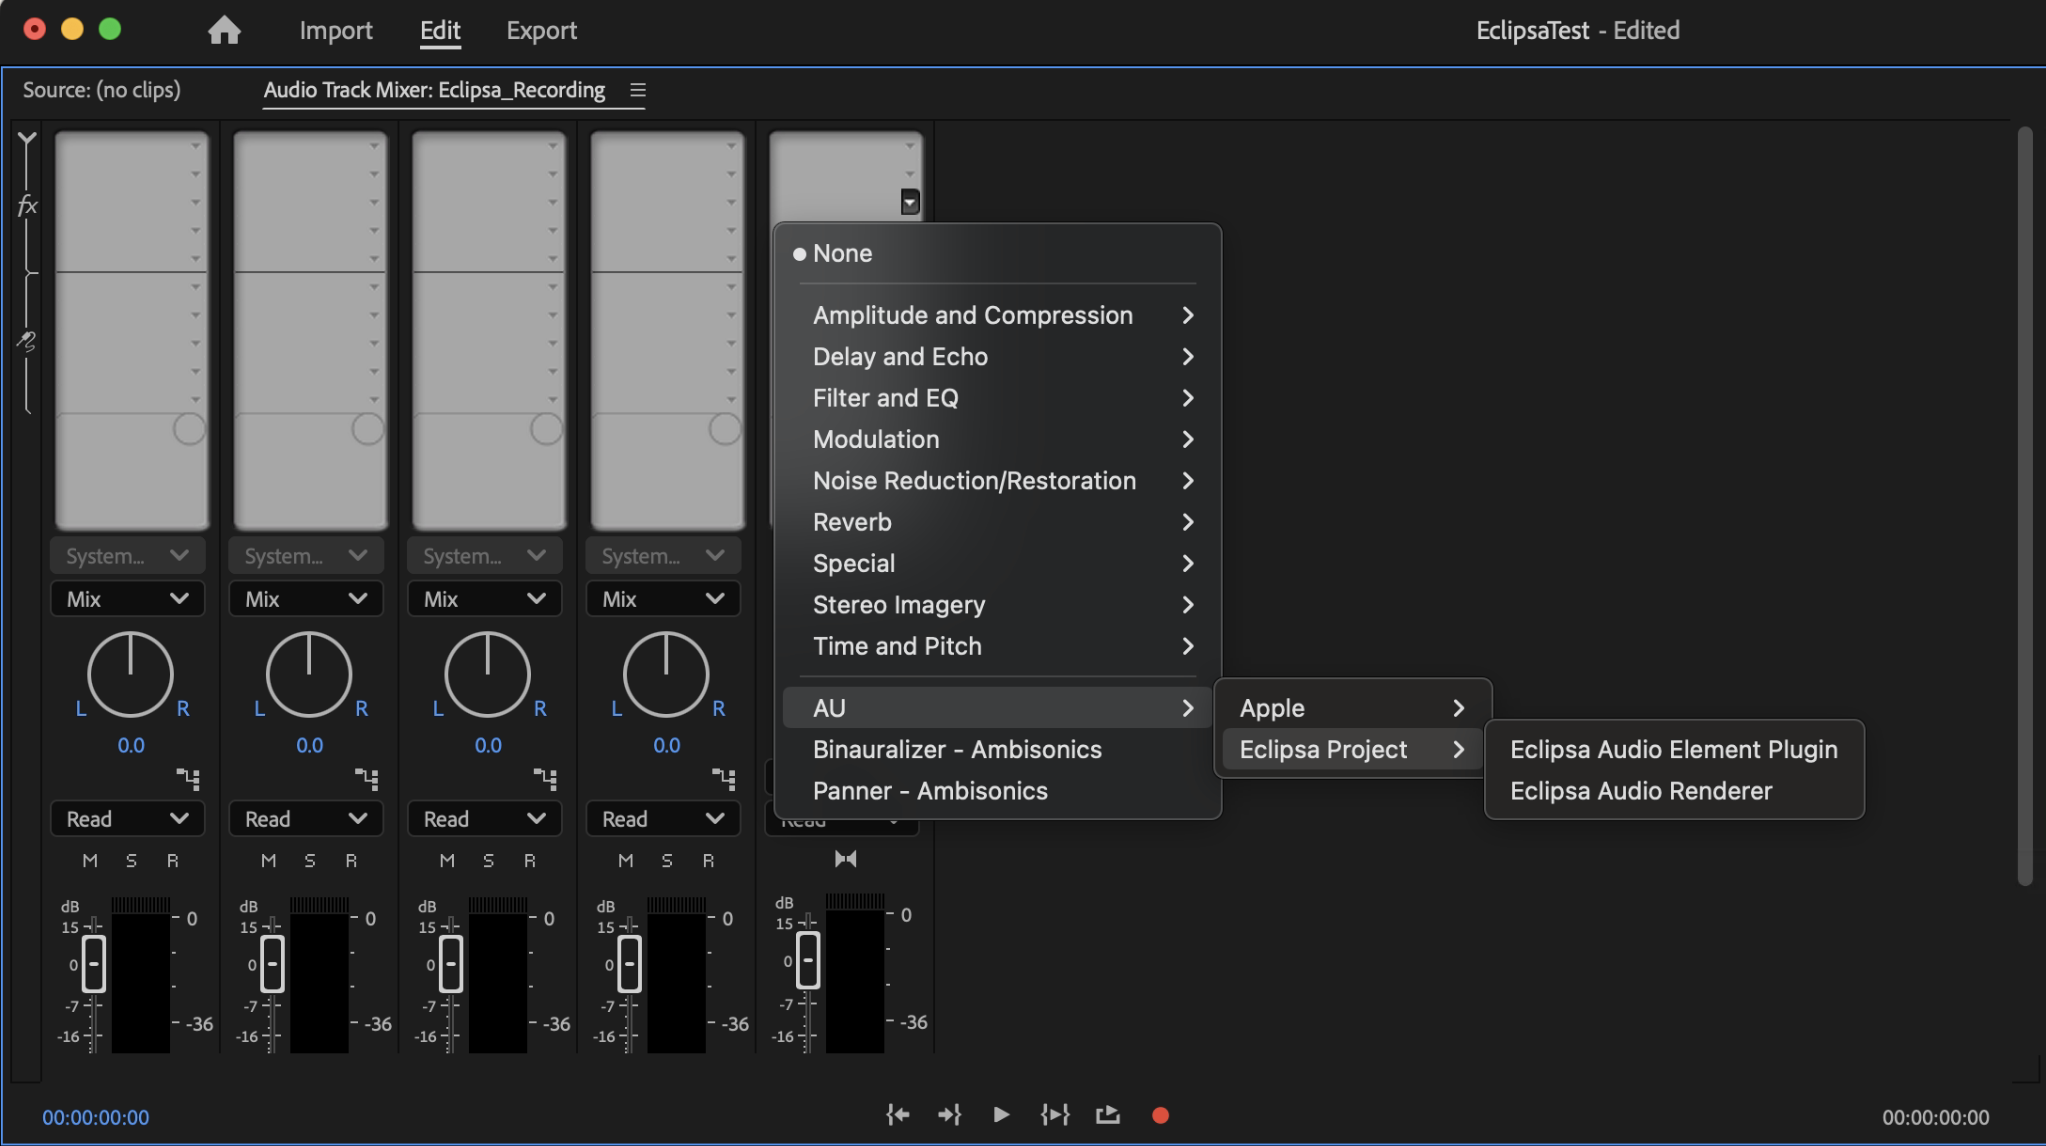
* In the "Audio Track Mixer" window, select the fx for the mix track, which is typically the rightmost track. It should be identifiable by the selectable channel count box showing 16.
  * If the fx table is not shown, it may be hidden and can be unhidden by clicking on the leftmost side of the Audio Track Mixer
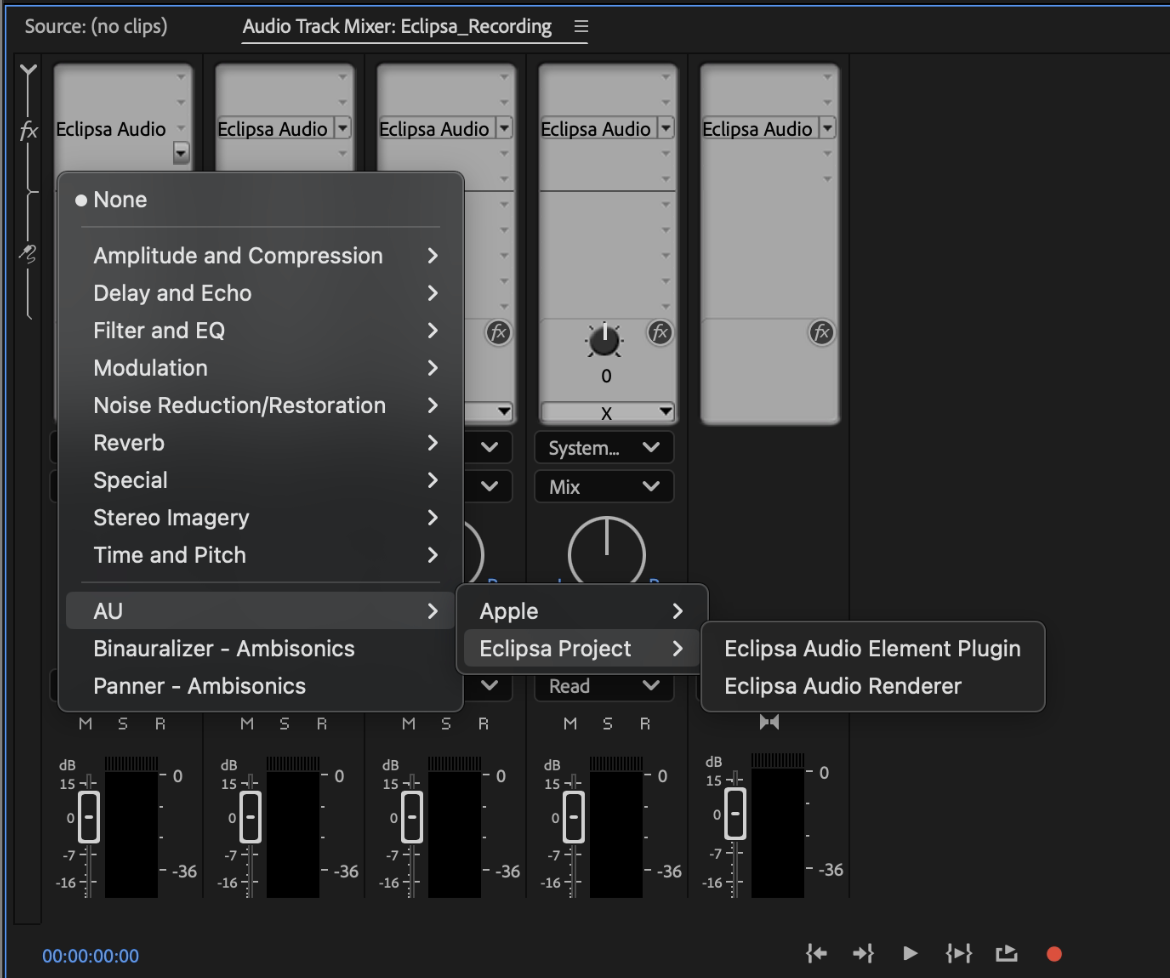
* Click one of the fx slots and select "AU" --> "Eclipsa Project" --> "Eclipsa Audio Renderer"

<figure><img src="https://2064516701-files.gitbook.io/~/files/v0/b/gitbook-x-prod.appspot.com/o/spaces%2FISImAXhuTi4GI5slDrH1%2Fuploads%2FqJrvNNPUKdVcK137ntkQ%2FScreenshot%202025-06-24%20at%2012.01.35%E2%80%AFPM.png?alt=media&amp;token=08d708a6-76fb-44b8-9f84-6af500891d51" alt=""><figcaption><p>Select "AU" --> "Eclipsa Project" --> "Eclipsa Audio Renderer" from the mix tracks fx inserts</p></figcaption></figure>

***

<mark style="color:yellow;">**Note:**</mark> Adobe Premiere Pro only supports up to 16 channels for AU plugins, limiting it to the "Simple" routing profile only.

<mark style="color:yellow;">**Note:**</mark> In Adobe Premiere Pro, there may be audio glitching if the audio frequency differs between the imported, played, and exported audio. If glitching occurs, change "Sample Rate" in "Sequence" --> "Sequence Settings"

***

{% endtab %}

{% tab title="Logic Pro" %}
1\. Open Project and Configure Settings

* Navigate to **File** → **Project Settings** → **Audio...**
* In the Project Settings window under the **Audio** tab:
  * Set **Spatial Audio** to Off
  * Set **Surround Format** to 7.1.4
  * **Important:** Turn off Dolby Atmos if it's enabled<br>

    <figure><img src="https://2064516701-files.gitbook.io/~/files/v0/b/gitbook-x-prod.appspot.com/o/spaces%2FISImAXhuTi4GI5slDrH1%2Fuploads%2FhtoGoa9bKFNATKC5Ea5l%2Fimage.png?alt=media&amp;token=3c75cc4a-43d6-49be-a596-588808b31d4f" alt=""><figcaption></figcaption></figure>
* Click **Apply** or close the settings window to save changes

#### 2. Verify Plugins in Plugin Manager  <a href="#verify-via-logic-pro-plug-in-manager" id="verify-via-logic-pro-plug-in-manager"></a>

#### 3. Add Eclipsa Audio Renderer to Master Track

* Select the Output (Stereo Out / Mix Bus).
* Click on an empty insert slot in the Output track.
* Navigate to: **Audio Units** → **Audio Units Effects** → **Manufacturer: Eclipsa Project** → **Eclipsa Audio Renderer for Logic Pro**<br>

  <figure><img src="https://2064516701-files.gitbook.io/~/files/v0/b/gitbook-x-prod.appspot.com/o/spaces%2FISImAXhuTi4GI5slDrH1%2Fuploads%2F58JaUpRh1oTcDXLDW2O7%2FRendererLogic.gif?alt=media&amp;token=09efaf96-55fc-456e-aca2-2e6e301a9ba7" alt=""><figcaption></figcaption></figure>
* This plugin handles the final spatial audio rendering on the master output
  {% endtab %}
  {% endtabs %}

2\. Configure the Plugin and Add an Audio Element:

* Once the Eclipsa Audio Renderer Plugin interface opens, you can configure the monitored speaker layout by selecting the "Speaker Setup" in the **top left corner:**

<figure><img src="https://2064516701-files.gitbook.io/~/files/v0/b/gitbook-x-prod.appspot.com/o/spaces%2FISImAXhuTi4GI5slDrH1%2Fuploads%2FV9nEvA70yG3iJzrtvZe3%2FRenderer.png?alt=media&amp;token=dc926f1b-6cb6-4c05-aeb8-d273fa9cc75e" alt=""><figcaption></figcaption></figure>

* To enable playback and monitoring, add a stereo **audio element** to your mix presentation:
  * Click the **Reroute** button (bottom right of the interface) to access the audio element creation screen.
  * Select **+Add Audio Element** and choose the type (e.g., stereo).
  * Confirm the audio element creation to ensure your panned audio can be routed here for playback.&#x20;

<figure><img src="https://2064516701-files.gitbook.io/~/files/v0/b/gitbook-x-prod.appspot.com/o/spaces%2FISImAXhuTi4GI5slDrH1%2Fuploads%2FePdkOqKVydFt2BN1opDf%2FRendererAddElement.gif?alt=media&amp;token=781bf04a-0e02-4b23-8747-c91758e8216b" alt=""><figcaption></figcaption></figure>

3\. Setting Up Mix Presentations:

* In the Eclipsa Audio Renderer Plugin, configure a mix presentation by clicking the **Edit** button
* Rename the default presentation and assign it a language if desired.
* Add the previously created audio element to the mix presentation by selecting **Add Audio Element.**
* Leave the binaural checkbox checked to ensure the audio element will playback binaurally during binaural playback.

<figure><img src="https://2064516701-files.gitbook.io/~/files/v0/b/gitbook-x-prod.appspot.com/o/spaces%2FISImAXhuTi4GI5slDrH1%2Fuploads%2FLixdh5CWWQ06y5cYpV6L%2FRendererEdit.png?alt=media&amp;token=9ac88adf-0f7e-43ad-9783-4e5ce8f8c5b8" alt=""><figcaption></figcaption></figure>

The Eclipsa Audio Renderer Plugin is now set up to handle monitoring, playback, and mix presentation configurations, allowing you to route all panned elements here for a complete 3D audio experience.

## **The Eclipsa Audio Element Plugin**

The Eclipsa Audio Element Plugin is used to place and manipulate individual audio tracks within the 3D space, adding spatial information to each track and routing it to an audio element within the Eclipsa Audio Renderer Plugin.

### How to Use the Eclipsa Audio Element Plugin

1\. Add the Eclipsa Audio Element Plugin to a track

{% tabs %}
{% tab title="Avid ProTools" %}
1\. **Create** a new audio track.

* Click Track > New (Shift + Command + n) and choose Mono or Stereo Audio Track based on your needs.
* Add audio to the new track by dragging and dropping an external sample audio file onto the new track or recording audio into the track.<br>

  <figure><img src="https://2064516701-files.gitbook.io/~/files/v0/b/gitbook-x-prod.appspot.com/o/spaces%2FISImAXhuTi4GI5slDrH1%2Fuploads%2F8w4UBExppA9eBGOUHUct%2FNew%20Track.png?alt=media&amp;token=7127ab4e-50ef-40ba-bfd1-e25f2d5f5c55" alt=""><figcaption></figcaption></figure>

2\. **Insert** the Eclipsa Audio Element Plugin:

* Locate an empty **Insert slot** on your audio track.
* &#x20;Navigate to Multi-Channel Plug-In - Sound Field (Category) or Eclipsa Project (Manufacturer), and select the Eclipsa Audio Element plugin from the list.<br>

  <figure><img src="https://2064516701-files.gitbook.io/~/files/v0/b/gitbook-x-prod.appspot.com/o/spaces%2FISImAXhuTi4GI5slDrH1%2Fuploads%2F7JR5mx9wopwv2a05FOhS%2FAudio%20Element.png?alt=media&amp;token=1668c8ce-68f7-4890-9fbe-ea7c4afabf2d" alt=""><figcaption></figcaption></figure>

3\. Configure a send from the audio track the Eclipsa Audio Element Plugin is on to the aux track the Eclipsa Audio Renderer Plugin is on:

* Select **Sends** --> **track** ,and navigate to and select the track hosting the Eclipsa Audio Renderer Plugin (Mix Bus in this example):

<figure><img src="https://2064516701-files.gitbook.io/~/files/v0/b/gitbook-x-prod.appspot.com/o/spaces%2FISImAXhuTi4GI5slDrH1%2Fuploads%2FgGkYdyOywdjngqO8dRU5%2FSends.gif?alt=media&amp;token=ba81a2fe-e19e-4f47-90cb-2d0d5d1b0304" alt=""><figcaption></figcaption></figure>
{% endtab %}

{% tab title="REAPER" %}
1\. Create a new audio track:

* Navigate to Track > Insert New Track (or Command + T).
* Add audio to this new track (e.g. dragging and dropping an external sample audio file onto the new track).

2\. Add the Audio Element Plugin to the new audio track:

* Select "FX" under the new track.
* Under "VST3" select the "VST3: Eclipsa Audio Element Plugin."

<figure><img src="https://2064516701-files.gitbook.io/~/files/v0/b/gitbook-x-prod.appspot.com/o/spaces%2FISImAXhuTi4GI5slDrH1%2Fuploads%2FB9ERXE0nnbwRnGVhj8NK%2FScreenshot%202025-05-26%20at%2011.19.02%E2%80%AFAM.png?alt=media&amp;token=1b5e4280-4d4f-45fe-9a11-e8b951d6ee48" alt=""><figcaption><p>Select "FX" then "VST3" --> "VST3: Eclipsa Audio Element Plugin (Eclipsa Project)"</p></figcaption></figure>

3\. Configure the pin connectors for the plugin:

* In the top right corner, select the pin connector button.
* Change the "Track channels" and "VST3 bus size" to 32 as 32 is the smallest available bus size for the required 28 channels.

<figure><img src="https://2064516701-files.gitbook.io/~/files/v0/b/gitbook-x-prod.appspot.com/o/spaces%2FISImAXhuTi4GI5slDrH1%2Fuploads%2FduaZmhAR8dJjvXQLJdlH%2FScreenshot%202025-05-26%20at%2012.19.49%E2%80%AFPM.png?alt=media&amp;token=fd190f20-284c-4b94-a619-73bcab7c76ab" alt=""><figcaption><p>Select REAPER pin connector and then update "Track channels" and "VST3 bus size"</p></figcaption></figure>
{% endtab %}

{% tab title="Adobe Premiere Pro" %}
1\. Add the plugin to an existing audio track in the sequence

* In the "Audio Track Mixer" window select the track to add the Eclipsa Audio Element Plugin to.
* In the fx list for the track select "AU" --> "Eclipsa Project" --> "Eclipsa Audio Element Plugin".

<figure><img src="https://2064516701-files.gitbook.io/~/files/v0/b/gitbook-x-prod.appspot.com/o/spaces%2FISImAXhuTi4GI5slDrH1%2Fuploads%2FkRCCfCHpdTxfgw34wqdV%2FScreenshot%202025-06-24%20at%202.17.31%E2%80%AFPM.png?alt=media&amp;token=e4d859a9-a60d-4d26-a58f-c777b89949a4" alt=""><figcaption><p>In the fx table select "AU" --> "Eclipsa Project" --> "Eclipsa Audio Element Plugin"</p></figcaption></figure>

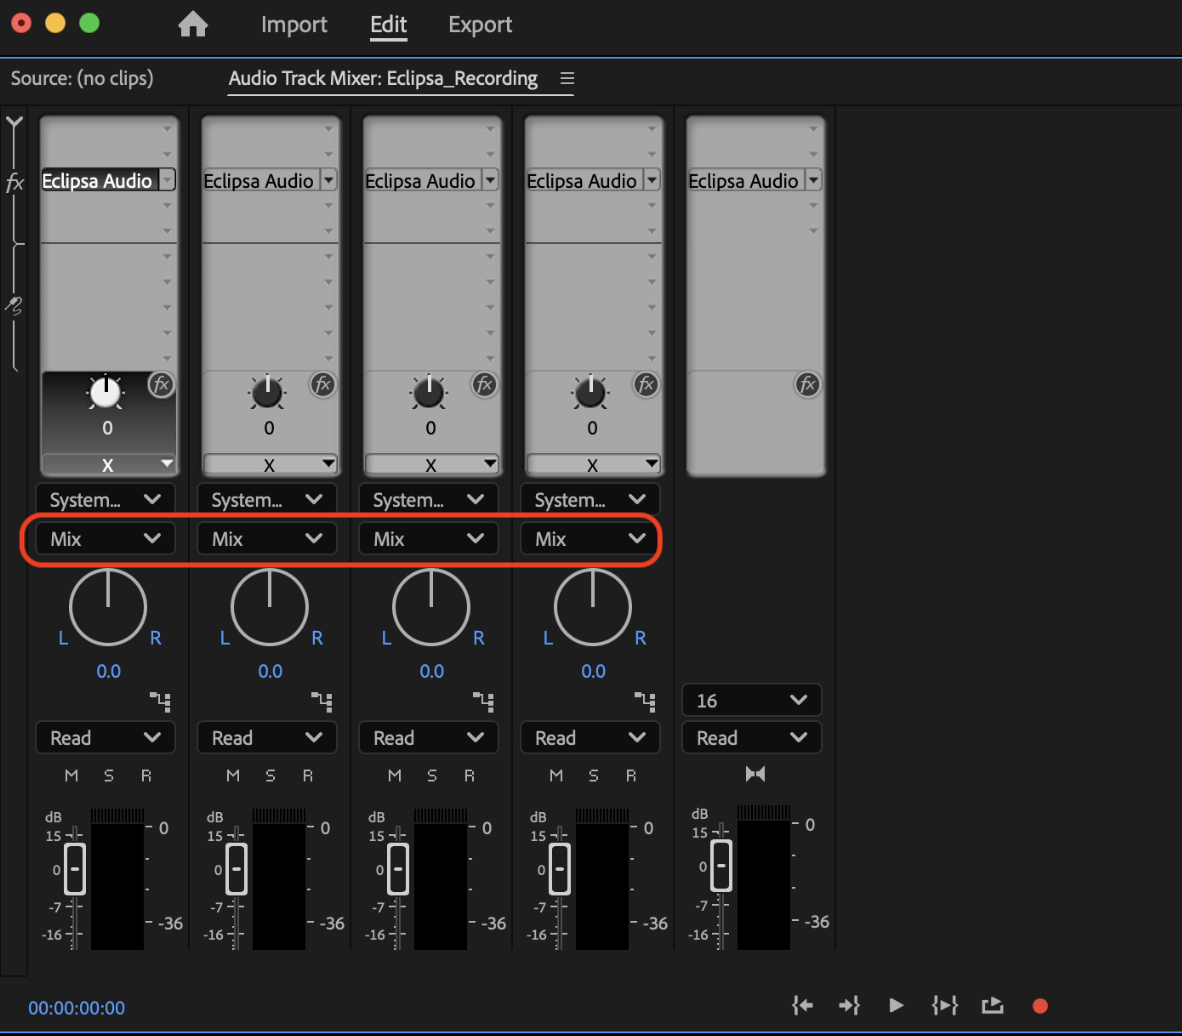
2\. Ensure the track sends audio to the mix

* By default, in Adobe Premiere Pro, audio channels are automatically forwarded from individual tracks to the Mix track.
* Ensure audio is forwarded correctly by verifying that the bus target for tracks with the Eclipsa Audio Element Plugin is "Mix"

<figure><img src="https://2064516701-files.gitbook.io/~/files/v0/b/gitbook-x-prod.appspot.com/o/spaces%2FISImAXhuTi4GI5slDrH1%2Fuploads%2FIwPbmcqFuhGOKdnJa6YY%2FScreenshot%202025-06-24%20at%202.14.25%E2%80%AFPM.png?alt=media&amp;token=7be16b1b-036e-4776-94c6-085fbafb1510" alt=""><figcaption><p>Ensure track audio is sent to the Mix track</p></figcaption></figure>
{% endtab %}

{% tab title="Logic Pro" %}
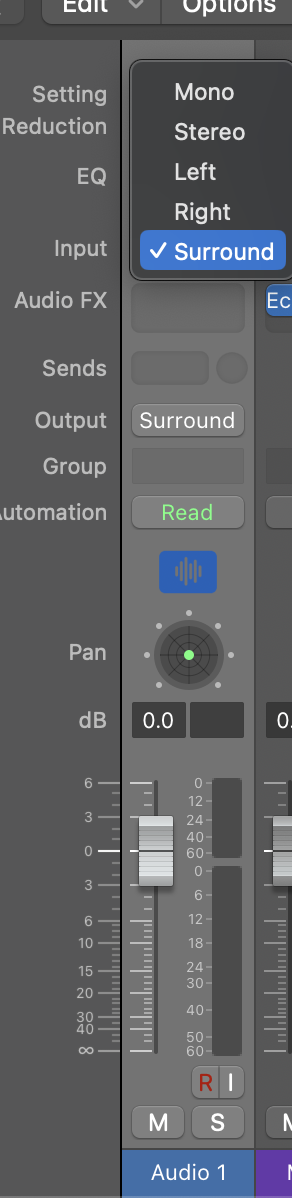
1\. Configure Audio Track  Input

* Select an existing audio track
* In the track's input section, change the input format to **Surround** to enable multichannel processing<br>

  <figure><img src="https://2064516701-files.gitbook.io/~/files/v0/b/gitbook-x-prod.appspot.com/o/spaces%2FISImAXhuTi4GI5slDrH1%2Fuploads%2FHhfiudXIDe3YjXxBFkNI%2Fimage.png?alt=media&amp;token=e7acad5c-f3d7-4822-b2ea-08bee9027e4c" alt="" width="146"><figcaption></figcaption></figure>
* This allows the track to handle the spatial audio format required for the Eclipsa plugins

#### 2. Add Eclipsa Audio Element Plugin to Audio Track

* On your audio track, click on an empty insert slot
* Navigate to: **Audio Units** → **Audio Units Effects** → **Manufacturer: Eclipsa Project** → **Eclipsa Audio Element Plugin**<br>

  <figure><img src="https://2064516701-files.gitbook.io/~/files/v0/b/gitbook-x-prod.appspot.com/o/spaces%2FISImAXhuTi4GI5slDrH1%2Fuploads%2FZ8XN1rR1rtspb2raopXu%2Fimage.png?alt=media&amp;token=f9d8aa25-28ed-48f3-842e-7022b0d50ee1" alt=""><figcaption></figcaption></figure>
* The plugin will load on the individual audio track for processing audio elements

#### 3. Ensure Track Routing to Master

* In Logic Pro, audio tracks automatically send to the master by default
* Check that the track's output is set to **"Stereo Out"** (or the surround master if using surround routing)
  {% endtab %}
  {% endtabs %}

2\. Configure the Audio Element Plugin and Choose an Audio Element:

* In the Audio Element Plugin interface, attach the track’s output to an audio element created in the Eclipsa Audio Renderer Plugin.&#x20;
* Select the audio element in the **Audio Element** drop down:<br>

  <figure><img src="https://2064516701-files.gitbook.io/~/files/v0/b/gitbook-x-prod.appspot.com/o/spaces%2FISImAXhuTi4GI5slDrH1%2Fuploads%2FnlQtVicUKGbL2RZuYmwN%2FChooseAudioElement.gif?alt=media&amp;token=feeb984e-4be2-4478-ad37-2bcd47d31383" alt=""><figcaption></figcaption></figure>

3\. Playback audio:

* Configuration should now be complete.
* Test playing back audio and check the channel monitoring in both the Eclipsa Audio Element Plugin and Eclipsa Audio Renderer Plugin to ensure audio is reaching both plugins.
* If audio appears in the Eclipsa Audio Element Plugin but not the Eclipsa Audio Renderer Plugin, ensure the audio track is correctly connected to the aux track (**see step 1**).

## **Additional Tips**

#### Ensure Audio Elements and Mix Presentations Are Correctly Configured

Audio elements and mix presentations in the Eclipsa Audio Renderer Plugin are essential for proper 3D playback and monitoring. During playback, only audio associated with audio elements assigned to the currently playing mix presentation will be played.

Each Audio Element Plugin instance must be configured with an audio element to ensure output during playback.

#### Spatialized Audio Must Pass Through an Audio Element Plugin

Insert an Audio Element Plugin on every track you want to spatialize. This setup ensures each sound source is routed to the correct audio element and fully integrated into the 3D mix. To reduce the number of Audio Element Plugins needed you can also use busses to route multiple tracks through a single Audio Element Plugin instance before routing the audio to the Eclipsa Audio Renderer Plugin. For more information see [Audio Element Plugin Routing](/eclipsa-audio-element-plugin-features-routing-and-monitoring-eclipsa-audio#combining-tracks-with-sub-busses).


# Eclipsa Audio Renderer Plugin Features: Configuring, Monitoring and Exporting Eclipsa Audio

Explore how to configure, monitor, and export immersive 3D audio using the Eclipsa Audio Renderer Plugin with audio elements and mix presentations.

## **Eclipsa Audio Renderer Plugin Guide**

The **Eclipsa** **Renderer** Plugin enables monitoring, configuring, and exporting of a 3D audio mix, as well as ensuring compatibility with Eclipsa Audio playback. The plugin allows for the management of audio elements, mix presentations, and export configurations, essential for creating a fully immersive audio experience.

### Setting Up the **Eclipsa Audio** **Renderer** Plugin

First, add the **Eclipsa Audio** **Renderer** Plugin to your Mix Bus aux track or add a new Aux Input track.

{% tabs %}
{% tab title="Avid ProTools" %}
1\. Widen your Mix Bus aux track to 5th Order Ambisonics:

* Navigate to your Mix Bus aux track or create a new Aux Input track to act as your Mix Bus.
* Set the track width to 5th Order Ambisonics to support the plugin as shown below.&#x20;

<figure><img src="https://2064516701-files.gitbook.io/~/files/v0/b/gitbook-x-prod.appspot.com/o/spaces%2FISImAXhuTi4GI5slDrH1%2Fuploads%2FTtsODAzttDFpz5Hgs7lh%2F5th_Order.gif?alt=media&amp;token=d99b76ef-0ac4-4300-bbea-3a4098632cbc" alt=""><figcaption></figcaption></figure>

***

<mark style="color:yellow;">**Note:**</mark> A 5th Order Ambisonics bus is the smallest bus supported by Avid ProTools with 28 channels, which are required by the IAMF file format. No ambisonics mixing is required, only the channels provided by this wider bus.

***

2\. Insert the Eclipsa Audio Renderer Plugin:

* Click on an empty Insert slot in the Mix Bus track.
* Choose Multi-Channel Plug-In and select Eclipsa Audio Renderer from the Instrument plugin list.
* Select the instance of the Eclipsa Audio Renderer with the highest speaker layout you wish to play back on from within ProTools.

<figure><img src="https://2064516701-files.gitbook.io/~/files/v0/b/gitbook-x-prod.appspot.com/o/spaces%2FISImAXhuTi4GI5slDrH1%2Fuploads%2Ff3JPKJUsDXGfDZFPH8a6%2Fimage.png?alt=media&amp;token=7fa04bee-9369-4047-b880-9032dd94b469" alt=""><figcaption><p>Select the "Eclipsa Audio Renderer" plugin with the largest speaker playback layout available in your studio</p></figcaption></figure>
{% endtab %}

{% tab title="REAPER" %}
1\. Add the Eclipsa Audio Renderer Plugin to the Master Track.

* Find the Master track on the REAPER Mixer tab.
* Select the "FX" button, then select "Add" if other plugins have already been added to this track.

<figure><img src="https://2064516701-files.gitbook.io/~/files/v0/b/gitbook-x-prod.appspot.com/o/spaces%2FISImAXhuTi4GI5slDrH1%2Fuploads%2FZMD5P053O0LQVEuyodHK%2FScreenshot%202025-06-02%20at%2010.40.05%E2%80%AFAM.png?alt=media&amp;token=3dc1b61e-32dc-4f50-9d62-4994b26a01dd" alt="" width="375"><figcaption><p>Select "FX" to add a plugin to the Master Track</p></figcaption></figure>

* Under "All Plugins" > "VST3" select "VST3: Eclipsa Audio Renderer (Eclipsa Project).
* Select "Add" to add the plugin to the Master track.

<figure><img src="https://2064516701-files.gitbook.io/~/files/v0/b/gitbook-x-prod.appspot.com/o/spaces%2FISImAXhuTi4GI5slDrH1%2Fuploads%2Ff2WW00RK1WgStPnjsW7t%2FScreenshot%202025-06-02%20at%2010.41.25%E2%80%AFAM.png?alt=media&amp;token=77b6e66d-388c-4a29-b99e-62e9ee41d3e0" alt=""><figcaption><p>Find the Renderer Plugin under "All Plugins" --> "VST3"</p></figcaption></figure>

2\. Use the Plug-In Pin Connector to connect the plugin

* On the "Eclipsa Audio Renderer" UI, change the "Speaker Setup" to match the speaker layout you wish to play back audio locally on
* In the Plug-In UI window, select the Pin Connector in the top right corner to open the Pin Connector UI

<figure><img src="https://2064516701-files.gitbook.io/~/files/v0/b/gitbook-x-prod.appspot.com/o/spaces%2FISImAXhuTi4GI5slDrH1%2Fuploads%2F3oe02Aoh6Kb9YTfq85St%2FRenderer%20Setup.gif?alt=media&amp;token=b06a1fc3-28e4-455b-b745-c37b4394f890" alt=""><figcaption></figcaption></figure>

* By default, REAPER configures plugin input to stereo. We can change this input by changing the "Track Channels" to one of two values:
  * **Simplified:** Select a value larger than 28, typically 32.
  * **Advanced**: Increase channels only to the number required by the plug-ins audio elements. The number of channels needed will be equal to the number of channels used by all audio elements.
* Under "VST3 bus size" select a value matching the number of speakers in the speaker layout you wish to play back audio locally on

<figure><img src="https://2064516701-files.gitbook.io/~/files/v0/b/gitbook-x-prod.appspot.com/o/spaces%2FISImAXhuTi4GI5slDrH1%2Fuploads%2F67mkaXG6CYR2toAWJlZi%2FScreenshot%202025-06-02%20at%2011.14.58%E2%80%AFAM.png?alt=media&amp;token=13e863a5-3865-4670-acc2-1cea9535f130" alt=""><figcaption><p>Set "Track channels" to 32 and "VST3 bus size" to match the desired number of output speakers</p></figcaption></figure>

***

<mark style="color:yellow;">**Note:**</mark> Due to a limitation of VST3, the plugin advertises it will support 36 input channels instead of 28, hence showing "32/36" in the pin connector. However, only the first 28 channels are used, as the IAMF standard only supports 28 channels. The remaining 8 channels are unused.

***

<mark style="color:yellow;">**Note:**</mark> REAPER automatically captures spacebar presses to start and stop playback, so when naming mix presentations, audio elements, etc, the space character can not be used as input.

***

{% endtab %}

{% tab title="Adobe Premiere Pro" %}
1\. Create a new sequence with 16 channels

* In Adobe Premiere Pro select "File" --> "New" --> "Sequence..."
* Select "Tracks", then under "Audio" change the "Mix" to "Multichannel"
* Change the "Number of Channels" to 16
* Add or remove tracks as needed for your project. Ensure the "Track Type" of all tracks is "Adaptive". A minimum of 1 track is required.

<figure><img src="https://2064516701-files.gitbook.io/~/files/v0/b/gitbook-x-prod.appspot.com/o/spaces%2FISImAXhuTi4GI5slDrH1%2Fuploads%2FufAswJkFt804etwnRiP2%2FScreenshot%202025-06-24%20at%2011.52.52%E2%80%AFAM.png?alt=media&amp;token=086b031c-cf39-42a4-b1d8-4467498898bd" alt=""><figcaption><p>Set Mix to "Multichannel" with 16 channels, and change Track Type to "Adaptive"</p></figcaption></figure>

2\. Refresh the Audio Plugins

* This step needs to be done once after installation
* If it's not visible already, open the "Audio Track Mixer" window by selecting "Window" --> "Audio Track Mixer" --> Your Sequence Name
* Select the hamburger button in the top left corner and select "Audio Plug-In Manager"

<figure><img src="https://2064516701-files.gitbook.io/~/files/v0/b/gitbook-x-prod.appspot.com/o/spaces%2FISImAXhuTi4GI5slDrH1%2Fuploads%2FcQN1V96SVQvdNxLaojyB%2FScreenshot%202025-06-20%20at%203.09.18%E2%80%AFPM.png?alt=media&amp;token=875afde0-12f7-4c07-81fa-91dc036a105e" alt=""><figcaption><p>Open the Audio Plug-In Manager</p></figcaption></figure>

* In the Audio Plug-In Manager select "Scan for Plug-Ins" and verify the Eclipsa Audio plugins are present

<figure><img src="https://2064516701-files.gitbook.io/~/files/v0/b/gitbook-x-prod.appspot.com/o/spaces%2FISImAXhuTi4GI5slDrH1%2Fuploads%2F2BbJxveiL8DFltfV6t7q%2FScreenshot%202025-06-24%20at%2011.42.48%E2%80%AFAM.png?alt=media&amp;token=d5bc9efa-7e02-434a-96da-689eff1e84bb" alt=""><figcaption><p>The "Eclipsa Audio Renderer" and "Eclipsa Audio Element Plugin" should be both be visible at the bottom</p></figcaption></figure>

3\. Add the Eclipsa Audio Renderer Plugin to the Mix Track

* In the "Audio Track Mixer" window, select the fx for the mix track, which is typically the rightmost track. It should be identifiable by the selectable channel count box showing 16.
  * If the fx table is not shown, it may be hidden and can be unhidden by clicking on the leftmost side of the Audio Track Mixer
* Click one of the fx slots and select "AU" --> "Eclipsa Project" --> "Eclipsa Audio Renderer"

<figure><img src="https://2064516701-files.gitbook.io/~/files/v0/b/gitbook-x-prod.appspot.com/o/spaces%2FISImAXhuTi4GI5slDrH1%2Fuploads%2FqJrvNNPUKdVcK137ntkQ%2FScreenshot%202025-06-24%20at%2012.01.35%E2%80%AFPM.png?alt=media&amp;token=08d708a6-76fb-44b8-9f84-6af500891d51" alt=""><figcaption><p>Select "AU" --> "Eclipsa Project" --> "Eclipsa Audio Renderer" from the mix tracks fx inserts</p></figcaption></figure>

***

<mark style="color:yellow;">**Note:**</mark> Adobe Premiere Pro only supports up to 16 channels for AU plugins, limiting it to the "Simple" routing profile only.

***

{% endtab %}

{% tab title="Logic Pro" %}
1\. Open Project and Configure Settings

* Navigate to **File** → **Project Settings** → **Audio...**
* In the Project Settings window under the **Audio** tab:
  * Set **Spatial Audio** to Off
  * Set **Surround Format** to 7.1.4
  * **Important:** Turn off Dolby Atmos if it's enabled
* Click **Apply** or close the settings window to save changes

#### 2. Add Eclipsa Audio Renderer to Master Track

* Navigate to the Mix Bus  / Stereo Out track
* Click on an empty insert slot on the track
* Navigate to: **Audio Units** → **Audio Units Effects** → **Manufacturer: Eclipsa Project** → **Eclipsa Audio Renderer**<br>

  <figure><img src="https://2064516701-files.gitbook.io/~/files/v0/b/gitbook-x-prod.appspot.com/o/spaces%2FISImAXhuTi4GI5slDrH1%2Fuploads%2F58JaUpRh1oTcDXLDW2O7%2FRendererLogic.gif?alt=media&amp;token=09efaf96-55fc-456e-aca2-2e6e301a9ba7" alt=""><figcaption></figcaption></figure>
* This plugin handles the final spatial audio rendering on the master output
  {% endtab %}
  {% endtabs %}

1. Configure Audio Elements
   * Select the "Reroute" button to go to the "Reroute" screen.
   * Select the desired Eclipsa Audio profile in the top left corner. Some DAW's and/or playback devices may only support certain profiles.
     * The "Simple" profile supports 1 audio element with up to 16 channels.
     * The "Base" profile supports 2 audio elements with up to a total 18 channels.
     * The "Base Enhanced" profile supports up to 28 audio elements with up to a total of 28 channels.
   * Add audio elements to your mix presentation within the Eclipsa Audio Renderer Plugin. Each audio element serves as the playback destination for all Audio Element Plugin outputs, allowing you to hear spatialized audio during playback.
2. Configure Mix Presentations:

* Mix Presentations allow you to set up multiple playback configurations, such as different languages or speaker layouts, all within a single project. This feature enables flexibility and customization for various playback scenarios.
  * Mix Presentations are each assigned one or more audio elements which will be played back when the mix presentation is played.
  * Audio elements may be assigned to multiple mix presentations.
  * The plug-ins allow the configuration of up to 5 mix presentations.
* To set up Mix Presentations:
  * Go to the Mix Presentation Editor in the Eclipsa Audio Renderer Plugin by selecting Edit button as shown.
  * Configure multiple presentations by assigning different audio elements and selecting the presentation language. In the Edit Mix Presentation screen, you can also assign Mix Tags. Mix Tags are metadata labels that help categorize the mix presentation or provide information to listeners about what presentation to select (e.g., 'Content Language: English', 'Focus: Dialogue', 'Scene Type: Action Scene', 'Supports Binaural: Yes'). These tags can be useful for organizing different versions of a mix or for providing information to playback systems about the intended use or characteristics of the presentation.
  * Each mix presentation can be customized to provide unique spatial experiences and configurations.
  * Configure the binaural playback for audio elements.
    * When toggled on, the audio element is rendered using binaural processing during binaural playback.&#x20;
    * When toggled off, the audio element will be rendered as stereo during binaural playback.

<figure><img src="https://2064516701-files.gitbook.io/~/files/v0/b/gitbook-x-prod.appspot.com/o/spaces%2FISImAXhuTi4GI5slDrH1%2Fuploads%2FQyzlbQyuHIcQYWD0Avof%2FRendererMixPres.gif?alt=media&amp;token=f5e6ac5f-3378-4308-b4fb-915977bcd0b8" alt=""><figcaption></figcaption></figure>

3. Select Mix Presentation for Playback

* On the main monitoring screen, select the mix presentation you wish to monitor during audio playback (stereo is selected in the video below).

<figure><img src="https://2064516701-files.gitbook.io/~/files/v0/b/gitbook-x-prod.appspot.com/o/spaces%2FISImAXhuTi4GI5slDrH1%2Fuploads%2F4eryPRLN3pUpYO8r7s5W%2FChooseMix.gif?alt=media&amp;token=76de992b-02b4-43cd-b92c-519372008beb" alt=""><figcaption></figcaption></figure>

***

<mark style="color:yellow;">**Note:**</mark> The Mix Presentation selected here will be the presentation played back, so you will only be able to hear and monitor audio from audio elements in this selected Mix Presentation.

***

### **Eclipsa Audio Renderer Plugin Monitoring**

#### Monitoring in Room View

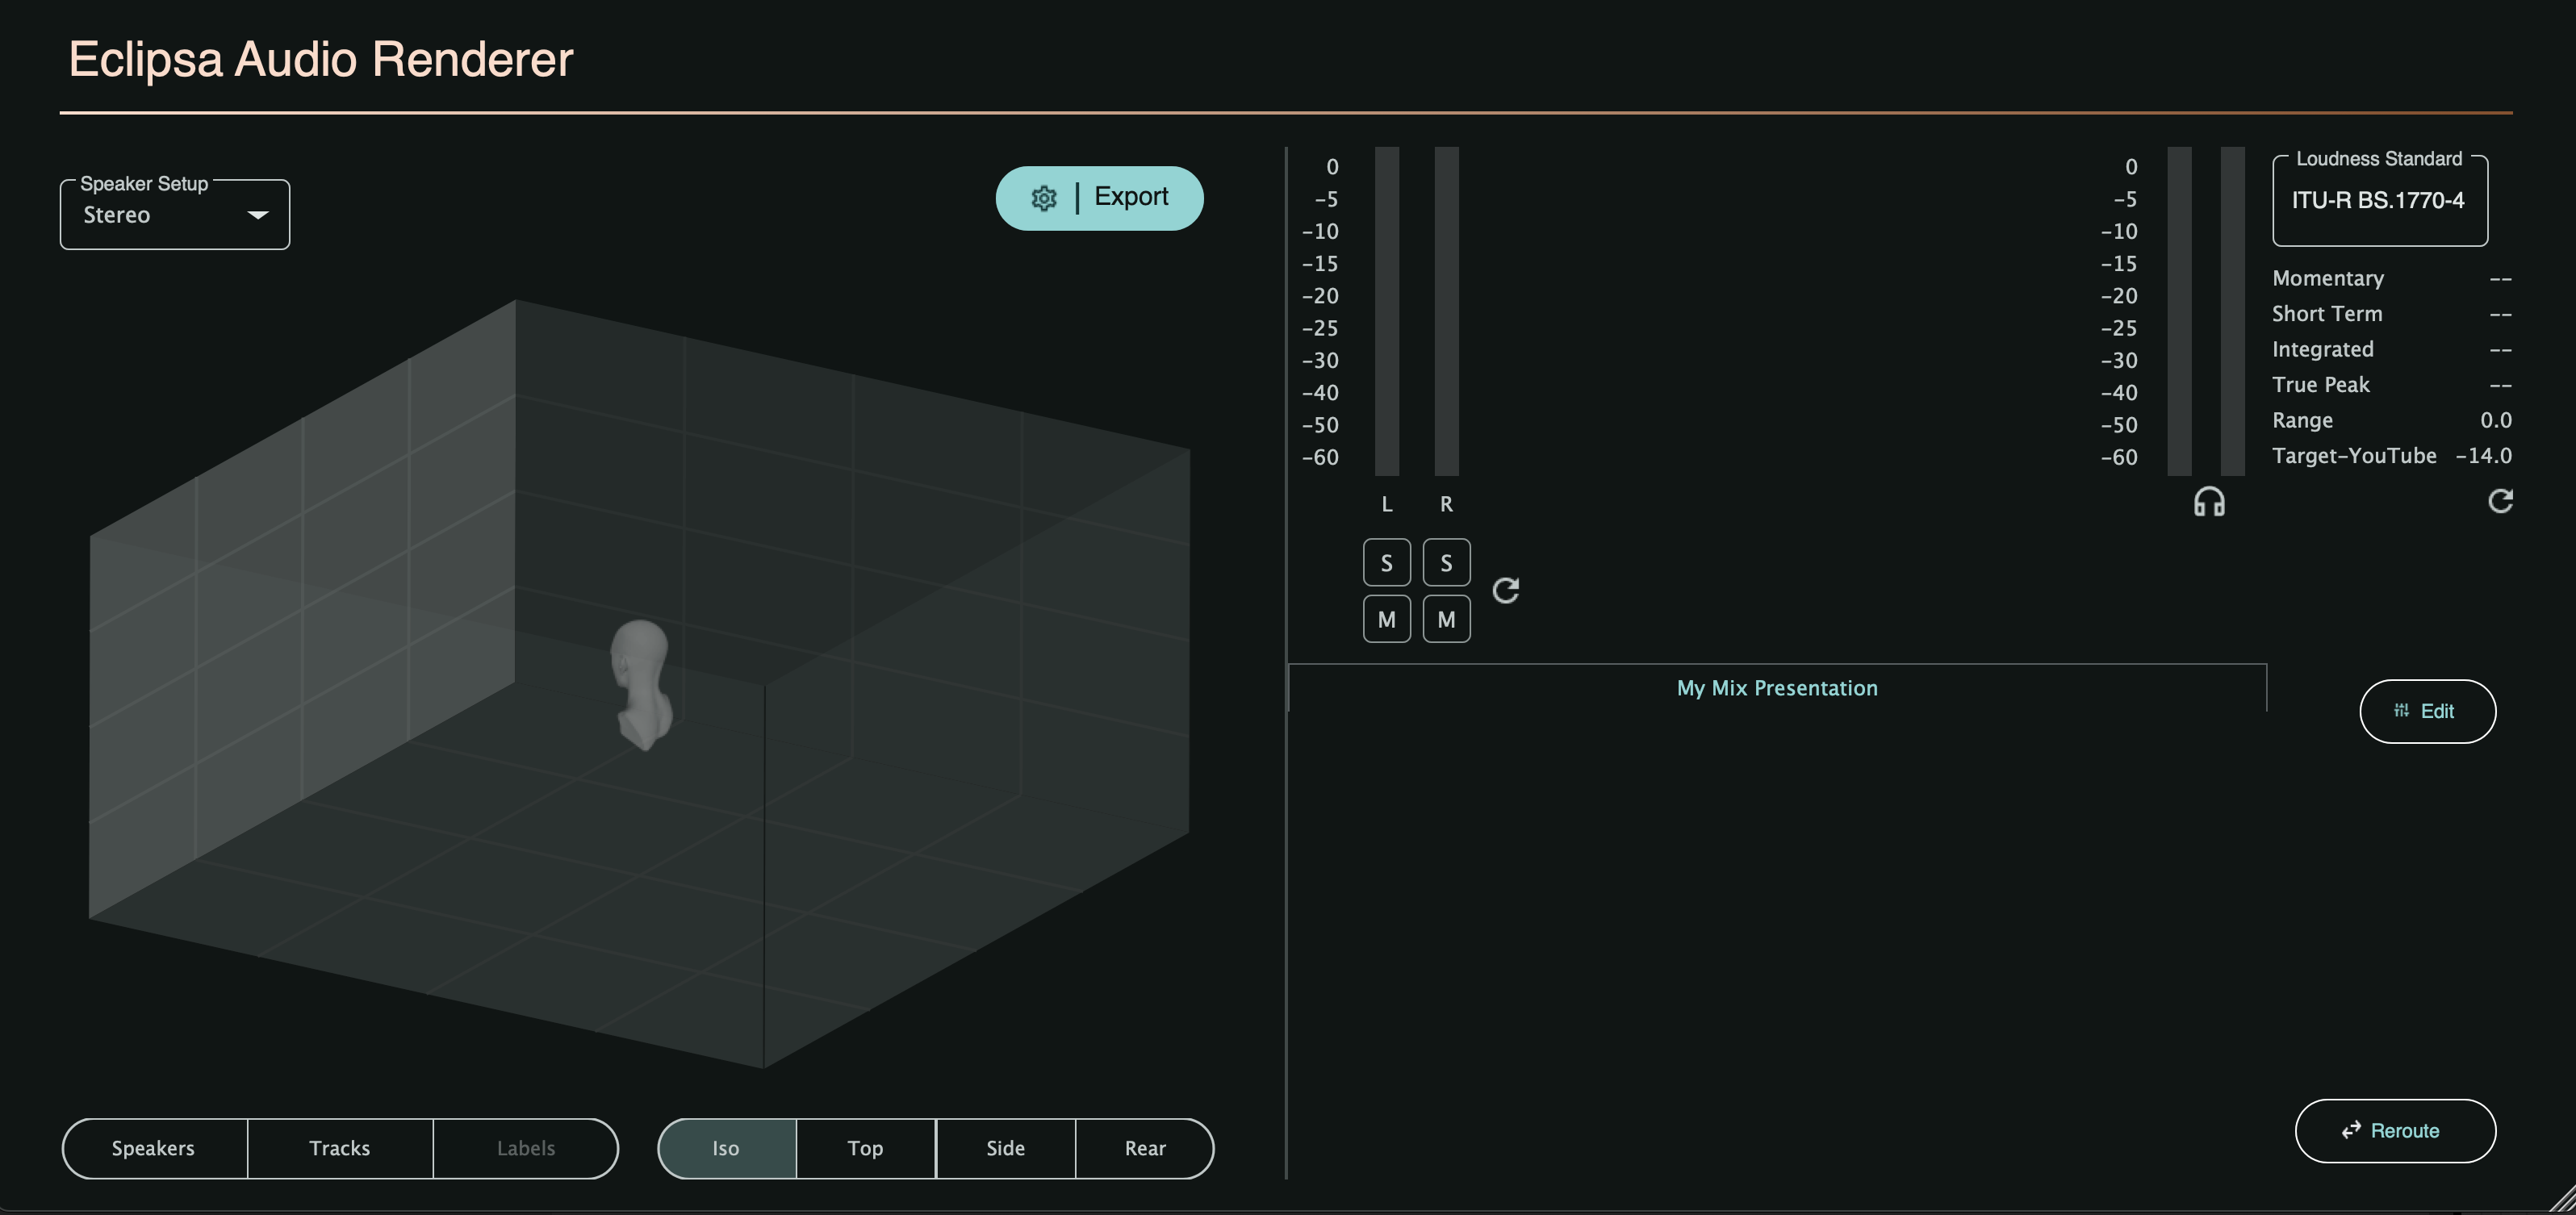
* The Room View in the Eclipsa Audio Renderer Plugin provides a real-time visualization of the audio playback of all tracks in your mix
* Turn on "Labels" to easily identify individual speakers and observe how the audio is being played back in 3D space. Switch between Iso, Top, Side and Rear views to better visualize where individual speakers will be positioned.
* Switch between different speaker setups to monitor how audio will be played back on different speaker layouts.
* Monitor individual channel and audio element loudnesses. Mute or solo individual channels or audio elements.
* Monitor the binaural loudness of the played audio using the two loudness bars on the right hand side.
* Track the ITU loudness of the final mix.
  * ITU loudness is computed using the current speaker setup as the reference speaker set.

<figure><img src="https://2064516701-files.gitbook.io/~/files/v0/b/gitbook-x-prod.appspot.com/o/spaces%2FISImAXhuTi4GI5slDrH1%2Fuploads%2FbU5VyneUdPXTb6nAF2Ci%2FScreenshot%202026-01-15%20at%2012.01.54%E2%80%AFPM.png?alt=media&amp;token=fff861e2-057d-4700-9e95-c800988239e9" alt=""><figcaption></figcaption></figure>

#### Playback and Adjustments

* As you play the mix, monitor each speakers loudness in the 3D space using the Eclipsa Audio Renderer Plugin’s visual tools.
* Make necessary adjustments to the tracks, audio elements or mix presentation to refine the spatial balance and depth for an immersive, cohesive mix.

### Exporting the Final Mix to IAMF or MP4

The Eclipsa Audio Renderer Plugin provides comprehensive export options to ensure your 3D audio mix is correctly formatted and optimized for immersive playback systems.

1\. Export Options:

* Access the Export settings in the Eclipsa Audio Renderer Plugin to configure your exported Eclipsa Audio by selecting the Export button:<br>

  <figure><img src="https://2064516701-files.gitbook.io/~/files/v0/b/gitbook-x-prod.appspot.com/o/spaces%2FISImAXhuTi4GI5slDrH1%2Fuploads%2FSsywV3g8T5acjR2JSBl2%2FExport.gif?alt=media&amp;token=9213f09b-13a5-47bb-ae2a-1ea722f32ea1" alt=""><figcaption></figcaption></figure>
* To export audio, first enable audio export by enabling "Export audio".

<figure><img src="https://2064516701-files.gitbook.io/~/files/v0/b/gitbook-x-prod.appspot.com/o/spaces%2FISImAXhuTi4GI5slDrH1%2Fuploads%2FZo91pFlZ0Da1yUHtDBUX%2FScreenshot%202026-01-12%20at%202.15.09%E2%80%AFPM.png?alt=media&amp;token=6899c9d6-8d14-4465-b615-95572fbe073b" alt=""><figcaption></figcaption></figure>

* Set the following export options if needed:

  * Save Audio To: Specify the output IAMF file to be written
  * Export audio elements as WAV: Allows for export of individual audio elements as WAV files. Audio element WAV files are exported to the same directory the IAMF file will be written to.
  * Start and End: Define the export duration to control which sections of the mix are rendered. If left as 0, all audio will be exported.
    * Select H:M:S to specify start and end time in an Hours:Minutes:Seconds format
    * Select Barts to specify start and end time in the Bars:Beats format
    * Select TC to specify start and end time using the Timecode format
  * File Format: Choose between IAMF and WAV for export.
  * Codec, Bit Depth and Other Codec Specific Parameters: Select from supported codecs and bit depths to meet your playback requirements.

2. Audio and Video Muxing

* Enable Mux video to combine IAMF audio with video to produce Eclipsa Audio compatible MP4 files
* Video Source: The input .mov or .mp4 file to attach IAMF audio to.
* Save video to: The output .mp4 file to have IAMF audio attached to it.<br>

***

<mark style="color:yellow;">**Note:**</mark> When using the Mux option to combining audio with video, the original audio of the video file will be overwritten by the IAMF audio in the output video file.

***

3. Exporting the Final Mix:

* Once you are satisfied with the mix and configured the export options you can render your DAW's bounce or export functionality. This process maintains the spatial characteristics and integrity of your 3D audio mix.
* To export a mix:
  * Ensure the “Export Audio” option is enabled and all export parameters are set in the Eclipsa Audio Renderer plugin

{% tabs %}
{% tab title="Avid ProTools" %}

### Use the Bounce Functionality in Avid ProTools

* Navigate to File > Bounce Mix
* Select the appropriate output settings for your mix
* After configuring the settings, click Bounce to start the export process.
* Pro Tools will process the mix and save the bounced file in the designated output folder.

<figure><img src="https://2064516701-files.gitbook.io/~/files/v0/b/gitbook-x-prod.appspot.com/o/spaces%2FISImAXhuTi4GI5slDrH1%2Fuploads%2FREc4jYi4LAhEzh9Hx6sA%2FScreenshot%202025-06-02%20at%2012.06.28%E2%80%AFPM.png?alt=media&amp;token=dd94311a-a273-47e3-a21f-13276a335dc7" alt=""><figcaption><p>Open the "Bounce Mix" UI via File --> Bounce Mix, then set the ProTools MP3 output info and select "Bounce"</p></figcaption></figure>
{% endtab %}

{% tab title="REAPER" %}

### Use the "Render" functionality in REAPER

* Navigate to File --> Render...
* Select the appropriate output settings for your mix
* After configuring the settings, click "Render # file"
* REAPER will process the mix and save the rendered audio file(s) in the designated output folder.

<figure><img src="https://2064516701-files.gitbook.io/~/files/v0/b/gitbook-x-prod.appspot.com/o/spaces%2FISImAXhuTi4GI5slDrH1%2Fuploads%2FB2ebQtWK8ixsAIbDLcac%2FScreenshot%202025-06-02%20at%2012.15.02%E2%80%AFPM.png?alt=media&amp;token=1720d090-d44a-4d48-a48b-b75d04b13ff8" alt="" width="563"><figcaption><p>Open the "Render" UI by selecting File --> Render, then set the render information and select "Render 1 file"</p></figcaption></figure>
{% endtab %}

{% tab title="Adobe Premiere Pro" %}

### Use the "Export" functionality in Adobe Premiere Pro

***

<mark style="color:yellow;">**Note:**</mark> Currently, only Waveform Audio (.wav) and Quicktime (.mov) are supported as export types for IAMF files. For exporting video as well as audio, export .mov video first, then use the mux option to combine video and IAMF audio in a separate export.

***

* Go to the Eclipsa Audio Renderer "Export" screen and select the "Start Export" button
* In Adobe Premiere Pro, select "Export" at the top of the screen
* Change the export format to "Waveform Audio"
* Configure the export path as required and click the "Export" button to export the audio file

<figure><img src="https://2064516701-files.gitbook.io/~/files/v0/b/gitbook-x-prod.appspot.com/o/spaces%2FISImAXhuTi4GI5slDrH1%2Fuploads%2F7ujY6tf0XS3OBu8omDOe%2FScreenshot%202025-06-24%20at%2012.20.07%E2%80%AFPM.png?alt=media&amp;token=3ae07911-a67d-4db9-9545-435b2d2e7577" alt=""><figcaption><p>Set "Format" to "Waveform Audio" before Exporting</p></figcaption></figure>

* Return to the Eclipsa Audio Renderer "Export" screen and select the "Stop Export" button
  {% endtab %}

{% tab title="Logic Pro" %}

### Use the Bounce Functionality in Logic Pro

* Navigate to File > Bounce Project or Section
* Select the appropriate output settings for your mix
* After configuring the settings, click OK to start the export process.
* Logic Pro will process the mix and save the bounced file in the designated output folder.<br>

  <figure><img src="https://2064516701-files.gitbook.io/~/files/v0/b/gitbook-x-prod.appspot.com/o/spaces%2FISImAXhuTi4GI5slDrH1%2Fuploads%2F87LvT44ZXK3BuxtWt1jr%2Fimage.png?alt=media&amp;token=cc887b3e-72ed-4bcb-8481-1dc5ebbb94ef" alt=""><figcaption></figcaption></figure>

{% endtab %}
{% endtabs %}

After the bounce is complete, locate the exported IAMF audio file and/or exported Audio Element WAV files or MP4 files in the output folder(s) specified in the Eclipsa Renderer plugin.

***

<mark style="color:yellow;">**Note:**</mark> The Eclipsa Renderer Plugin's export process runs in parallel to the DAW's own export process. This means the DAW must export an audio file in order for an IAMF audio file to be created. In some cases the export may slow at 99%-100% completion as the Eclipsa Renderer Plugin consolidates audio elements into an IAMF audio file due to the DAW not taking this process into account when predicting export time.

***

<mark style="color:yellow;">**Note:**</mark> The export settings configured in your DAW are not directly used by the Eclipsa Renderer Plugin during the bounce process. Only information and paths specified in the plug-in itself will be used when outputting the IAMF audio file or combining IAMF audio with video.&#x20;

***

### Validating Exported Eclipsa Mixes

After export has completed IAMF files can be validated using the built-in IAMF file player on the export screen.

Exported files are automatically loaded into the player and are ready for playback after export completes. Files can be played back using the provided play/pause/stop controls and seek bar. If needed, preexisting files can be loaded into the player as well by selecting them as an export target. Audio is played back on the audio device selected in the audio device drop down.

<figure><img src="https://2064516701-files.gitbook.io/~/files/v0/b/gitbook-x-prod.appspot.com/o/spaces%2FISImAXhuTi4GI5slDrH1%2Fuploads%2FhL7PPk7GfUrdAO6afdfW%2FScreenshot%202025-10-27%20at%203.07.18%E2%80%AFPM.png?alt=media&amp;token=0cdf937a-f3d7-4e9e-8390-065a5ba7accc" alt=""><figcaption><p>IAMF files selected for export will automatically be made available for validation playback</p></figcaption></figure>

Normally Eclipsa Audio players select a mix presentation based on the listeners speaker layout (see: [Getting Started](/getting-started#creating-mix-presentations)). The file validation player can simulate different speaker layouts by selecting a different target layout in the speaker target layout drop down. Simulate different speaker layouts to ensure the correct mix presentation will be automatically selected for different target speaker layouts.

***

<mark style="color:yellow;">**Note:**</mark> The validation player allows for the selection of different audio devices, however the selected audio device is not used to determine the mix presentation played back.

***


# Eclipsa Audio Element Plugin Features: Routing and Monitoring Eclipsa Audio

Explore how to route, monitor, and spatialize audio using the Eclipsa Audio Element Plugin by assigning audio elements and configuring output modes.

## Eclipsa Audio Element Plugin Guide

The Eclipsa Audio Element plugin enabled you to monitor spatialized audio as well as routes audio element audio to the Eclipsa Audio Renderer plugin. This plugin allows for assignment of audio elements to audio in your mix.

***

<mark style="color:yellow;">**Note:**</mark> In order to successfully spatialize audio, all audio must pass through an Eclipsa Audio Element plugin in order to be rendered by the Eclipsa Audio Renderer plugin. This typically means that each track in a mix must have an Eclipsa Audio Element plugin on it before iits audio is sent to the mix bus.

***

### Setting Up the Eclipsa Audio Element Plugin

First, add the Eclipsa Audio Element Plugin to an audio track:

{% tabs %}
{% tab title="Avid ProTools" %}
Choose a track and under "Inserts" select "plug-in" --> "Sound Field" --> "Eclipsa Audio Element Plugin"

<figure><img src="https://2064516701-files.gitbook.io/~/files/v0/b/gitbook-x-prod.appspot.com/o/spaces%2FISImAXhuTi4GI5slDrH1%2Fuploads%2FDchGeol8usgi2uaJATts%2FEclipsaAudioElementPluginSelect.png?alt=media&amp;token=1557b9bd-b6c3-413a-82e8-96d42fd43b81" alt=""><figcaption><p>Select "plug-in" --> "Sound Field" --> "Eclipsa Audio Element Plugin"</p></figcaption></figure>
{% endtab %}

{% tab title="REAPER" %}
Choose a track and select "FX", then under "VST3" select the "VST3: Eclipsa Audio Element Plugin"

<figure><img src="https://2064516701-files.gitbook.io/~/files/v0/b/gitbook-x-prod.appspot.com/o/spaces%2FISImAXhuTi4GI5slDrH1%2Fuploads%2FB9ERXE0nnbwRnGVhj8NK%2FScreenshot%202025-05-26%20at%2011.19.02%E2%80%AFAM.png?alt=media&amp;token=1b5e4280-4d4f-45fe-9a11-e8b951d6ee48" alt=""><figcaption><p>Select "FX" then "VST3" --> "VST3: Eclipsa Audio Element Plugin (Eclipsa Project)"</p></figcaption></figure>
{% endtab %}

{% tab title="Adobe Premiere Pro" %}
Open the "Audio Track Mixer" window and select the track to add the Eclipsa Audio Element Plugin to.

In the fx list for the track select "AU" --> "Eclipsa Project" --> "Eclipsa Audio Element Plugin".

<figure><img src="https://2064516701-files.gitbook.io/~/files/v0/b/gitbook-x-prod.appspot.com/o/spaces%2FISImAXhuTi4GI5slDrH1%2Fuploads%2FkRCCfCHpdTxfgw34wqdV%2FScreenshot%202025-06-24%20at%202.17.31%E2%80%AFPM.png?alt=media&amp;token=e4d859a9-a60d-4d26-a58f-c777b89949a4" alt=""><figcaption><p>In the fx table select "AU" --> "Eclipsa Project" --> "Eclipsa Audio Element Plugin"</p></figcaption></figure>
{% endtab %}

{% tab title="Logic Pro" %}
On your audio track, click on an empty insert slot.

Navigate to: **Audio Units** → **Audio Units Effects** → **Manufacturer: Eclipsa Project** → **Eclipsa Audio Element Plugin**

<figure><img src="https://2064516701-files.gitbook.io/~/files/v0/b/gitbook-x-prod.appspot.com/o/spaces%2FISImAXhuTi4GI5slDrH1%2Fuploads%2Fp9rlbZXMKDr558VxgmaK%2Fimage.png?alt=media&amp;token=efb1e4b3-f188-4584-83f4-4d6d9482687d" alt=""><figcaption></figcaption></figure>
{% endtab %}
{% endtabs %}

1. Set the name of the audio track in the Eclipsa Audio Element Plugin if desired.
2. Select the Audio Element you wish to use with your track in the Audio Element dropdown.

<figure><img src="https://2064516701-files.gitbook.io/~/files/v0/b/gitbook-x-prod.appspot.com/o/spaces%2FISImAXhuTi4GI5slDrH1%2Fuploads%2Fa379DEgvS1PwzRHcYVDd%2FName%20%26%20AE.gif?alt=media&amp;token=3b098229-ce5b-47ab-bdf5-2bcab4fd6ce2" alt=""><figcaption></figcaption></figure>

Finally, ensure the tracks audio is sent to the audio bus containing the Eclipsa Audio Renderer Plugin.

{% tabs %}
{% tab title="Avid ProTools" %}
Configure a send from the track the Eclipsa Audio Element Plugin is on to the track the Eclipsa Audio Renderer Plugin is on.

One way to do this is by selecting "Sends" --> "track" and then selecting the track hosting the Eclipsa Audio Renderer Plugin, typically the "Mix Bus" track.

<figure><img src="https://2064516701-files.gitbook.io/~/files/v0/b/gitbook-x-prod.appspot.com/o/spaces%2FISImAXhuTi4GI5slDrH1%2Fuploads%2FTzTpYQFA5PAUJlbOTeHU%2FScreenshot%202025-05-26%20at%2011.32.05%E2%80%AFAM.png?alt=media&amp;token=1efd6299-79b4-471f-b4b8-5fcbb207929e" alt=""><figcaption><p>Under "Sends A-E" select "track" --> "Mix Bus(5th Order Ambisonics)"</p></figcaption></figure>
{% endtab %}

{% tab title="REAPER" %}
By default, REAPER configures plugin output to stereo, so we need to increase the number of channels available to the plugin for audio output. This can be done one of two ways:

* **Simplified:** Increase channels to a value greater than 28, which is the maximum number of channels IAMF uses.
* **Advanced:** Increase channels only to the number required by the plug-ins audio element. The number of channels and there indexes can be found in the Eclipsa Audio Renderer Plugin on the "Reroute" page. For example, if you have an audio element which requires channels 3-8, the Eclipsa Audio Element plugin will require access to those channels, which means the channels must be increased to 8.

To increase the channels:

* In the top right corner, select the REAPER pin connector routing button
* Change the "Track channels" and "VST3 bus size" to 32 as 32 is the smallest available bus size for the required 28 channels.

<figure><img src="https://2064516701-files.gitbook.io/~/files/v0/b/gitbook-x-prod.appspot.com/o/spaces%2FISImAXhuTi4GI5slDrH1%2Fuploads%2FduaZmhAR8dJjvXQLJdlH%2FScreenshot%202025-05-26%20at%2012.19.49%E2%80%AFPM.png?alt=media&amp;token=fd190f20-284c-4b94-a619-73bcab7c76ab" alt=""><figcaption><p>Select REAPER routing and then update "Track channels" and "VST3 bus size"</p></figcaption></figure>

***

<mark style="color:yellow;">**Note:**</mark> The Eclipsa Audio Element plugin in REAPER supports a maximum of 16 channels in, as the largest possible audio element is 16 channels.

***

{% endtab %}

{% tab title="Adobe Premiere Pro" %}
By default, in Adobe Premiere Pro, audio channels are automatically forwarded from individual tracks to the Mix track.

Ensure audio is forwarded correctly by verifying that the bus target for tracks with the Eclipsa Audio Element Plugin is "Mix"

<figure><img src="https://2064516701-files.gitbook.io/~/files/v0/b/gitbook-x-prod.appspot.com/o/spaces%2FISImAXhuTi4GI5slDrH1%2Fuploads%2FIwPbmcqFuhGOKdnJa6YY%2FScreenshot%202025-06-24%20at%202.14.25%E2%80%AFPM.png?alt=media&amp;token=7be16b1b-036e-4776-94c6-085fbafb1510" alt=""><figcaption><p>Ensure track audio is sent to the Mix track</p></figcaption></figure>
{% endtab %}

{% tab title="Logic Pro" %}
By default, in Logic Pro, audio channels are automatically forwarded from individual tracks to the Master track. No additional work is necessary.
{% endtab %}
{% endtabs %}

### Monitoring Audio Playback In the Room View

The room view in the Eclipsa Audio Element Plugin provides a real-time visualization of the audio playback of audio on a specific track, and how it will be renderer to the selected audio element.

* View the loudness in 3D space by observing what speakers in the room have audio
* Monitor individual channel loudnesses and mute or solo these individual channels
* Observe the binaural loudness of the track
* Track the ITU loudness of the track

<figure><img src="https://2064516701-files.gitbook.io/~/files/v0/b/gitbook-x-prod.appspot.com/o/spaces%2FISImAXhuTi4GI5slDrH1%2Fuploads%2FtRsgfZqjcT3KxZJm1zBn%2FAudioElementMonitoring.png?alt=media&amp;token=5631316f-01a1-4831-bf78-3cf4ffb48c88" alt=""><figcaption><p>Monitoring a Channel Audio Element</p></figcaption></figure>

For Ambisonic audio elements, ambisonics energy spheres are used to display the loudness instead of channels. Note that for ambisonic audio elements it is not possible to mute individual channels.

<figure><img src="https://2064516701-files.gitbook.io/~/files/v0/b/gitbook-x-prod.appspot.com/o/spaces%2FISImAXhuTi4GI5slDrH1%2Fuploads%2FV9qyeUGq7wNokTkwwGH6%2FAmbisonicMonitoring.png?alt=media&amp;token=919fe479-a722-4e3f-9ff4-87c1c19742cb" alt=""><figcaption><p>Monitoring an Ambisonic Audio Element</p></figcaption></figure>

### Panning and Passthrough Output Modes

The Eclipsa Audio Element Plugin features 2 Output Modes:

* **Passthrough Mode** is the default mode and is used when the Simple 3D Audio Panning is disabled
  * In passthrough mode, audio is directly mapped from the incoming channels to the outgoing channels using a 1-1 mapping
  * If the incoming audio and audio element type match, the incoming channels will be mapped on to the matching audio element channels.
    * Eg: If the incoming audio is 5.1 and a 5.1 speaker audio element is used, the 5.1 incoming audio will be mapped to the 5.1 channels of the audio element
  * If the incoming audio and audio element type do not match, the incoming channels will simply be mapped directly across to the audio element channels. Extra incoming channels will be discarded.
    * Eg: If the incoming audio is stereo and a 5.1 speaker audio element is used, the stereo audio will be mapped to the first two channels of the 5.1 speaker audio element.
* **Panning Mode** is used when the Simple 3D Audio Panning is enabled
  * In panning mode, audio is panned to all channels of the selected audio element.
  * The audio on the first channel, typically the Left speaker channel, is panned to the selected audio elements channels.
  * Use panning mode when you want to mix a track to a specific audio element layout.
  * Enable panning mode by enabling the "Panning Controls" in the top right corner.

### Handling Multiple Tracks With One Eclipsa Audio Element Plugin

While most projects will want an Eclipsa Audio Element plugin on all tracks, there are some cases where the number of Eclipsa Audio Element plugins needed can be reduced.

#### Using A Single Audio Element and Single Eclipsa Audio Element Plugin

* If only 1 Audio Element is required, the Eclipsa Audio Element Plugin can be placed on the mix bus directly before the Eclipsa Audio Renderer Plugin.
* In this case, all audio on the mix is assigned to a single audio element

#### Combining Tracks With Sub-Busses

* If there are many tracks assigned to the same audio element, you may consider creating a separate bus for these tracks
* The Eclipsa Audio Element plugin can then be placed on this separate bus
* Audio for these tracks can be sent to this separate bus and audio from this separate bus can then be sent to the main mix bus
* Sub-Busses is an advanced feature and may not be available in all DAW's. Configuring sub-busses is beyond the scope of this document.

***

<mark style="color:yellow;">**Note:**</mark> An Audio Element Plugin is required on each track or at some point along the track’s signal path to ensure proper spatial rendering of the audio.

***


# Eclipsa Audio Element Plugin: Simple 3D Audio Panning

Learn how to use Simple 3D Audio Panning in the Eclipsa Audio Element Plugin to position mono audio tracks in 3D space with intuitive X, Y, Z controls.

## Simple 3D Audio Panning

The Eclipsa Audio Element Plugin provides a 3D Audio Panning feature which allows for simplistic audio panning. This feature is meant to help those who are looking for a simplified panning experience or are unfamiliar with the panning tools offered by the DAW.

***

<mark style="color:yellow;">**Note:**</mark> Simple 3D Audio Panning pans a single mono track to the selected audio element's speaker layout. If a track has more than one channel, only the first channel is panned, typically the Left speaker.

***

### **How to Use the 3D Audio Panning**

**1. Add the Eclipsa Audio Element Plugin to the track you wish to pan**

* Open your session and select the audio track to be panned.
* Insert and configure the Eclipsa Audio Element plugin as detailed in [Eclipsa Audio Element Plugin Features](/eclipsa-audio-element-plugin-features-routing-and-monitoring-eclipsa-audio#setting-up-the-eclipsa-audio-element-plugin)

**2. Enable the panning controls and configure panned audio**

* Enable the panning controls by clicking the "Panning Controls" toggle in the top right corner
* Ensure the that Eclipsa Audio Element Plugin's Output Mode is "Panning Mode"
* Ensure the correct audio is being panned:
  * The Simple 3D Audio Panning only takes audio from the first channel on a track. On non-mono tracks, this is typically the Left speaker.
  * If this is not the audio you wish to pan, use an external down-mixer, external panner, or routing controls to ensure the correct audio is on the first channel of the track.

**2. Adjust the X, Y, and Z Coordinates:**

* Once the panning controls are active, a control panel will be displayed with options to adjust the X (left-right), Y (front-back), and Z (up-down) coordinates of your sound element in 3D space.
* The Audio Element Plugin interface provides a 3D space view that visually shows where your audio playback is located in 3D space. By default, audio is placed at (0,0,0)
* A blue dot indicates where in 3D space your track has been placed<br>

  <figure><img src="https://2064516701-files.gitbook.io/~/files/v0/b/gitbook-x-prod.appspot.com/o/spaces%2FISImAXhuTi4GI5slDrH1%2Fuploads%2Fh2vOIwPCm95iYpgPHEEg%2FPanningControlsEnabled.png?alt=media&amp;token=560c628f-44d4-489e-86fd-dea6ddce791d" alt=""><figcaption><p>Eclipsa Audio Element Plugin with Panning Controls Enabled</p></figcaption></figure>
* X Coordinate: Controls the left-right position of your sound object within the 3D space.
* Y Coordinate: Adjusts the depth or front-back placement, bringing sounds closer or moving them farther away.
* Z Coordinate: Alters the height of the sound object, allowing you to place it above or below the listener’s perspective.
* As you make adjustments, the audio element’s position will update in real-time.
* For example:
  * Moving the X to the right increases its loudness on the right side as shown below.
  * &#x20;Moving X to the left will make it louder on the left side.
  * Similarly, adjusting the Y and Z coordinates will shift the audio’s depth and height, allowing you to create realistic and dynamic audio movements.\ <br>

    <figure><img src="https://2064516701-files.gitbook.io/~/files/v0/b/gitbook-x-prod.appspot.com/o/spaces%2FISImAXhuTi4GI5slDrH1%2Fuploads%2FPWUHcErcRqsuwh4L27yV%2FPannedRight.png?alt=media&amp;token=43dadcb5-ef68-4125-b09b-828483589950" alt=""><figcaption><p>Audio Moved to the Right Side Plays Back on the Right Side Speakers</p></figcaption></figure>

    <figure><img src="https://2064516701-files.gitbook.io/~/files/v0/b/gitbook-x-prod.appspot.com/o/spaces%2FISImAXhuTi4GI5slDrH1%2Fuploads%2FJohLo2RL2z8g798kCefO%2FPannedTop.png?alt=media&amp;token=e3609286-94e1-49df-87e4-0b32f881cefa" alt=""><figcaption><p>Audio Moved to the Front Top Plays Back on the Top Front Speaker</p></figcaption></figure>

### Using the Roof Feature

The Roof feature provides additional control for moving sound objects vertically within a roof-like 3D structure, enhancing spatial realism for overhead sounds or rising/falling effects.

#### Enabling and Using the Roof Feature

* In the Audio Element Plugin interface, locate the option to enable the Roof feature, located below the room view. Note that a variety of different roof shapes are provided (e.g., Tent, Dome, Curved, Flat).
* Once activated, the selected roof structure will appear in the 3D visualizer as shown below and the Z-coordinate dial will become disabled.
* Adjusting the X coordinate (left-right movement) and Y coordinate (front-back movement) will now also influence the Z coordinate in order to ensure the audio object follows the selected roof.
* As you move the object closer to the listener (increase Y) or farther away (decrease Y), the object will slide along the roof. The Z-value will automatically be computed to keep the panned object moving along the roof.
* The visualizer will display the height changes in real time, helping you better understand how the audio element moves both horizontally and vertically within the space.

<figure><img src="https://2064516701-files.gitbook.io/~/files/v0/b/gitbook-x-prod.appspot.com/o/spaces%2FISImAXhuTi4GI5slDrH1%2Fuploads%2FhjVYzbsRH47qOZPcOLC9%2FPanningWithRoof.png?alt=media&amp;token=2701f9b0-f4c8-4daf-9ea2-9a818dedc6fb" alt=""><figcaption><p>Panning with the Dome Roof Enabled</p></figcaption></figure>

#### When to Use the Roof Feature

* Use this feature to more precisely place sound elements or for sound elements that need dynamic vertical movement, such as overhead sounds or sound effects that rise or fall within the 3D environment.
* See [Automated Panning](/eclipsa-audio-renderer-plugin-features-configuring-monitoring-and-exporting-eclipsa-audio) to better understand how to move sound elements over time using the Eclipsa Audio Element plugin.

#### Disabling the Roof Feature

* If you do not need height adjustments, you can turn off the roof feature by toggling the feature off. The Z value will remain fixed unless manually adjusted.

### **Monitoring Playback and Loudness**

* The Eclipsa Audio Element Plugin provides speaker monitoring information showing the individual loudness of each speaker as well as loudness when played back to binaural headphones.
* Individual speakers can be soloed/muted as needed to better understand track playback.
* Loudness Standard information is also provided in the top right corner for determining the exact loudness of the panned track.
* Use this visual feedback to ensure that your sounds are the correct volume on the track.
* To more accurately understand how multiple tracks are placed in 3D, the Eclipsa Audio Renderer Plugin Room View can display the locations of all panned tracks by enabling the "Tracks" view

<figure><img src="https://2064516701-files.gitbook.io/~/files/v0/b/gitbook-x-prod.appspot.com/o/spaces%2FISImAXhuTi4GI5slDrH1%2Fuploads%2FzoR4gF5lAHa85ypVxaDs%2FScreenshot_RoomPlayback.png?alt=media&amp;token=50013574-f542-47d1-b479-eb7016abf028" alt=""><figcaption><p>Panned tracks are visible in the room view to help understand there relation to other panned tracks</p></figcaption></figure>


# Eclipsa Audio Element Plugin: Automating Audio Panning

Learn how to automate 3D audio movement using the Eclipsa Audio Element Plugin to create dynamic, immersive sound with position-based keyframe control.

***

<mark style="color:yellow;">**Note:**</mark> Automating audio panning may not be available in all DAWs.

***

## Automated 3D Movement With Audio Panning

One of the key features of the Eclipsa Audio Element Plugin's audio panning is the ability to automate the movement of sound elements in 3D space. Automation adds dynamic motion to your audio, enhancing the immersive experience.

{% tabs %}
{% tab title="Avid ProTools" %}
**1. Open the Automation Dialog**

* Right-click on the Audio Element Plugin interface and select the **Automation Dialog**.\
  ![](https://2064516701-files.gitbook.io/~/files/v0/b/gitbook-x-prod.appspot.com/o/spaces%2FISImAXhuTi4GI5slDrH1%2Fuploads%2FWlHz6lpX5JTDxWbJ5wv3%2Fimage.png?alt=media\&token=70c83682-06f1-409b-a24e-53ad7e3279d9)
* In the dialog box, choose the parameter you wish to automate. For instance, select the **Y position** (front-back movement) to automate depth.\
  ![](https://2064516701-files.gitbook.io/~/files/v0/b/gitbook-x-prod.appspot.com/o/spaces%2FISImAXhuTi4GI5slDrH1%2Fuploads%2FS8IPPWqeCwoDHcwd9C3S%2FAutomationSelection.png?alt=media\&token=a9fbbba5-b3b5-4636-a95a-3ae2d1bab0b3)
* Once you have selected the position to automate, add it to the automation list for the plugin. This makes the parameter available for automation in Pro Tools.

**2. Set Up Automation**

* Right-click on the track and select the Track View Dropdown (by default "waveform" is selected) and select Eclipsa Audio Element Plugin --> Variable to display the automation lane for the variable. In this example we select Y for the Y-position.\
  ![](https://2064516701-files.gitbook.io/~/files/v0/b/gitbook-x-prod.appspot.com/o/spaces%2FISImAXhuTi4GI5slDrH1%2Fuploads%2FqxXIM44FVRvcmYoGd00Y%2FSelectYAutomation.png?alt=media\&token=3849ffae-6a54-48ce-b64c-11cba656f188)
* A black line will appear representing the position of the variable over time.\
  ![](https://2064516701-files.gitbook.io/~/files/v0/b/gitbook-x-prod.appspot.com/o/spaces%2FISImAXhuTi4GI5slDrH1%2Fuploads%2F4c5MV0nKQrTWu1IgdRwM%2Fimage.png?alt=media\&token=f3f1e44f-71e7-4ddd-9ae9-74e6dd8e7ff0)

**3. Modify the Automation**

* Use the **Grabber Tool** (or any other editing tool) to add keyframes and adjust the variable position over time. For example:
  * Move the sound forward by setting the Y position to -50 at the beginning of the automation.
  * Move it backward by setting the Y position to +50 at the end of the automation.\
    ![](https://2064516701-files.gitbook.io/~/files/v0/b/gitbook-x-prod.appspot.com/o/spaces%2FISImAXhuTi4GI5slDrH1%2Fuploads%2FcrY0hIBAeWp9OSEyhklf%2Fimage.png?alt=media\&token=e5777974-6e7f-4445-91a3-e6d6011d7692)
* Similarly other automation tools or recording hardware can be used to set the automation values. The use of these other tools is outside the scope of this document.
  {% endtab %}

{% tab title="REAPER" %}
**1. Add the parameter to the track envelope**

* Open the plug-in UI and in the top right corner select "Param"
* Select "Show track envelope", then the position variable to be automated. In this example we select Y for the Y position

<figure><img src="https://2064516701-files.gitbook.io/~/files/v0/b/gitbook-x-prod.appspot.com/o/spaces%2FISImAXhuTi4GI5slDrH1%2Fuploads%2Fnsr4zAb60Xp3ORfnsJZw%2FScreenshot%202025-06-02%20at%203.48.44%E2%80%AFPM.png?alt=media&amp;token=643585f5-dd43-485d-814b-cfa8305d403a" alt=""><figcaption><p>Select "Param" --> "Show track envelope" --> "Y"</p></figcaption></figure>

**2. Add a keyframe to the envelope**

* Return to the track view, and you should see the envelope controls for the variable under the variables name. In this example, you should see "Y / Eclipsa Audio Element Plugin".
  * If the envelope controls are not visible, click on the variable dial and select "Show envelope"
* Right click the automation track at the point you wish to add a keyframe and select "Insert point"

<figure><img src="https://2064516701-files.gitbook.io/~/files/v0/b/gitbook-x-prod.appspot.com/o/spaces%2FISImAXhuTi4GI5slDrH1%2Fuploads%2FQaNExFeb4uapciFSg8dE%2FScreenshot%202025-06-02%20at%203.53.41%E2%80%AFPM.png?alt=media&amp;token=c9f824ca-f2d9-4f2b-9d50-a21d24cc6f6a" alt=""><figcaption><p>Right-click the envelope and select "Inert point" to add a keyframe</p></figcaption></figure>

**3. Adjust the parameter value**

* Click on the inserted point and drag it up or down to adjust the variable.
* Add additional keyframes to specify the value at specific points or the rate of change of the variable.

<figure><img src="https://2064516701-files.gitbook.io/~/files/v0/b/gitbook-x-prod.appspot.com/o/spaces%2FISImAXhuTi4GI5slDrH1%2Fuploads%2FZgvF4TuNJsfR9PHxFGOq%2FScreenshot%202025-06-02%20at%203.55.54%E2%80%AFPM.png?alt=media&amp;token=997a9b8d-8fa3-4541-b4c1-0eeaedc681c4" alt=""><figcaption><p>Use multiple keyframes to adjust the value smoothly over time</p></figcaption></figure>

* You can also use the draw tool to manually add positional changes by holding the command key.
* Similarly other automation tools or recording hardware can be used to set the automation values. The use of these other tools is outside the scope of this document.
  {% endtab %}

{% tab title="Adobe Premiere Pro" %}
Automated audio panning via the Eclipsa Audio Element Plugin is not officially supported for Adobe Premiere Pro.

Note that Adobe Premiere Pro does have support for parameter automation, but automating the  Eclipsa Audio Element Plugin parameters can result in glitchy or lossy audio.
{% endtab %}

{% tab title="Logic Pro" %}
**1. Enable Automation in Logic Pro**

* Select Mix --> Show Automation

<figure><img src="https://2064516701-files.gitbook.io/~/files/v0/b/gitbook-x-prod.appspot.com/o/spaces%2FISImAXhuTi4GI5slDrH1%2Fuploads%2FOheMpP9ACatSujwNUOfp%2FScreenshot%202025-10-28%20at%203.11.24%E2%80%AFPM.png?alt=media&amp;token=da58f48f-0e3b-4452-9dd6-0636cfa89096" alt=""><figcaption><p>Enable Automation with Mix --> Show Automation</p></figcaption></figure>

**2. Select the Parameter to Automate**

* On a track with an audio element, select the Eclipsa Audio Element plugin in the automation dropdown
* Select the dimension to be automated

<figure><img src="https://2064516701-files.gitbook.io/~/files/v0/b/gitbook-x-prod.appspot.com/o/spaces%2FISImAXhuTi4GI5slDrH1%2Fuploads%2FMbzkHriQrnQByBzsumi3%2FScreenshot%202025-10-28%20at%203.11.50%E2%80%AFPM.png?alt=media&amp;token=b79f510b-02ce-40e8-994b-3e706cc91b3c" alt=""><figcaption><p>On the track, select the yellow automation dropdown --> Eclipsa --> dimension</p></figcaption></figure>

**3. Change the automation parameter to "Touch" or "Write"**

* In the green dropdown, change the automation mode to a write mode such as Touch or Write
* Select the track
* Set the values of the parameter by modifying the tracks automation curve as desired using either touch or write mode

<figure><img src="https://2064516701-files.gitbook.io/~/files/v0/b/gitbook-x-prod.appspot.com/o/spaces%2FISImAXhuTi4GI5slDrH1%2Fuploads%2Fym4vhnJwUMz8FEhsKHi8%2FScreenshot%202025-10-28%20at%203.16.13%E2%80%AFPM.png?alt=media&amp;token=574c16e8-58ce-4007-803a-8bfe57ac4ed2" alt=""><figcaption><p>Set the dimensions parameters on the displayed automation curve</p></figcaption></figure>
{% endtab %}
{% endtabs %}

### **Automating Multiple Parameters**

* You can automate the Y (forward-backward), X (left-right) and Z (up-down) positions. This allows for complex movements, such as an audio object moving diagonally or spiralling within the 3D space.
* The [Roof feature](/eclipsa-audio-element-plugin-simple-3d-audio-panning#using-the-roof-feature) in the Eclipsa Audio Element Plugin can be used to automatically adjust the Z position (up-down) of the panned audio when the Y position (front-back) or the X position (right-left) changes. This can simplify the creation of dynamic vertical movements such as a sound passing overhead. Alternatively, you can directly automate the Z position for precise height control.

### **Playback and Refinement**

* As you play the session, observe the sound moving forward and backward based on the automation. Depending on the DAW, movement can be refined by using additional keyframes or recording hardware.&#x20;


# Online Tutorials

Online tutorials cover much of the information in this documentation alongside walkthroughs of plugin functionality.

### Introductory Tutorials

* [Getting Started with Eclipsa and Walkthrough of Plugin Features on Avid Pro Tools](https://www.youtube.com/watch?v=Tss3dCbCXmE)
* [Using the Plugin in Adobe Premiere Pro](https://www.youtube.com/watch?v=MHwBmuKYOb4)<br>


# Release Notes

Release notes for Eclipsa Audio Plugins with detailed version updates, new features, enhancements, and bug fixes.

The latest version can be downloaded from the [Eclipsa Audio Plugins website](https://www.eclipsaapp.com/) <br>

***

## Version - 1.4.5 Beta

August 13, 2026

This maintenance release focuses on adding better feedback during export failures, as well as resolving the Windows Home installer failure.

Fixed Issues:

* Export fails silently if an error occurs during writing ([#120](https://github.com/google/eclipsa-audio-plugin/pull/120))
* AAX and VST3 Plug-in fails to start on Windows Home ([#116](https://github.com/google/eclipsa-audio-plugin/issues/116))
* WAV file writing fails silently if an error occurs in the WAV file writer ([#121](https://github.com/google/eclipsa-audio-plugin/pull/121))
* No feedback when Audio and Video length are mismatched during a mux ([#122](https://github.com/google/eclipsa-audio-plugin/pull/122))
* WAV Audio elements are always exported but rarely needed ([#118](https://github.com/google/eclipsa-audio-plugin/pull/118))

***

## Version - 1.4.4 Beta

June 29, 2026

This maintenance release adds LFE elements and binaural playback support. It also resolves an issue with OPUS export audio corruption.

New Features:

* Added support for LFE audio elements ( [#113](https://github.com/google/eclipsa-audio-plugin/pull/113) )
  * LFE audio elements use pass-through mode, explicitly allowing LFE audio effects in the mix
* Binaural playback in validation ( [#112](https://github.com/google/eclipsa-audio-plugin/pull/112) )
  * When using the exported file validation player, you can now select binaural as one of the playback layouts

Fixed Issues:

* OPUS export sometimes adds audio artifacts ( [#111](https://github.com/google/eclipsa-audio-plugin/pull/111) )
* Users accidentally disable binaural playback of mixes ( [#114](https://github.com/google/eclipsa-audio-plugin/pull/114) )
* Files aren't saved in cases where Logic Pro is installed using the App Store ( [#115](https://github.com/google/eclipsa-audio-plugin/pull/115) )

Known Issues:

* VST3 plugin fails to start on Windows 10 and 11 Home Edition ( [#116](https://github.com/google/eclipsa-audio-plugin/issues/116) )

***

## Version - 1.4.3 Beta

April 30, 2026

This maintenance release targets additional performance improvements, addresses export-related behaviour, and adds indicators for YouTube supported content.

Fixed Issues:

* IAMF player takes an excessive amount of time to probe file length (<https://github.com/google/eclipsa-audio-plugin/pull/109>)
* Configured export timestamps don't persist in UI (<https://github.com/google/eclipsa-audio-plugin/pull/106>)
* Muxed video length set by audio track when it should be set by video track (<https://github.com/google/eclipsa-audio-plugin/pull/108>)
* IAMF profiles now indicate when YouTube compatible (<https://github.com/google/eclipsa-audio-plugin/pull/107>)

***

## Version - 1.4.2 Beta

February 23, 2026

This maintenance release addresses Pro Tools Ultimate audio corruption and adds significant performance improvements.

Computation of ambisonics visualizers now uses a lighterweight algorithm resulting in a smoother UI experience. Similarly, the true peak computation now uses a more efficient algorithm. These changes reduce resource warnings in hosts and minimize latency in rendering both audio and the UI.

Fixed Issues:

* Plugin causes audio corruption in Pro Tools (<https://github.com/google/eclipsa-audio-plugin/pull/100>)
* Visualization of ambisonics audio elements causes panner UI stuttering (<https://github.com/google/eclipsa-audio-plugin/pull/101>)
* Plugins give resource usage warnings in Pro Tools (<https://github.com/google/eclipsa-audio-plugin/pull/103>)

Known Bugs:&#x20;

* Track positions are not updated until audio is played back (<https://github.com/google/eclipsa-audio-plugin/issues/7>)

***

## Version - 1.4.1 Beta

January 16, 2025

This release is focused on adding Windows support for the REAPER DAW as well as a bug fixes for UI and playback issues.

Note that this release does not contain a fix for audio corruption issues on Avid Pro Tools. Pro Tools users should apply one of the fixes found [here](https://github.com/google/eclipsa-audio-plugin/issues/90) or roll back to v1.2.1.

New Features:

* Windows Support for VST3 on REAPER
  * A Windows specific VST3 installer is available for Windows plugin installation
  * The VST3 plugin has been validated on REAPER.
  * Note that while VST3 support is now available on Windows, the VST3 plugin may not work on DAWs other then REAPER.

Fixed Issues:

* On Windows, adding the Audio Element plugin causes 10-15 seconds of lag (<https://github.com/google/eclipsa-audio-plugin/pull/92>)
* Plugin version is not readily available (<https://github.com/google/eclipsa-audio-plugin/pull/93>)
* It is unclear why audio elements can not be deleted (<https://github.com/google/eclipsa-audio-plugin/pull/94>)
* Pressing enter does not update text boxes (<https://github.com/google/eclipsa-audio-plugin/pull/96>)
* Audio elements not belonging to any mix cause issues during playback on some players (<https://github.com/google/eclipsa-audio-plugin/pull/97>)

Known Bugs:

* On MacOS Pro Tools, played audio may become corrupt when the export validation player is used. A workaround is available. (<https://github.com/google/eclipsa-audio-plugin/issues/90>**)**
* Track positions are not updated until audio is played back (<https://github.com/google/eclipsa-audio-plugin/issues/7>)

***

## Version - 1.4.0 Beta

December 18, 2025

This release is focused on adding Windows support for the Pro Tools DAW as well as a major bug fix for video muxing.

New Features:

* Windows Support for Pro Tools
  * The plugin now supports the Windows version of Avid Pro Tools
  * A Windows specific installer is available for Windows plugin installation
  * Note that for IAMF audio playback via the built-in IAMF player, audio must be played back on a different audio device then the one Pro Tools is playing audio back on, as Pro Tools prevents audio from being played back on audio devices it is currently using

Fixed Issues:

* Muxed videos fail to upload to YouTube if they contain complex mix presentations (<https://github.com/google/eclipsa-audio-plugin/pull/82>)
* Output files can have non-IAMF extensions leading to playback issues (<https://github.com/google/eclipsa-audio-plugin/pull/75>)
* Plugin occasionally crashes when closing the UI (<https://github.com/google/eclipsa-audio-plugin/pull/74>)
* Crashing occurs when using Bluetooth with Premiere Pro

Known Bugs:

* On MacOS ProTools, played audio may become corrupt when the export validation player is used. A workaround is available. (<https://github.com/google/eclipsa-audio-plugin/issues/90>**)**
* Track positions are not updated until audio is played back (<https://github.com/google/eclipsa-audio-plugin/issues/7>)

***

## Version - 1.3.1 Beta

November 17, 2025

In addition to addressing several bugs, this patch automatically downgrades the selected IAMF profile on export if possible.

All Plugin Hosts

* The Renderer plugin no longer hangs on close if the IAMF file player is not ready (<https://github.com/google/eclipsa-audio-plugin/pull/73>).
* The minimum `.iamf` profile required is now automatically applied on file export (<https://github.com/google/eclipsa-audio-plugin/pull/70>). &#x20;
* `.iamf` and `.mp4` file extensions now correctly auto-populate if not present in the user-provided path in the File Export Screen (<https://github.com/google/eclipsa-audio-plugin/pull/68>).
* The IAMF file player now displays a warning message if the `.iamf` file selected for playback is invalid (<https://github.com/google/eclipsa-audio-plugin/pull/69>).

Premiere Pro

* Clicking the `Loudness Stats` refresh icon while the sequence is paused now properly displays reset values (<https://github.com/google/eclipsa-audio-plugin/pull/71>).

***

## Version - 1.3.0 Beta

November 1, 2025

This release is focused on a number of usability improvements including an integrated IAMF player for validating exported files.

New Features:

* IAMF File Playback Support
  * Exported files can now be played back using the integrated player on the export screen in order to validate the audio in the exported file.
  * The integrated player supports all normal playback functions (play, stop, seek, etc).
  * The integrated player also allows separate selection of on device speakers and target playback layout, allowing the testing of different playback layouts on devices with limited speaker layouts.
* Export via Beats:Bars and Timecode
  * In the file export options, the Start and End times for export can now be specified using Beats:Bars or Timecode depending on DAW support.
  * This allows for more exact export Start and End times depending on how a project is mixed.
* Logic Pro Automation
  * Panner automation support has been added to the Logic Pro DAW.
* Documentation Updates
  * Added a[Getting Started](/getting-started#creating-mix-presentations) section explaining how playback devices make use of mix presentations to help guide mix presentation creation

Fixed Issues:

* Editable text isn't highlighted when it's selected (<https://github.com/google/eclipsa-audio-plugin/pull/57>)
* Dial rotation requires rotating the mouse (<https://github.com/google/eclipsa-audio-plugin/pull/56>)
* Automation in LogicPro doesn't work (<https://github.com/google/eclipsa-audio-plugin/pull/55>)
* Occasional audio distortion during panning if buffer size fluctuates (<https://github.com/google/eclipsa-audio-plugin/pull/54>)
* Audio elements take a while to populate in the selection box (<https://github.com/google/eclipsa-audio-plugin/pull/53>)
* Panner knobs don't reset when option clicked (<https://github.com/google/eclipsa-audio-plugin/pull/58>)
* LUFS information is useless without target information (<https://github.com/google/eclipsa-audio-plugin/pull/58>)

Known Bugs:

* Logic Pro 1.2.2 on M1 hardware no longer works. No issues on newer hardware (M3 or better).
* There is significant lag when seeking more then a few seconds during validation playback, and on closing the plugin after export if the validated file is not yet loaded.
* Track positions are not updated until audio is played back (<https://github.com/google/eclipsa-audio-plugin/issues/7>)
* In Adobe Premiere Pro, plugin crashes when used with Pixel Buds Pro 2 and possibly other Bluetooth headsets

***

## Version - 1.2.1 Beta

October 1, 2025

This release is focused on performance improvements to the IAMF export process and support for LogicPro.

New Features:

* Support for the LogicPro DAW on MacOS
  * An AU version of the plugin is now available with LogicPro support.
  * Note that this is a different AU version, and requires a different installer, then the existing AU plugin.
  * See the Getting Started guide to get started using LogicPro.
  * Note that panning automation is not supported by LogicPro at this time.
* Streaming file support
  * Moved to version 2.0.0 of the iamf-tools library, which supports streaming file output.
  * Audio file output is now significantly faster, and no longer causes a long hang at the end of the export process.
  * CPU and memory overhead for audio file output is also significantly better with the newer library.
  * Note that attaching audio to video still causes a pause at the end of exporting, while the audio file is finalized and attached to the video file, but this pause time is reduced.
* Automatic naming of audio element plugins
  * Audio element plugins now automatically pick up the name of the track they are placed on
  * This simplifies audio element plugin setup and monitoring

Fixed Issues:

* Audio elements are listed even though they can not be added to the project ( <https://github.com/google/eclipsa-audio-plugin/pull/47> )
* Unit test build times are slow ( <https://github.com/google/eclipsa-audio-plugin/pull/45> )
* Audio element plugins occasionally crash during automated panning (<https://github.com/google/eclipsa-audio-plugin/pull/51>)

Known Bugs:

* Track positions are not updated until audio is played back (<https://github.com/google/eclipsa-audio-plugin/issues/7>)
* In Adobe Premiere Pro, plugin crashes when used with Pixel Buds Pro 2 and possibly other Bluetooth headsets

***

## Version - 1.2.0 Beta

August 1, 2025

This release is focused on plugin project upgrade support as well as various bug fixes reported during the public beta.

New Features:

* Plugin Upgrade Support
  * When a new plugin release is installed Eclipsa Plugin instances in existing DAW projects will automatically update to the newly installed release.
  * Upgrade support starts with this release, so DAW projects created with previous versions of the Eclipsa Plugin instances can not be updated.
  * New releases must be manually downloaded and installed.
* Binaural Playback Improvements
  * Binaural playback of audio elements is now enabled by default and must be explicitly disabled.
  * During binaural playback, non-binaural audio elements are now played back as stereo.
  * A tool-tip has been added to try and better explain the behaviour since there was a lot of confusion around how binaural and non-binaural audio elements are treated.
  * This behaviour now matches the IAMF web demo.
* Documentation Updates
  * Several documentation updates, mostly to the Getting Started and Eclipsa Audio Renderer Plugin Features page to help clarify functionality

Fixed Issues:

* Adobe Premiere Pro very occasionally crashes when audio playback first starts (<https://github.com/google/eclipsa-audio-plugin/pull/36>)
* Log files fail to clear themselves properly (<https://github.com/google/eclipsa-audio-plugin/pull/34>)
* Non-Binaural Audio Elements are rendered binaurally (<https://github.com/google/eclipsa-audio-plugin/pull/33>)
* On smaller laptops, the UI is larger then the screen (<https://github.com/google/eclipsa-audio-plugin/pull/31>)
* Track loudness is still drawn even when the tracks audio element is muted (<https://github.com/google/eclipsa-audio-plugin/pull/29>)
* Solo/Mute state of audio elements is reset when the UI is closed and re-opened (<https://github.com/google/eclipsa-audio-plugin/pull/26>)
* In ProTools, session audio playback fails until the UI is opened (<https://github.com/google/eclipsa-audio-plugin/pull/25>)

Known Bugs:

* Track positions are not updated until audio is played back (<https://github.com/google/eclipsa-audio-plugin/issues/7>)
* In Adobe Premiere Pro, plugin crashes when used with Pixel Buds Pro 2 and possibly other Bluetooth headsets

***

## Version - 1.1.1 Beta

July 7, 2025

This is the public beta release version. This version focuses on installer changes for public release only, and has no plugin feature updates.

New Features:

* Public Installers
  * Installers now distribute a publicly available version with full code signing
  * Added anonymous public usage analytics for monitoring DAW usage

***

## Version - 1.1.0 Alpha

June 30, 2025

This release is focused on adding alpha support for Adobe Premiere Pro.

New Features:

* Alpha plugin support for Adobe Premiere Pro.&#x20;
  * Support is available via AU plugin only
  * Some manual intervention in the export process is required and not all export types are supported. See the Adobe Premiere Pro section of[Eclipsa Audio Renderer Plugin Features: Configuring, Monitoring and Exporting Eclipsa Audio](/eclipsa-audio-renderer-plugin-features-configuring-monitoring-and-exporting-eclipsa-audio#exporting-the-final-mix-to-iamf-or-mp4)
  * Automated Audio Panning is not supported
  * Audio and video can not be exported together. Instead, export video first, then export audio, using the mux feature to attach the audio to the previously exported video.

Fixed Issues:

* Selected mix presentation resets after re-opening the renderer UI (<https://github.com/google/eclipsa-audio-plugin/pull/21>)
* Solo and Mute settings in the Audio Element Plugin reset after re-opening the UI (<https://github.com/google/eclipsa-audio-plugin/pull/19>)
* GPAC libraries out of date (<https://github.com/google/eclipsa-audio-plugin/pull/4>)
* Debug version crashes when exporting twice (<https://github.com/google/eclipsa-audio-plugin/pull/6>)
* Crash log email is incorrect (<https://github.com/google/eclipsa-audio-plugin/pull/12>)

Known Bugs:

* Audio element Solo/Mute behaviour may be inconsistent when muting/soloing multiple audio elements
* In Avid ProTools, after loading a project with the Eclipsa Renderer, no audio is played back until the Renderer UI has been opened.

***

## Version - 1.0.0 Alpha

June 12, 2025

The Eclipsa Audio Plugins are a pair of plugins designed to help creators produce spatialized audio in the Eclipsa Audio format. The plugins help configure, monitor, manage and spatialize audio for export to IAMF audio files or Eclipsa Audio compatible MP4 files. This initial release provides a solid foundation of features focused on highlighting the Eclipsa Audio format and simplifying the process of creating spatialized audio.

&#x20;

Key Features:

* 3D Audio Capture: Captures the creative audio intent of authors when positioning, monitoring and recording tracks in 3D space
* Audio Structure Definition: Enables creators to define the structure of their spatialized audio and it's elements according to the IAMF standard.
* Real-Time Monitoring: Allows creators to monitor the audio content on their audio system throughout the creative process, ensuring mixes translate well to the target environment.
* Audio Transcoding: Provides multiple options for encoding audio, adhering to the creators intentions and the IAMF standards
* &#x20;IAMF File Encoding: Provides a simple process for exporting the final audio mix into an IAMF audio file.
* Audio and Video Muxing: Provides support for combining audio with video files, producing seamless 3D audio in Eclipsa Audio compatible MP4 files which can be used on platforms such as YouTube.

***