Eclipsa Audio Renderer Plugin Features: Configuring, Monitoring and Exporting Eclipsa Audio
Eclipsa Audio Renderer Plugin Guide
The Eclipsa Renderer Plugin enables monitoring, configuring, and exporting of a 3D audio mix, as well as ensuring compatibility with Eclipsa Audio playback. The plugin allows for the management of audio elements, mix presentations, and export configurations, essential for creating a fully immersive audio experience.
Setting Up the Eclipsa Audio Renderer Plugin
First, add the Eclipsa Audio Renderer Plugin to the Mix Bus
1. Widen the Mix Bus to 5th Order Ambisonics
Navigate to your Mix Bus track or create a new Aux Input track to act as your master bus.
Set the track width to 5th Order Ambisonics to support the plugin as shown below.

Note: A 5th Order Ambisonics bus is the smallest bus supported by Avid ProTools with 28 channels, which are required by the IAMF file format. No ambisonics mixing is required, only the channels provided by this wider bus.
2. Insert the Eclipsa Audio Renderer Plugin:
Click on an empty Insert slot in the Mix Bus track.
Choose Multi-Channel Plug-In and select Eclipsa Audio Renderer from the Instrument plugin list.
Select the instance of the Eclipsa Audio Renderer with the highest speaker layout you wish to play back on from within ProTools.

1. Add the Eclipsa Audio Renderer Plugin to the Master Track
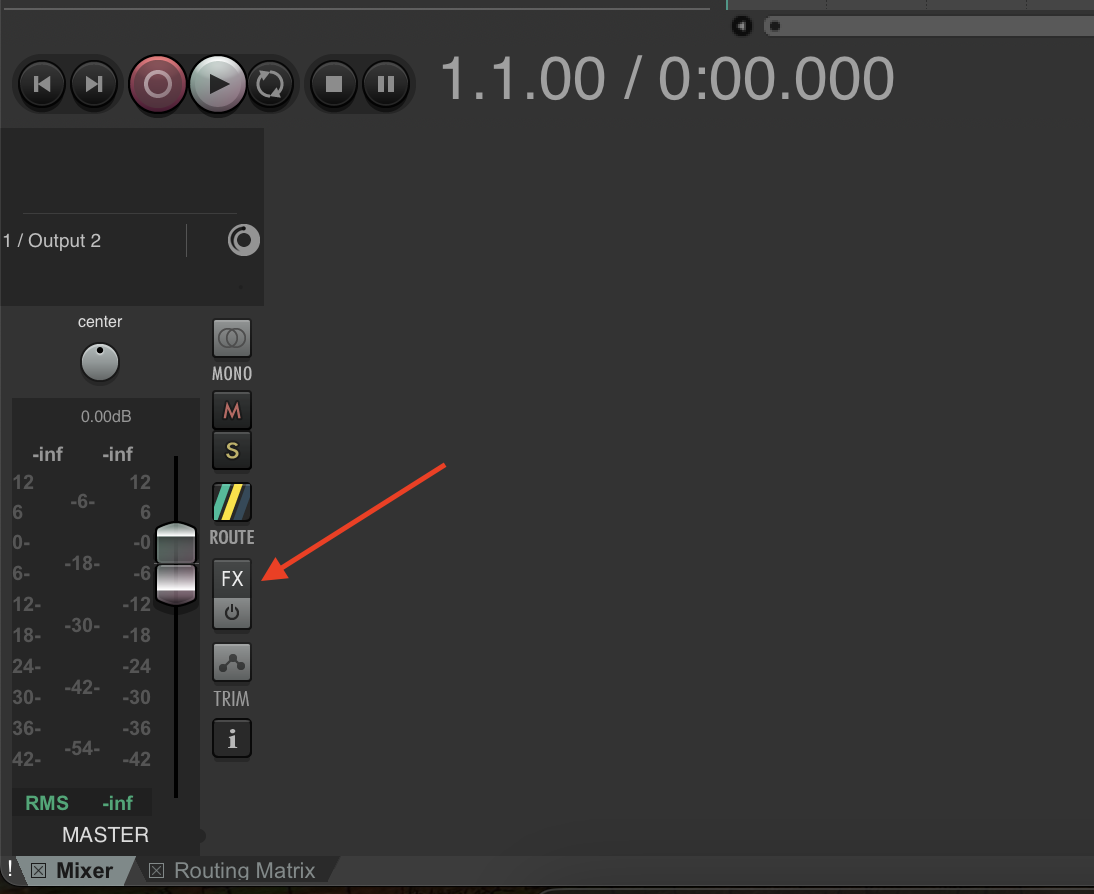
Find the Master track on the REAPER Mixer tab
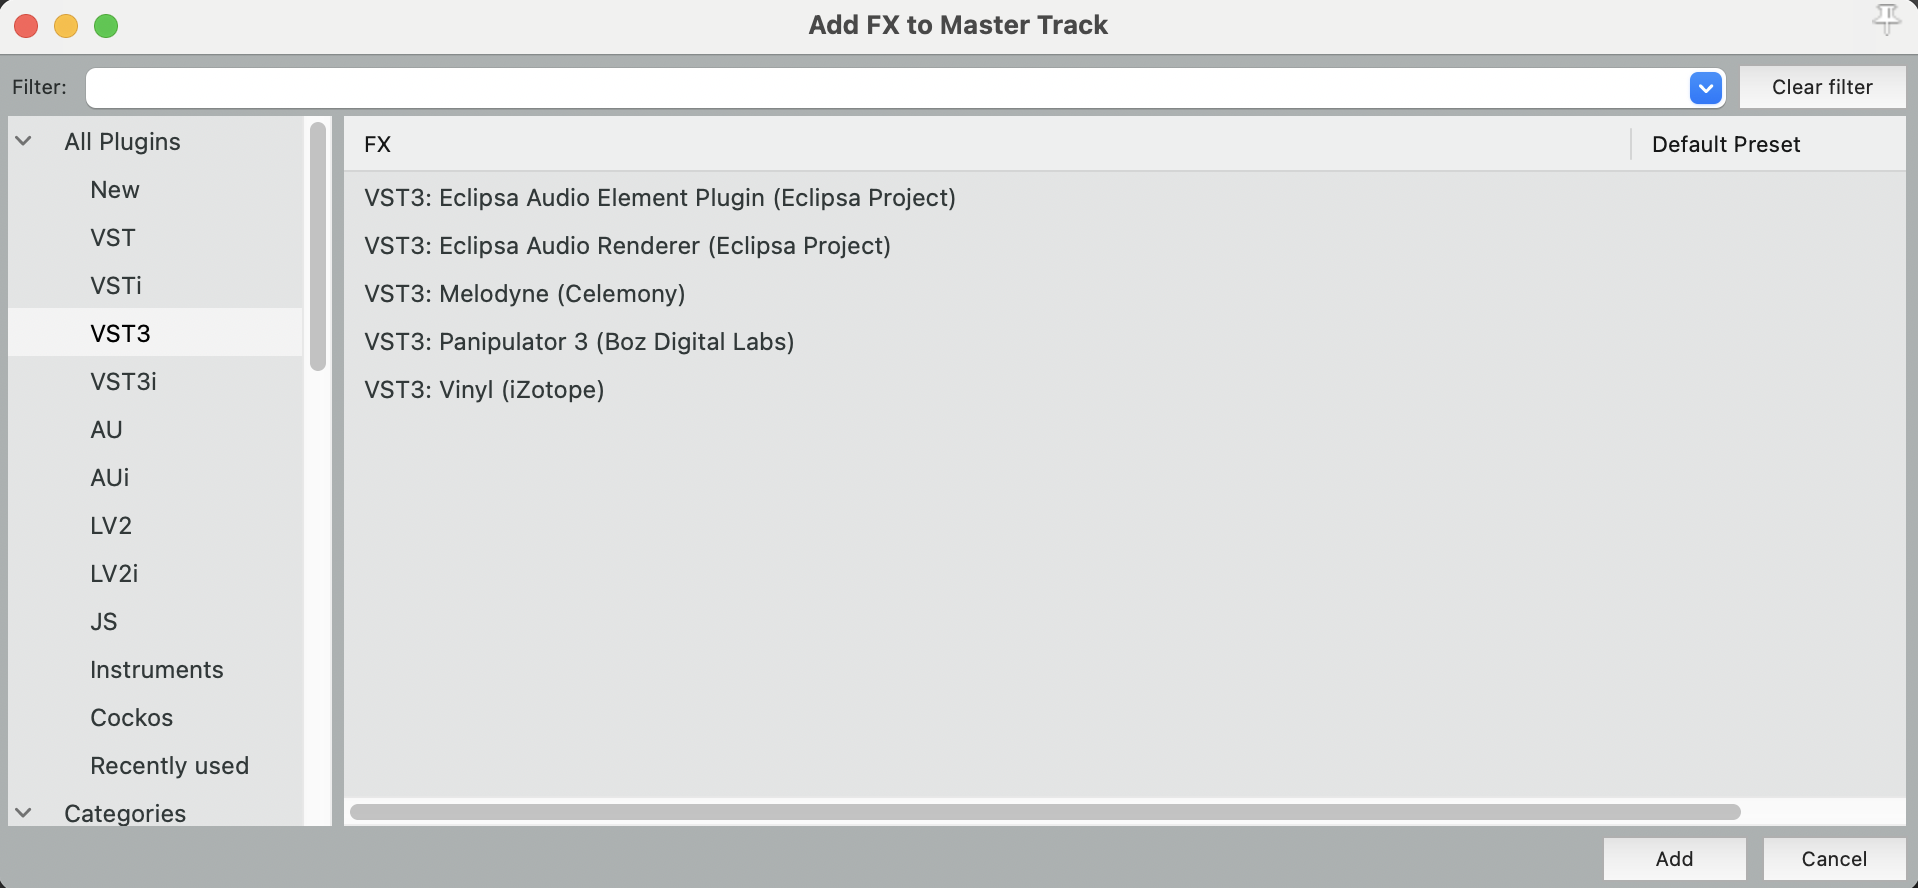
Select the "FX" button, then select "Add" if other plugins have already been added to this track

Under "All Plugins" --> "VST3" select "VST3: Eclipsa Audio Renderer (Eclipsa Project)
Select "Add" to add the plugin to the Master track

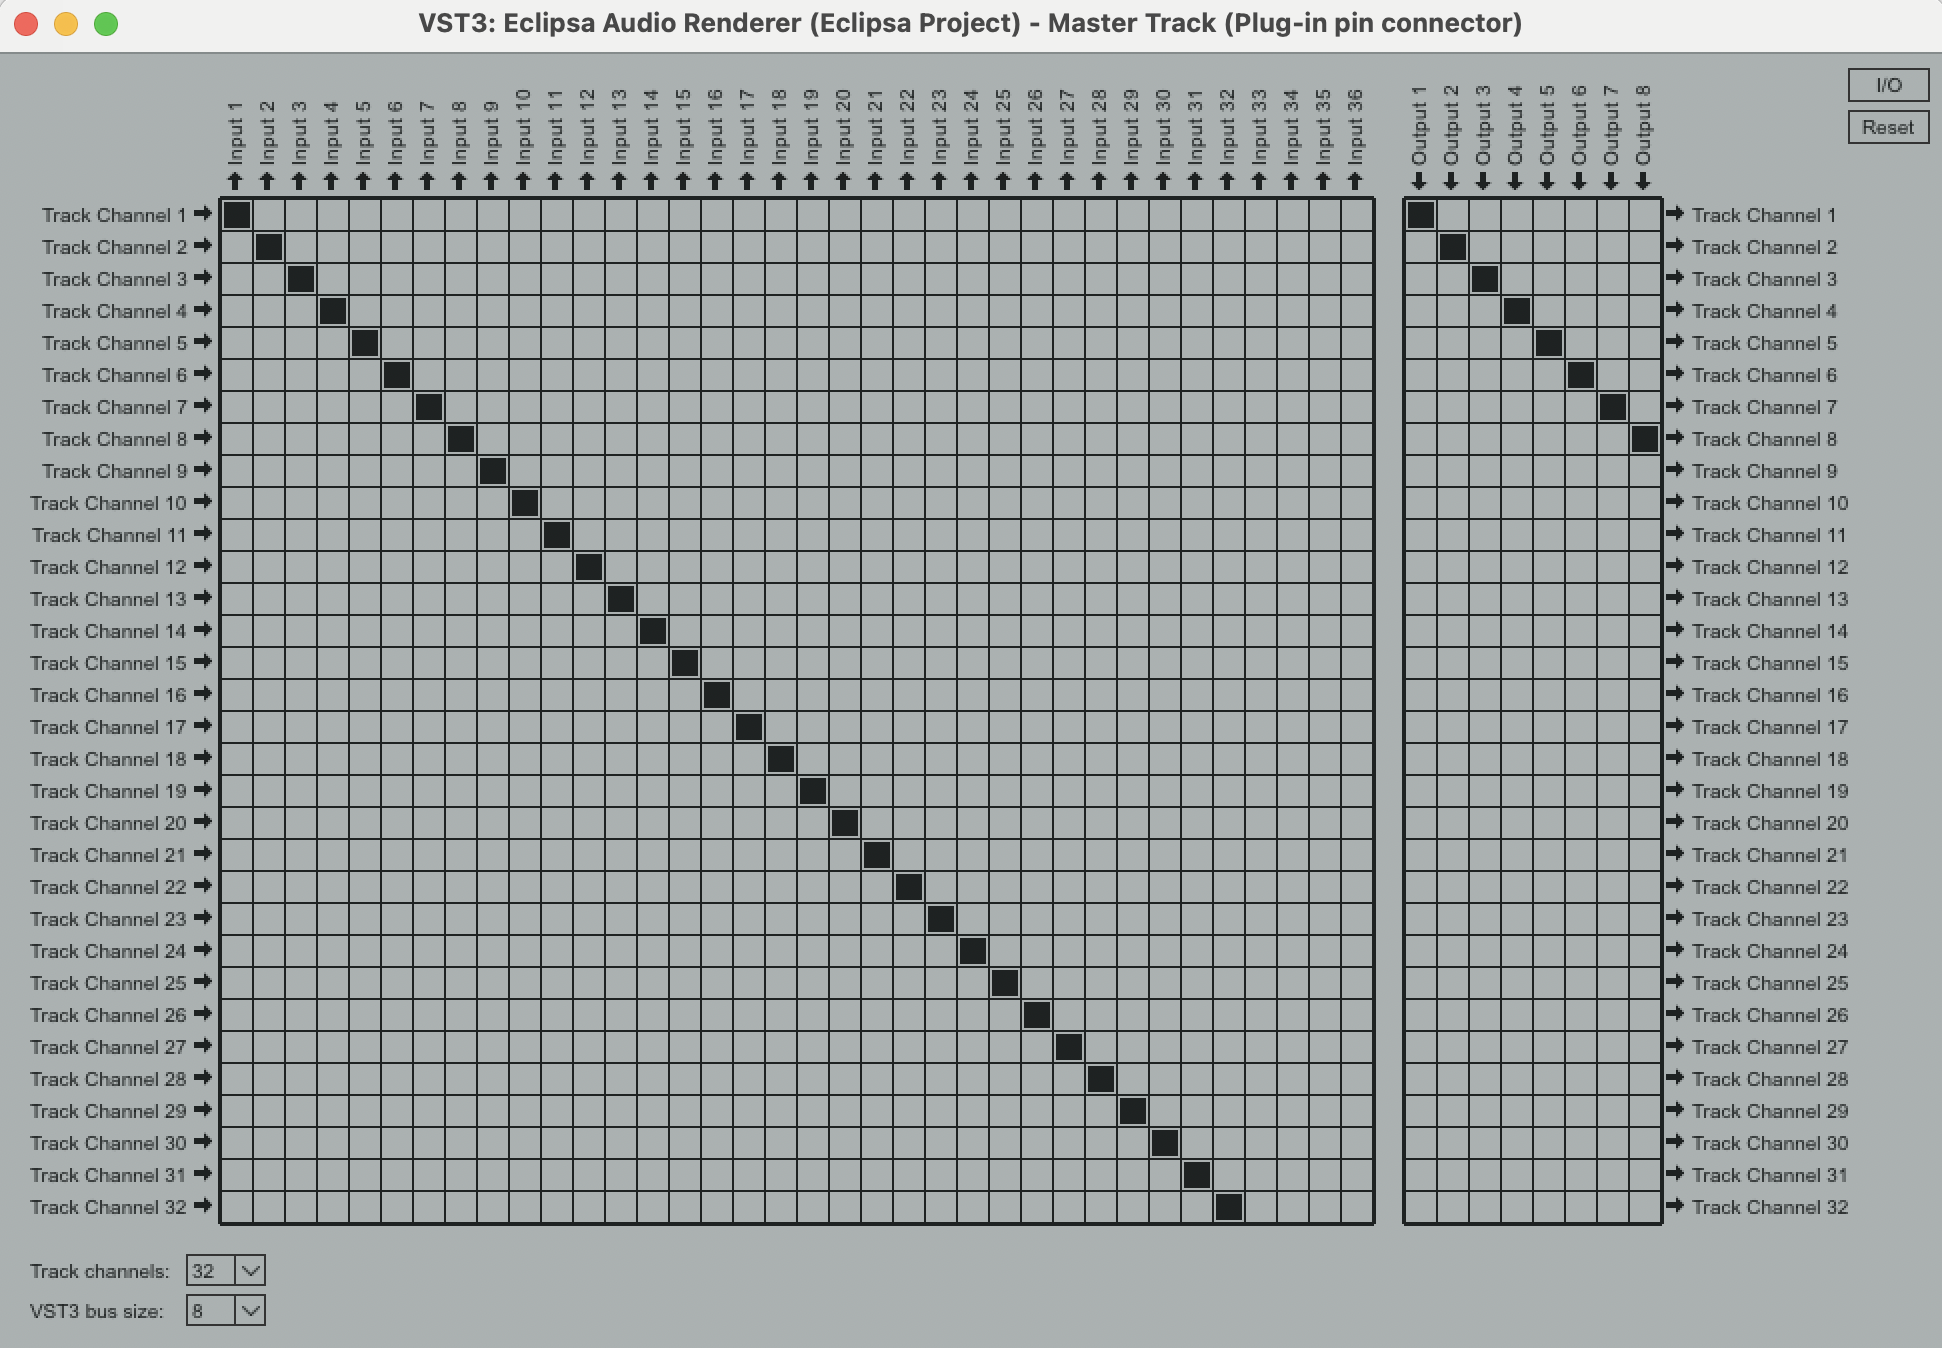
2. Use the Plug-In Pin Connector to connect the plugin
On the "Eclipsa Audio Renderer" UI, change the "Speaker Setup" to match the speaker layout you wish to play back audio locally on
In the Plug-In UI window, select the Pin Connector in the top right corner to open the Pin Connector UI

By default, REAPER configures plugin input to stereo. We can change this input by changing the "Track Channels" to one of two values:
Simplified: Select a value larger than 28, typically 32.
Advanced: Increase channels only to the number required by the plug-ins audio elements. The number of channels needed will be equal to the number of channels used by all audio elements.
Under "VST3 bus size" select a value matching the number of speakers in the speaker layout you wish to play back audio locally on

Note: Due to a limitation of VST3, the plugin advertises it will support 36 input channels instead of 28, hence showing "32/36" in the pin connector. However, only the first 28 channels are used, as the IAMF standard only supports 28 channels. The remaining 8 channels are unused.
Note: REAPER automatically captures spacebar presses to start and stop playback, so when naming mix presentations, audio elements, etc, the space character can not be used as input.
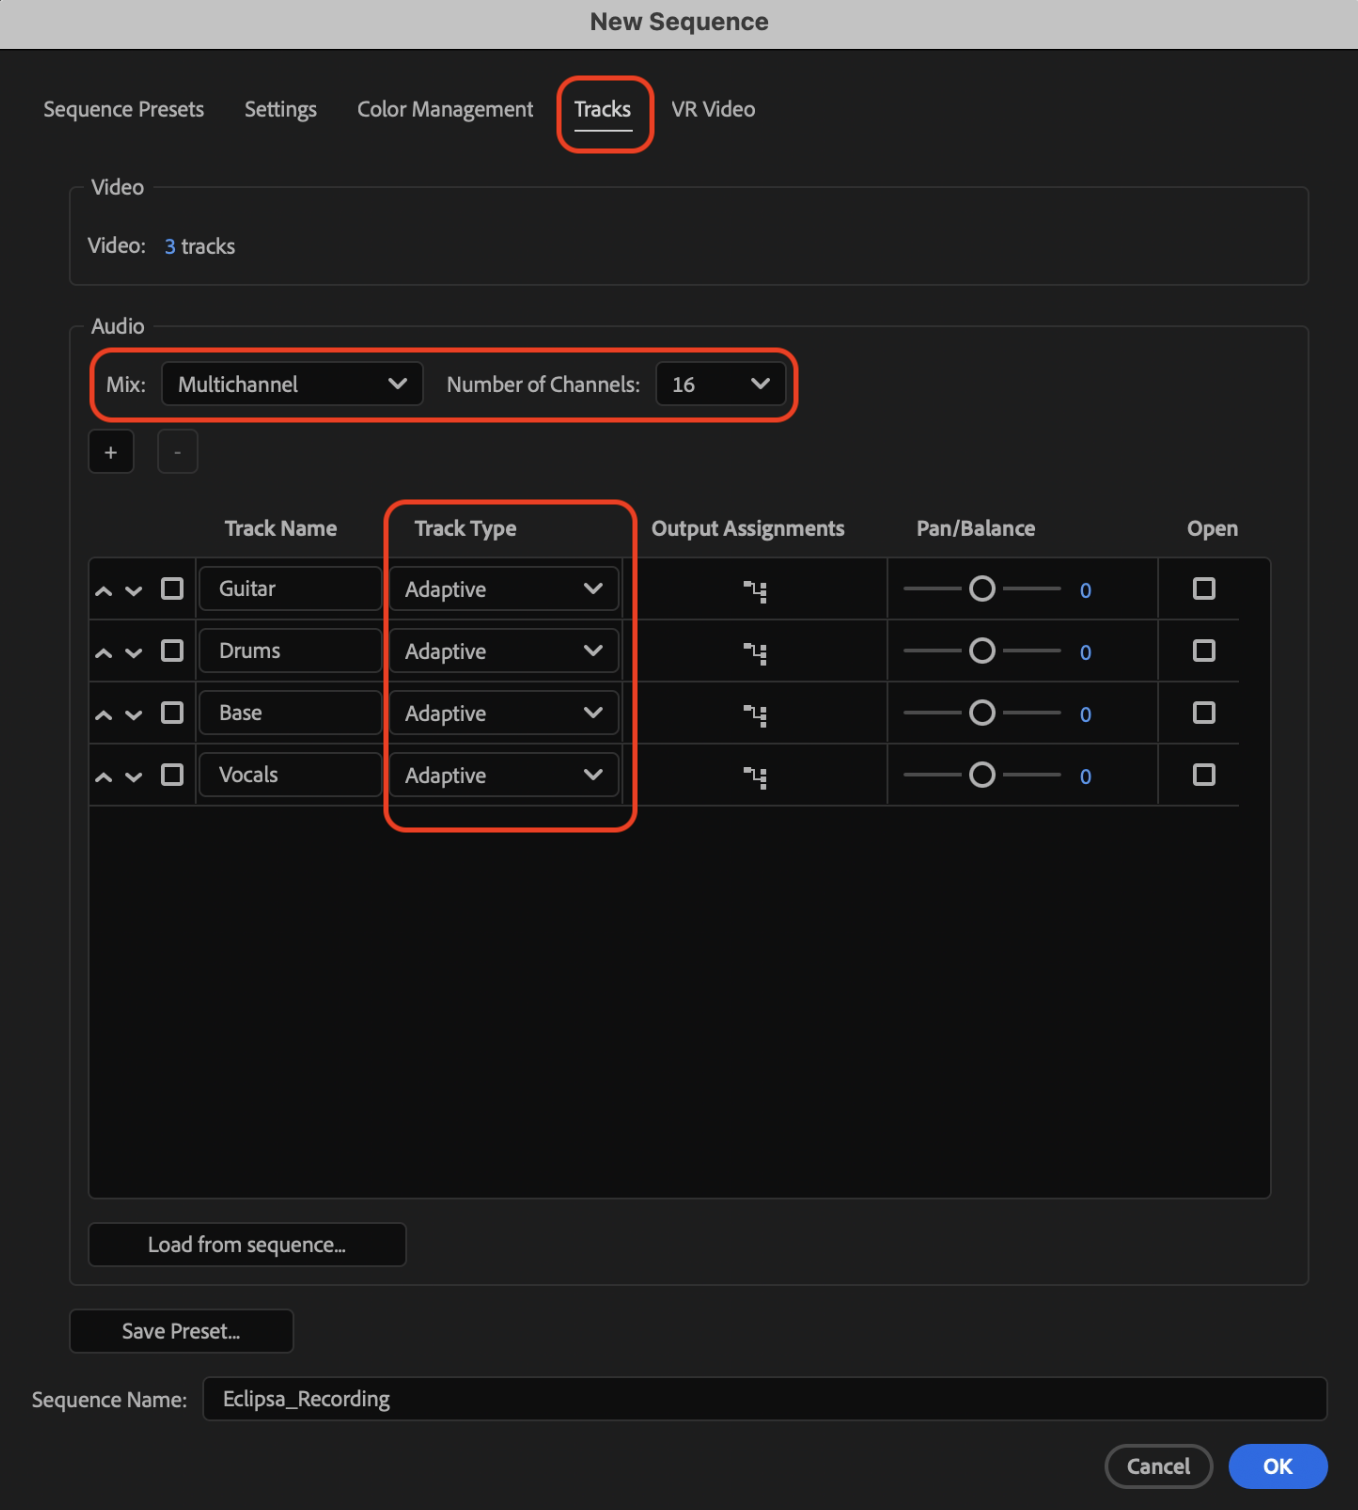
1. Create a new sequence with 16 channels
In Adobe Premiere Pro select "File" --> "New" --> "Sequence..."
Select "Tracks", then under "Audio" change the "Mix" to "Multichannel"
Change the "Number of Channels" to 16
Add or remove tracks as needed for your project. Ensure the "Track Type" of all tracks is "Adaptive". A minimum of 1 track is required.

2. Refresh the Audio Plugins
This step needs to be done once after installation
If it's not visible already, open the "Audio Track Mixer" window by selecting "Window" --> "Audio Track Mixer" --> Your Sequence Name
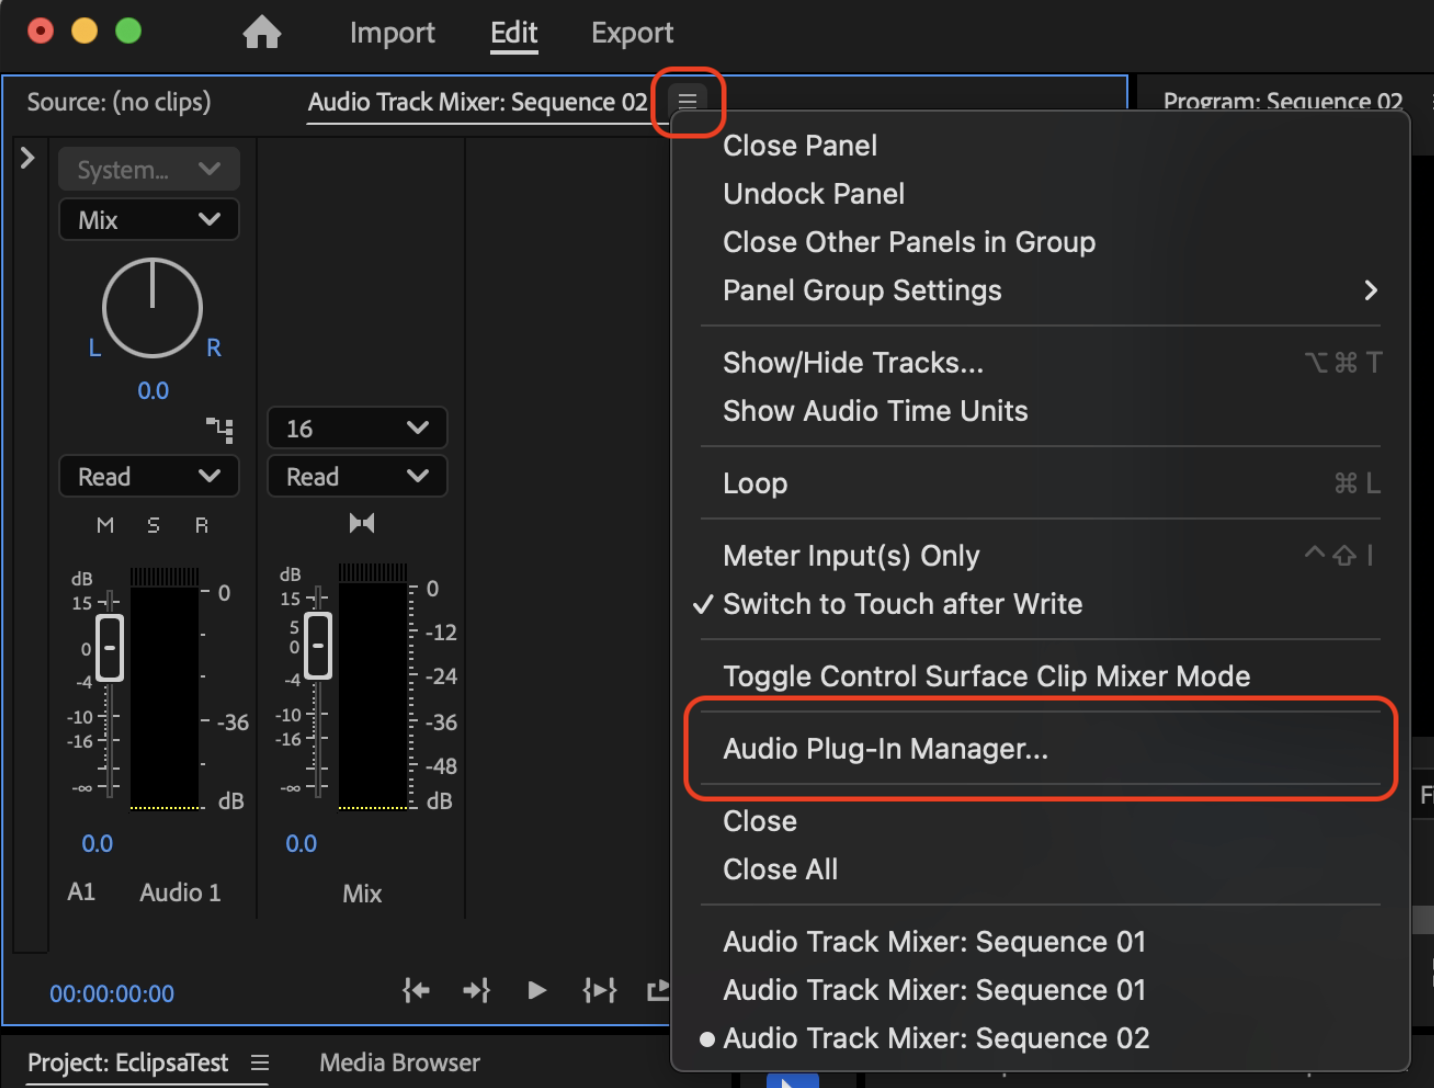
Select the hamburger button in the top left corner and select "Audio Plug-In Manager"

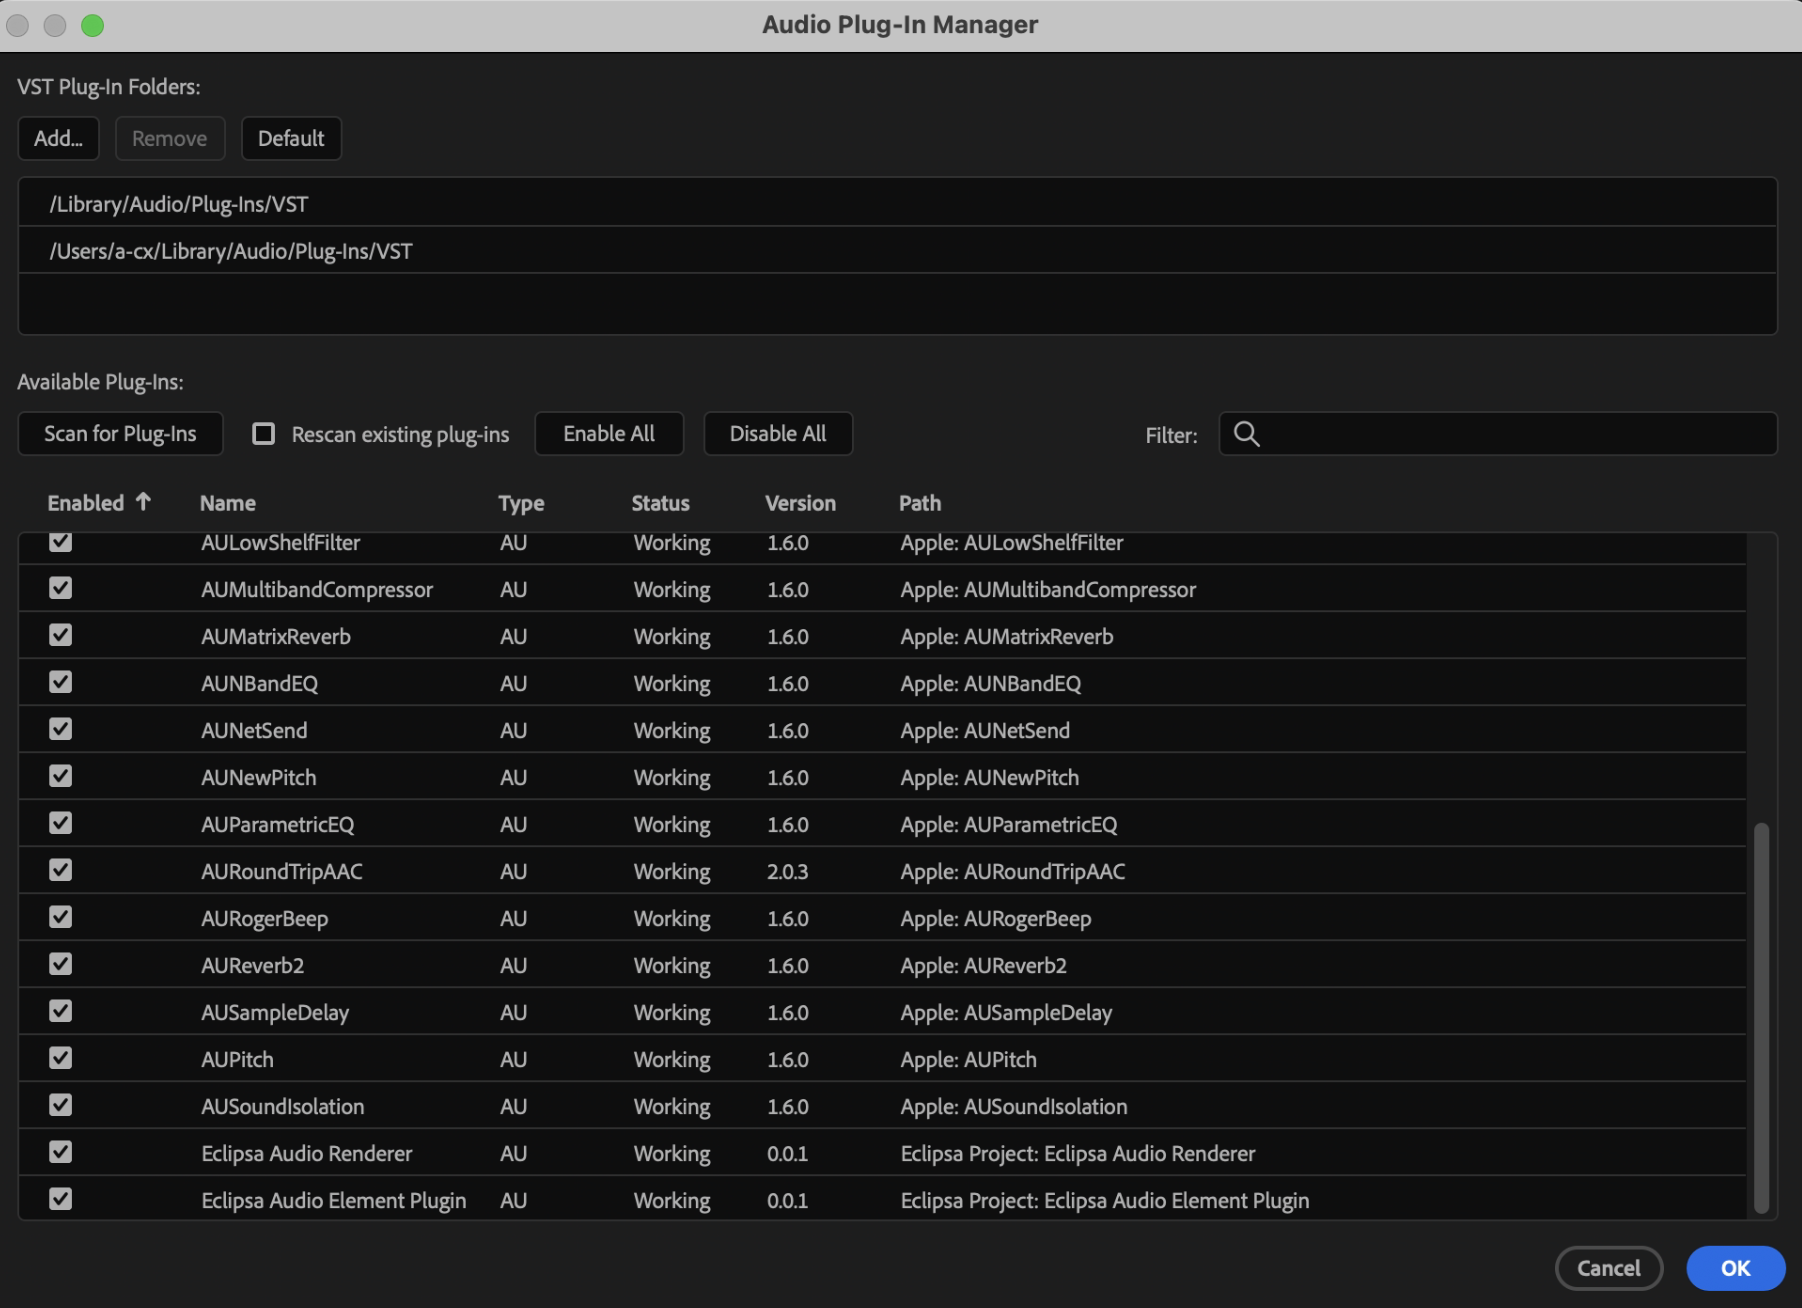
In the Audio Plug-In Manager select "Scan for Plug-Ins" and verify the Eclipsa Audio plugins are present

3. Add the Eclipsa Audio Renderer Plugin to the Mix Track
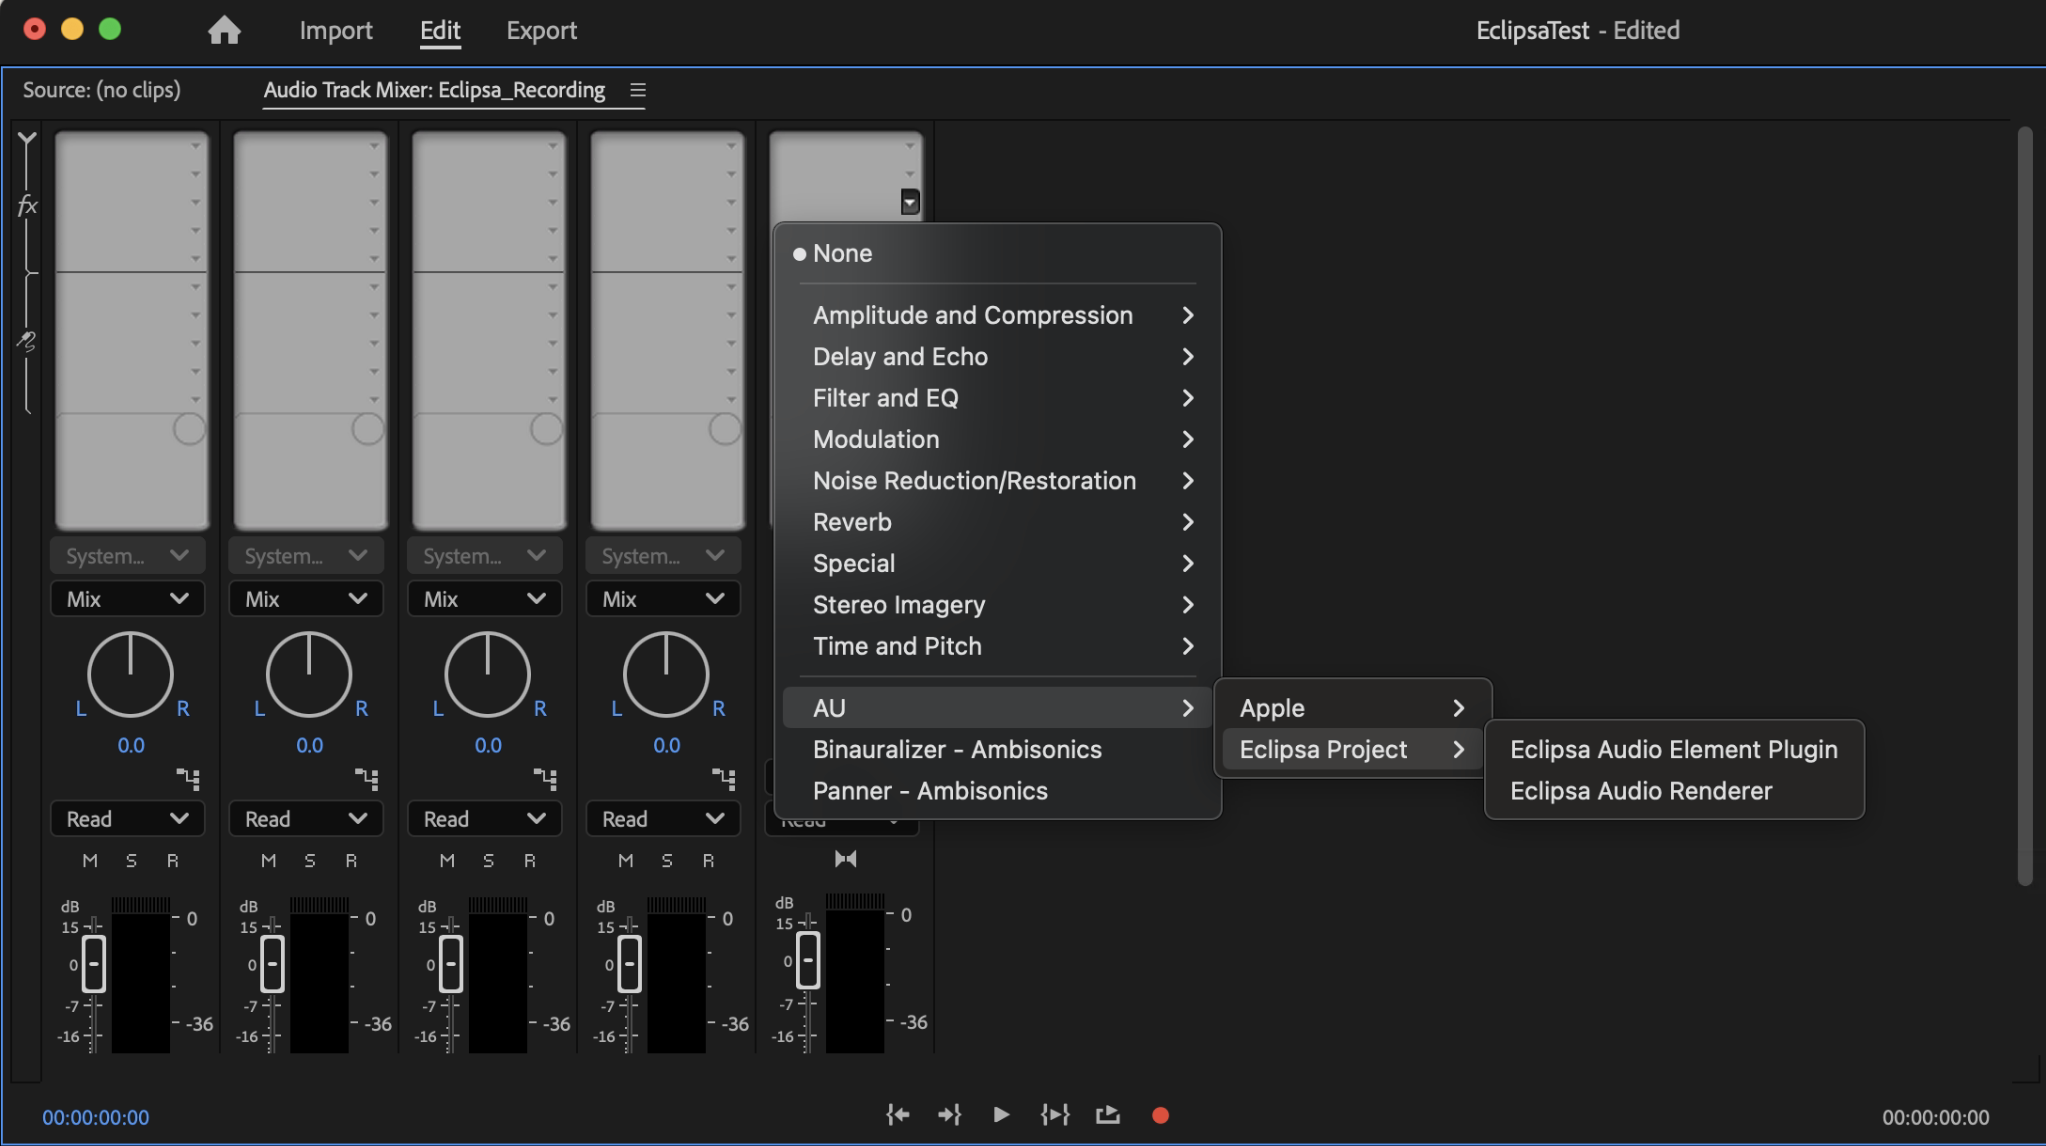
In the "Audio Track Mixer" window, select the fx for the mix track, which is typically the rightmost track. It should be identifiable by the selectable channel count box showing 16.
If the fx table is not shown, it may be hidden and can be unhidden by clicking on the leftmost side of the Audio Track Mixer
Click one of the fx slots and select "AU" --> "Eclipsa Project" --> "Eclipsa Audio Renderer"

Note: Adobe Premiere Pro only supports up to 16 channels for AU plugins, limiting it to the "Simple" routing profile only.
1. Open Project and Configure Settings
Navigate to File → Project Settings → Audio...
In the Project Settings window under the Audio tab:
Set Spatial Audio to Off
Set Surround Format to 7.1.4
Important: Turn off Dolby Atmos if it's enabled
Click Apply or close the settings window to save changes
2. Add Eclipsa Audio Renderer to Master Track
Select the Master track (Stereo Out)
Click on an empty insert slot in the Master track
Navigate to: Audio Units → Audio Units Effects → Manufacturer: Eclipsa Project → Eclipsa Audio Renderer

This plugin handles the final spatial audio rendering on the master output
Configure Audio Elements
Select the "Reroute" button to go to the "Reroute" screen.
Select the desired Eclipsa Audio profile in the top left corner. Some DAW's and/or playback devices may only support certain profiles.
The "Simple" profile supports 1 audio element with up to 16 channels.
The "Base" profile supports 2 audio elements with up to a total 18 channels.
The "Base Enhanced" profile supports up to 28 audio elements with up to a total of 28 channels.
Add audio elements to your mix presentation within the Eclipsa Audio Renderer Plugin. Each audio element serves as the playback destination for all Audio Element Plugin outputs, allowing you to hear spatialized audio during playback.
Configure Mix Presentations
Mix Presentations allow you to set up multiple playback configurations, such as different languages or speaker layouts, all within a single project. This feature enables flexibility and customization for various playback scenarios.
Mix Presentations are each assigned one or more audio elements which will be played back when the mix presentation is played.
Audio elements may be assigned to multiple mix presentations.
The plug-ins allow the configuration of up to 5 mix presentations.
To set up Mix Presentations:
Go to the Mix Presentation Editor in the Eclipsa Audio Renderer Plugin by selecting Edit button as shown.
Configure multiple presentations by assigning different audio elements and selecting the presentation language. In the Edit Mix Presentation screen, you can also assign Mix Tags. Mix Tags are metadata labels that help categorize the mix presentation or provide information to listeners about what presentation to select (e.g., 'Content Language: English', 'Focus: Dialogue', 'Scene Type: Action Scene', 'Supports Binaural: Yes'). These tags can be useful for organizing different versions of a mix or for providing information to playback systems about the intended use or characteristics of the presentation.
Each mix presentation can be customized to provide unique spatial experiences and configurations.
Configure the binaural playback for audio elements.
When toggled on, the audio element is rendered using binaural processing during binaural playback.
When toggled off, the audio element will be rendered as stereo during binaural playback.


Select Mix Presentation for Playback
On the main monitoring screen, select the mix presentation you wish to monitor during audio playback.

Note: The Mix Presentation selected here will be the presentation played back, so you will only be able to hear and monitor audio from audio elements in this selected Mix Presentation.
Eclipsa Audio Renderer Plugin Monitoring
Monitoring in Room View
The Room View in the Eclipsa Audio Renderer Plugin provides a real-time visualization of the audio playback of all tracks in your mix
Turn on "Labels" to easily identify individual speakers and observe how the audio is being played back in 3D space. Switch between Iso, Top, Side and Rear views to better visualize where individual speakers will be positioned.
Switch between different speaker setups to monitor how audio will be played back on different speaker layouts.
Monitor individual channel and audio element loudnesses. Mute or solo individual channels or audio elements.
Monitor the binaural loudness of the played audio using the two loudness bars on the right hand side.
Track the ITU loudness of the final mix.
ITU loudness is computed using the current speaker setup as the reference speaker set.

Playback and Adjustments
As you play the mix, monitor each speakers loudness in the 3D space using the Eclipsa Audio Renderer Plugin’s visual tools.
Make necessary adjustments to the tracks, audio elements or mix presentation to refine the spatial balance and depth for an immersive, cohesive mix.
Exporting the Final Mix to IAMF or MP4
The Eclipsa Audio Renderer Plugin provides comprehensive export options to ensure your 3D audio mix is correctly formatted and optimized for immersive playback systems.
1. Export Options:
Access the Export settings in the Eclipsa Audio Renderer Plugin to configure your exported Eclipsa Audio by selecting the Export button:

Access Export options by selecting "Export" To export audio, first enable audio export by enabling "Export audio".

Set the following export options if needed:
Save Audio To: Specify the output IAMF file to be written
Export audio elements as WAV: Allows for export of individual audio elements as WAV files. Audio element WAV files are exported to the same directory the IAMF file will be written to.
Start and End: Define the export duration to control which sections of the mix are rendered. If left as 0, all audio will be exported.
Select H:M:S to specify start and end time in an Hours:Minutes:Seconds format
Select Barts to specify start and end time in the Bars:Beats format
Select TC to specify start and end time using the Timecode format
File Format: Choose between IAMF and WAV for export.
Codec, Bit Depth and Other Codec Specific Parameters: Select from supported codecs and bit depths to meet your playback requirements.
Audio and Video Muxing
Enable Mux video to combine IAMF audio with video to produce Eclipsa Audio compatible MP4 files
Video Source: The input .mov or .mp4 file to attach IAMF audio to.
Save video to: The output .mp4 file to have IAMF audio attached to it.
Note: When using the Mux option to combining audio with video, the original audio of the video file will be overwritten by the IAMF audio in the output video file.
Exporting the Final Mix:
Once you are satisfied with the mix and configured the export options you can render your DAW's bounce or export functionality. This process maintains the spatial characteristics and integrity of your 3D audio mix.
To export a mix:
Ensure the “Export Audio” option is enabled and all export parameters are set in the Eclipsa Audio Renderer plugin
Use the Bounce Functionality in Avid ProTools
Navigate to File > Bounce Mix
Select the appropriate output settings for your mix
After configuring the settings, click Bounce to start the export process.
Pro Tools will process the mix and save the bounced file in the designated output folder.

Use the "Render" functionality in REAPER
Navigate to File --> Render...
Select the appropriate output settings for your mix
After configuring the settings, click "Render # file"
REAPER will process the mix and save the rendered audio file(s) in the designated output folder.

Use the "Export" functionality in Adobe Premiere Pro
Note: Currently, only Waveform Audio (.wav) and Quicktime (.mov) are supported as export types for IAMF files. For exporting video as well as audio, export .mov video first, then use the mux option to combine video and IAMF audio in a separate export.
Go to the Eclipsa Audio Renderer "Export" screen and select the "Start Export" button
In Adobe Premiere Pro, select "Export" at the top of the screen
Change the export format to "Waveform Audio"
Configure the export path as required and click the "Export" button to export the audio file

Return to the Eclipsa Audio Renderer "Export" screen and select the "Stop Export" button
After the bounce is complete, locate the exported IAMF audio file and/or exported Audio Element WAV files or MP4 files in the output folder(s) specified in the Eclipsa Renderer plugin.
Note: The Eclipsa Renderer Plugin's export process runs in parallel to the DAW's own export process. This means the DAW must export an audio file in order for an IAMF audio file to be created. In some cases the export may slow at 99%-100% completion as the Eclipsa Renderer Plugin consolidates audio elements into an IAMF audio file due to the DAW not taking this process into account when predicting export time.
Note: The export settings configured in your DAW are not directly used by the Eclipsa Renderer Plugin during the bounce process. Only information and paths specified in the plug-in itself will be used when outputting the IAMF audio file or combining IAMF audio with video.
Validating Exported Eclipsa Mixes
After export has completed IAMF files can be validated using the built-in IAMF file player on the export screen.
Exported files are automatically loaded into the player and are ready for playback after export completes. Files can be played back using the provided play/pause/stop controls and seek bar. If needed, preexisting files can be loaded into the player as well by selecting them as an export target. Audio is played back on the audio device selected in the audio device drop down.

Normally Eclipsa Audio players select a mix presentation based on the listeners speaker layout (see: Creating Mix Presentations). The file validation player can simulate different speaker layouts by selecting a different target layout in the speaker target layout drop down. Simulate different speaker layouts to ensure the correct mix presentation will be automatically selected for different target speaker layouts.
Note: The validation player allows for the selection of different audio devices, however the selected audio device is not used to determine the mix presentation played back.
Last updated